Where the Food Comes From….
When you’re a kid, you don’t really think about where food comes from. An adult (usually a family member) puts a complete meal in front of you, and you eat it. Pretty simple. As you get older, you might even start helping to prepare those meals, doing small tasks like mixing or pouring. You still don’t really give much thought about where the food actually comes from, again, you just eat it when it’s placed in front of you. The same thing happens when you are away at college/university. A cafeteria worker puts food in front of you. You know that somewhere behind the buffet line there is a kitchen and staff who make things, but you hardly give it any thought.
Eventually, you might move away from your family, and into your own home. You’ve entered the “real world” and you’re probably spending too much time at work to really think about preparing food. Purchasing pre-made meals sounds like a good idea. You don’t know who made them, or how much work went into them, but they’re good.
So here I am, married, and for the first time cooking every single day. I don’t use pre-made meals and I try to make most things from “scratch”. Sometimes we buy a loaf of bread, but I most often put to use the bread machine we got as a wedding gift. I make things like spaghetti sauce and sweet & sour sauce from base ingredients. I don’t even buy pre-formed hamburger patties, preferring to mix my own mince and shape the patties by hand.
Tim got this brilliant idea that we should have a burger party sometime and make mini burgers out of all the types I make. Of course, mini burgers require mini buns, and I decided I might like to try my hand at making my own buns. I searched all over the internet, and most of the recipes seemed a bit too involved for a beginner. I don’t count my bread machine as experience at all, and the only other bread items I’ve made on my own have been things like banana bread and blueberry muffins. Nothing that involves kneading and punching and rising at any rate. I did finally stumble on a “no knead” roll recipe that I might like to try, but it involves 12 hours of rising! Which means that I either have to wake up really early in the morning to mix it together, or I need to stay up late at night to mix it together. Neither of which really appeals to me, but I still might give it a go one week when Tim’s on the overnight shift (since I never seem to sleep on those) and I need something to do.
A few days ago I was reading my Betty Crocker cookbook looking for ideas for meal planning and I stumbled on a recipe for regular dinner rolls. Now, this wouldn’t be interesting, except that there were directions for making cloverleaf dinner rolls, and as I looked at the picture in the cookbook I had one of those childhood epiphanies – this is where the Thanksgiving rolls my Aunt Beatie makes come from. Her rolls are slightly sweet, perfectly shaped, and pull apart into thirds giving you extra room for butter. She makes them ahead of time at her house in MD, and then heats them at Aunt Janie’s house before we eat.
Well, I just had to try this out for myself. Since I have a bread machine, I followed the directions for making the dough in the bread machine, and I even left the dough in the bread machine to rise (since it calls for a warm place!). Here’s the recipe. I copied it off of the Betty Crocker website, so it uses US measurements. I keep a handy chart inside my kitchen cabinet for easy converting, but I also keep a set of US measuring cups.
1 cup water [cookbook calls for room temperature]
2 tablespoons butter or margarine, softened
1 egg
3 1/4 cups Gold Medal® Better for Bread™ flour [used regular bread flour]
1/4 cup sugar
1 teaspoon salt
3 teaspoons bread machine or active dry yeast [The cookbook only calls for 2 1/4]
Butter or margarine, melted, if desired
1. Measure carefully, placing all ingredients except melted butter in bread machine pan in the order recommended by the manufacturer. Select Dough/Manual cycle. Do not use delay cycle.
2. Remove dough from pan, using lightly floured hands. Cover and let rest 10 minutes on lightly floured surface. [this step was not in my cookbook. Cookbook advised to let rise for 1 hour, then if you could poke it and not have the hole fill in, you punched it down, then did step 3]
3. Grease large cookie sheet with shortening. Divide dough into 15 equal pieces*. Shape each piece into a ball. Place 2 inches apart on cookie sheet. Cover and let rise in warm place 30 to 40 minutes or until double. (Dough is ready if indentation remains when touched.)
4. Heat oven to 375°F. Bake 12 to 15 minutes or until golden brown. Brush tops with melted butter. Serve warm, or cool on wire rack.
For cloverleaf rolls, use a cupcake/muffin pan and divide roll into 45 pieces, then put three pieces in each cup.
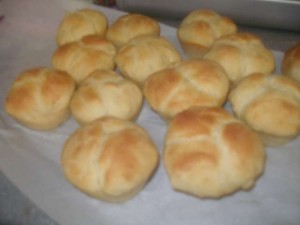
Here’s what my rolls looked like:

Not quite as perfect as my aunt’s, but close enough!
[LJ readers reading this on the LJ RSS feed: Please click on the link at the top of the entry to go directly to my blog to leave a comment, as comments left on the LJ RSS do not get seen by me. Facebook users can comment directly on Facebook.]
No commentsNo comments yet. Be the first.
Leave a reply

