[Recipe] Slimming World Style Japanese Ramen (Wagamama Fakeaway)
 A few days ago, a member of my slimming world group posted a picture of a delicious looking Japanese Ramen style soup her husband had made. Based on her photo, and a recipe I found on BBC Good Food, I came up with this. It reminds me of the kinds of meals you can get at Wagamama.
Japanese Ramen, Serves 2. SYNS: 0
You Will Need:
2 blocks of Ramen noodles (medium chinese noodles)
2L water
2 chicken stock cubes
6 sprigs purple broccoli
1 carrot, diced
200g baby corn, sliced into rounds
1 spring onion stalk, sliced
2 boneless chicken breasts
2TBS Chinese 5 spice
1TBS soy sauce
2 handfuls spinach
2 eggs, hardboiled and sliced in half
1. Slice chicken breasts into strips and coat with the Chinese five spice. Spray a pan with fry light, and fry strips until golden, or use a griddle pan. Set aside.
2. Add the water, stock cubes, soy sauce, purple broccoli, baby corn, spring onion, and carrot to a pot and bring to a boil. Allow vegetables to cook through.
3. Add Ramen and cook according to package.
4. Place one handful of uncooked spinach in the bottom of each bowl and slowly ladle the broth and vegetables on top. Use tongs to extract 3 broccoli sprigs per bowl. Evenly divide the noodles and chicken between the bowls and garnish with egg.
***
DISCLAIMER: I do not work for Slimming World, I am not affiliated with Slimming World beyond being a paying customer/member, I get no personal benefit from writing this post other than the joy of sharing.
Please note: Syn values are based on my exact ingredients using the online calculator. Your Syn value may vary based on your ingredients and the size of your baking containers and portions, so use this number as a guide only. Syn values also frequently change, but these values are correct at the time of publication.
The contents of this post, including images are © Rebecca J Lockley and Tim Lockley unless otherwise stated and should not be reproduced without permission.
For full Copyright and Disclaimer, please read http://www.blog.beccajanestclair.com/copyright/
Facebook: https://www.facebook.com/blog.beccajanestclair
Twitter: https://twitter.com/annaonthemoon
Instagram: https://www.instagram.com/beccajanestclair
Blog: http://blog.beccajanestclair.com
YouTube: https://www.youtube.com/channel/beccajanestclair

[Recipe] 2.5 Syn General Tso’s Chicken
 Ah, the great American Chinese staple. Full disclaimer – I can’t actually remember what General Tso’s Chicken is supposed to taste like, as it’s been almost 9 years since I had any, but I do remember the first time Tim and I ordered Chinese food here in the UK and I wanted to know where the General Tso’s chicken was on the menu! Chinese food in the UK and the US is very different. A friend of mine explained that a lot of British Chinese food recipes are from Hong Kong, whereas American Chinese food is…well, American. (kind of like how Italian food in the US is different from Italian food from Italy). So I swapped my General Tso for Sweet & Sour Chicken Cantonese style, but I always wanted to know how to make my own General Tso’s Chicken. And naturally, since I follow Slimming World, I also wanted to find something that was low in syns, especially since your average takeaway can be 10+ syns.
I originally found this recipe on a Beach Body blog, but modified it for Slimming world.
You will need:
450g diced chicken breast
2 TBS cornflour/cornstarch
1/2 tsp salt
small piece of fresh ginger, about the size of your thumbnail finely chopped
2 spring onion sprigs, chopped
150ml chicken or vegetable stock
2 TBS passata (or for a thicker sauce, use tomato puree)
1 TBS Hoisin Sauce
1 tsp Agave syrup (or use sweetener)
1. Preheat the oven to 180C.
2. Coat the chicken in the cornflour and place on a lined baking tray and bake 15-20 minutes*
3. while the chicken is cooking, combine together all other ingredients and bring to a boil, then simmer 10 minutes.
4. When the chicken is cooked, toss it with the sauce.
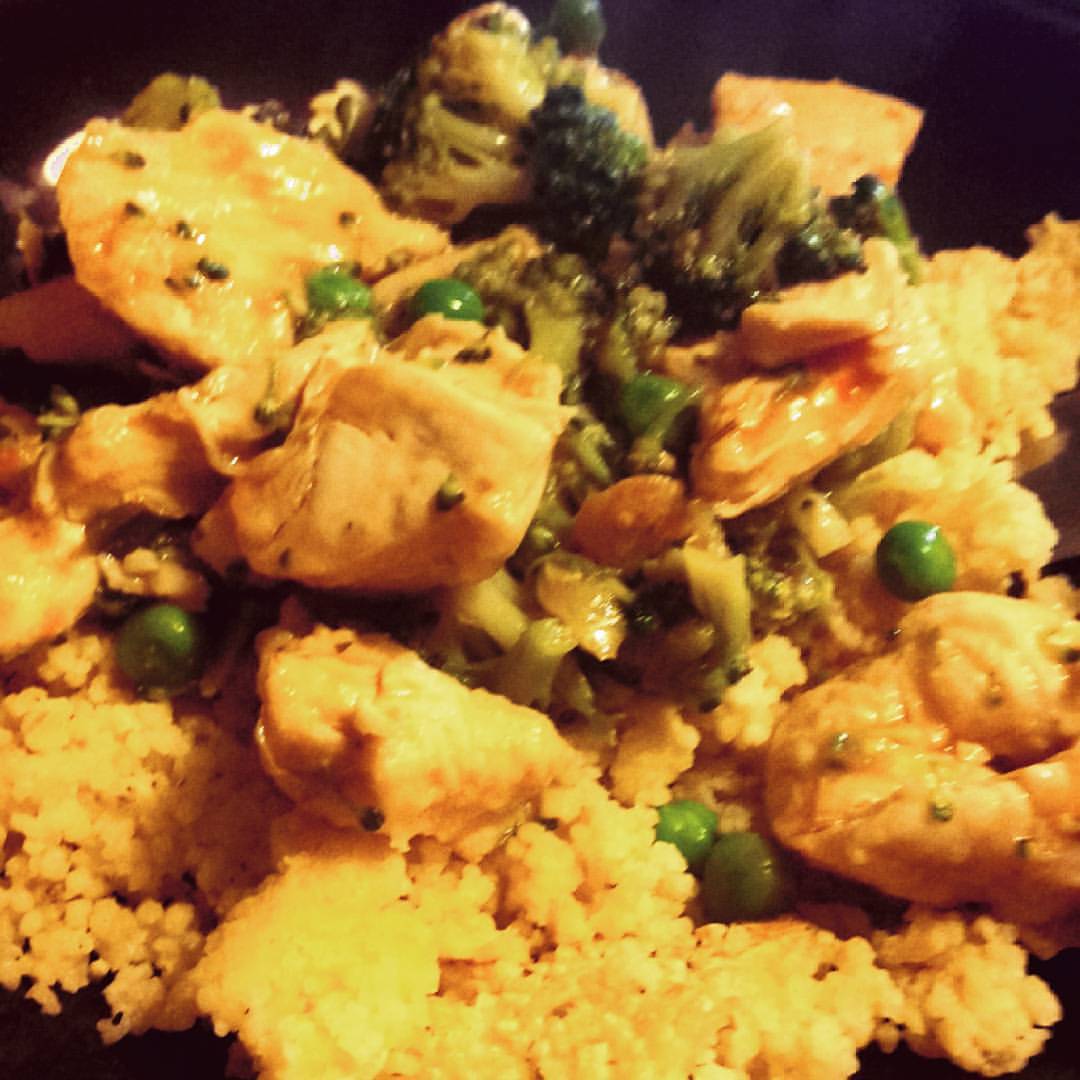
I served ours with broccoli, peas, and egg-fried cous cous. Divided into 2 portions, this comes out at 2.5 syns per person.
*for crispier but still low syns you could fry them in fry light!
***
DISCLAIMER: I do not work for Slimming World, I am not affiliated with Slimming World beyond being a paying customer/member, I get no personal benefit from writing this post other than the joy of sharing.
Please note: Syn values are based on my exact ingredients using the online calculator. Your Syn value may vary based on your ingredients and the size of your baking containers and portions, so use this number as a guide only. Syn values also frequently change, but these values are correct at the time of publication.
The contents of this post, including images are © Rebecca J Lockley and Tim Lockley unless otherwise stated and should not be reproduced without permission. If you are not reading this on http://blog.beccajanestclair.com, my facebook page, Networked Blogs, the RSS feed(s), or through an e-mail subscription, please notify me.
[LJ readers reading this on the LJ RSS feed: Please click on the link at the top of the entry to go directly to my blog to leave a comment, as comments left on the LJ RSS do not get seen by me. Facebook users reading this from my Networked Blogs link can either comment on facebook or on my blog. If you are reading this through an e-mail subscription, you might need to go directly to my blog to view videos and images.]
For full Copyright and Disclaimer, please read http://www.blog.beccajanestclair.com/copyright/
[Recipe] Cauliflower Cheese & Bacon
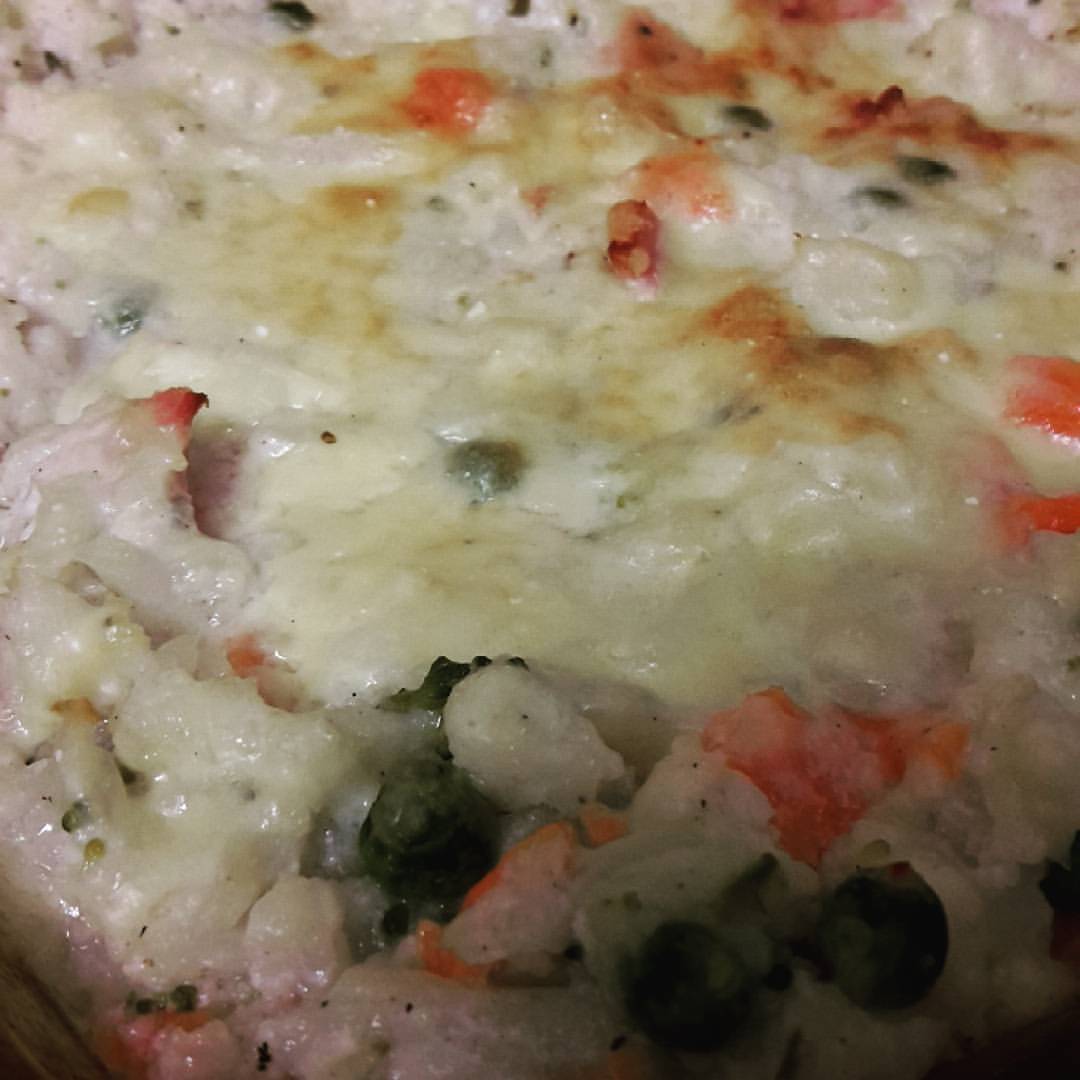 Do you ever watch those recipe videos on Facebook and get really hungry? Me too. Last night, one of my friends linked to a video for Loaded Cauliflower Casserole and it got me hungry and wanting to create this dish to be Slimming World friendly. So I went out shopping today and picked up a Cauliflower and we had this for Tea tonight.
You Will Need:
1 Head of Cauliflower (chopped into florets)
300g frozen mixed vegetables
200g bacon medallions
250g Quark
3 heaped spoonfuls Fromage Frais
1 TBS dried or fresh chives (or use spring onion if you have them. I forgot to buy some but had chives)
1/4 tsp pepper
1/4 tsp mustard powder
45g reduced fat cheddar cheese
1. Boil or steam the cauliflower florets until tender and cook the frozen vegetables. Drain both.
2. Grill bacon. Chop bacon into bite sizes bits.
3. Combine quark, fromage frais, chives, pepper, and mustard.
4. Stir quark mixture into vegetables, add chopped bacon.
5. Spread into a casserole dish and top with 45g cheddar cheese
6. Bake at 200C 25 minutes or until bubbly and cheese is golden.
Syns per recipe: 6 (for the cheese).
This recipe is easy to adapt for vegetarians, just omit the bacon or use veggie bacon. If you are following a Low Carb High Fat diet, use full fat cream cheese and sour cream instead.
***
DISCLAIMER: I do not work for Slimming World, I am not affiliated with Slimming World beyond being a paying customer/member, I get no personal benefit from writing this post other than the joy of sharing.
Please note: Syn values are based on my exact ingredients using the online calculator. Your Syn value may vary based on your ingredients and the size of your baking containers and portions, so use this number as a guide only. Syn values also frequently change, but these values are correct at the time of publication.
The contents of this post, including images are © Rebecca J Lockley and Tim Lockley unless otherwise stated and should not be reproduced without permission. If you are not reading this on http://blog.beccajanestclair.com, my facebook page, Networked Blogs, the RSS feed(s), or through an e-mail subscription, please notify me.
[LJ readers reading this on the LJ RSS feed: Please click on the link at the top of the entry to go directly to my blog to leave a comment, as comments left on the LJ RSS do not get seen by me. Facebook users reading this from my Networked Blogs link can either comment on facebook or on my blog. If you are reading this through an e-mail subscription, you might need to go directly to my blog to view videos and images.]
For full Copyright and Disclaimer, please read http://www.blog.beccajanestclair.com/copyright/
[Recipe] Cheap and Easy Vegetable Soup
 When I was younger and home sick from school, my mom would always make me a bowl of Campbell’s vegetable soup with ABC pasta (I liked vegetable soup better than chicken noodle). When I became a vegetarian, I stopped eating it because it had meat based (beef or chicken) stock in it. And then I moved to the UK and stopped being vegetarian, but Campbell soup wasn’t sold here until recently. Two weeks ago when I was sick I happened to be looking at the tinned vegetables in Tesco and I spotted a tin of mixed veg – carrot, potato, parsnip, and peas. I thought it might be nice as a soup, so I picked some up and I’ve been making this soup every few days since. It’s quick, cheap, easy, and surprisingly tastes just like Campbell’s, so it’s also a nice bit of comfort food for this expat.
Vegetable Soup
Syns: 0
You will need:
1 tin mixed vegetables
1 tin chopped tomatoes
1L vegetable stock or broth (made from scratch, cubes, or stock pots*)
handful of pearl barley, small pasta, or rice (optional)
1. Check the cooking time on the barley, pasta, or rice as this will determine how long the soup will take. Pearl barley takes about 30 minutes, but small pasta only 10-15 minutes.
2. Combine everything in a large pot, bring to a boil, and then simmer per directions on the barley, pasta, or rice (I simmer mine for 30 minutes).
And you’re done. This made plenty for my husband and I to have for lunch over two days. I think the total cost for this is under £1, so it’s quite frugal too!
***
*Double check to make sure your stock is still syn free, or calculate the syns. Oxo cubes are free.
DISCLAIMER: I do not work for Slimming World, I am not affiliated with Slimming World beyond being a paying customer/member, I get no personal benefit from writing this post other than the joy of sharing.
Please note: Syn values are based on my exact ingredients using the online calculator. Your Syn value may vary based on your ingredients and the size of your baking containers and portions, so use this number as a guide only. Syn values also frequently change, but these values are correct at the time of publication.
The contents of this post, including images are © Rebecca J Lockley and Tim Lockley unless otherwise stated and should not be reproduced without permission. If you are not reading this on http://blog.beccajanestclair.com, my facebook page, Networked Blogs, the RSS feed(s), or through an e-mail subscription, please notify me.
[LJ readers reading this on the LJ RSS feed: Please click on the link at the top of the entry to go directly to my blog to leave a comment, as comments left on the LJ RSS do not get seen by me. Facebook users reading this from my Networked Blogs link can either comment on facebook or on my blog. If you are reading this through an e-mail subscription, you might need to go directly to my blog to view videos and images.]
For full Copyright and Disclaimer, please read http://www.blog.beccajanestclair.com/copyright/
[Recipe] A Taste of Austria – Pork Schnitzel
 Austria has some amazing food. Some amazingly fattening food. Did you know that Austrians consume on average more calories per day than most other countries in the world? I didn’t either until my husband found an article about it. No wonder he and I both gained weight on our trip to Austria. We figure native Austrians probably need all those calories since everything is on top of a mountain! One of my huband’s favourite foods is Schnitzel, and they serve it pretty much everywhere. Large pieces of chicken, pork, or viel coated in batter and then deep fried. Wow. I can feel my arteries clogging just writing that. A few years back, the Slimming World magazine had some international foods, and incldued a recipe for Schnitzel, which I have used to base my recipe off of. The breadcrumbs are best if you are able to let them bake and stand for several hours, but you can crisp them up just before you make them or you can use them soft. But this is best with crispy crunchy breadcrumbs.
Pork Schnitzel
1 Syn per Schnitzel
You Will Need:
60g wholemeal bread (loaf or roll, but measure to make sure it’s 60!)
2 tsp Celery salt
2 tsp mixed herbs (I actually used Italian herbs as I was out of mixed and it was fine)
1 tsp dried parsley
1 egg
6 pork chops with the fat trimmed off (or pork steaks or pork medallions)
Frylight
For the Breadcrumbs:
1. Preheat oven to 150C.
2. Blitz the bread along with the spices in a blender or food processor until crumbs.
3. Line a baking tray with parchment paper.
4. Bake the crumbs for 15 minutes, stirring halfway.
5. Turn off the oven and and leave the crumbs in the oven for 4 hours.
6. Fold over the parchment paper and crush the now crispy crumbs with your hands, the back of a knife, or a rolling pin.
For the Schnitzel:
1. Preheat oven to 200C.
2. Whisk the egg white, then add the yolk and whisk some more.
3. Spray a baking tray with frylight.
4. Dredge the pork first in the egg, then in the breadcrumbs and place on the tray.
5. Spray the tops of the pork with some frylight.
6. Bake 25-30 minutes or until breadcrumbs are starting to brown.
This goes great with some chips, peas, and sauerkraut! Don’t forget to measure out your ketchup too. 1 TBS of reduced sugar and salt ketchup is half a syn. I just dumped all my ketchup on my chips, so it looks like a lot, but I only used 2TBS, bringing the total syns to my dinner to 4.
***
DISCLAIMER: I do not work for Slimming World, I am not affiliated with Slimming World beyond being a paying customer/member, I get no personal benefit from writing this post other than the joy of sharing.
Please note: Syn values are based on my exact ingredients using the online calculator. Your Syn value may vary based on your ingredients and the size of your baking containers and portions, so use this number as a guide only. Syn values also frequently change, but these values are correct at the time of publication.
The contents of this post, including images are © Rebecca J Lockley and Tim Lockley unless otherwise stated and should not be reproduced without permission. If you are not reading this on http://blog.beccajanestclair.com, my facebook page, Networked Blogs, the RSS feed(s), or through an e-mail subscription, please notify me.
[LJ readers reading this on the LJ RSS feed: Please click on the link at the top of the entry to go directly to my blog to leave a comment, as comments left on the LJ RSS do not get seen by me. Facebook users reading this from my Networked Blogs link can either comment on facebook or on my blog. If you are reading this through an e-mail subscription, you might need to go directly to my blog to view videos and images.]
For full Copyright and Disclaimer, please read http://www.blog.beccajanestclair.com/copyright/
[Recipe] Savory Cheese Cookies (Cheese Scones)
 I know you’re probably thinking savory cookies? What? But see, I started out reworking a recipe for Victorian Cheese Scones, and they came out a bit flat – more like a cheese biscuit, but they’re soft like a cookie. Since they’re too flat to be scones, I’ve decided they must be savory cookies. Even better? They work out at 2.5 Syns each! Of course, you could make them bigger/thicker and have them at 5 syns each, too. As this was originally a recipe measured in ounces, the grams are a little funny looking.
Savory Cheese Cookies (Cheese Scones)
You will need:
170g self-rising flour
28g Flora light (blue container) (if you’re not following SW, use any butter or margarine)
84g grated reduced fat Cheddar cheese*
1 egg
2 TBS semi-skim milk
pinch of salt & pepper
1/4 tsp Coleman’s mustard powder
about 1/2 TBS water (optional)
1. Preheat oven to 180C and line a tray with parchment paper OR spray with Frylight.
2. Whisk together egg and milk in a small bowl and set aside.
3. Sift together flour, salt, pepper, and mustard powder.
4. Rub in the Flora. I did his by kind of scrunching it, if that makes sense. You’ll wind up with the texture of breadcrumbs.
5. Stir in the cheese.
6. Mix in the milk and egg and combine until it forms a ball. If it’s not picking up all the flour and looks dry, add about 1/2TBS of water.
7. Lightly flour your work surface and roll out the dough to around 1/4″ to 1/2″.
8. Using a middle sized biscuit cutter, cut out 20 rounds and transfer them onto the baking sheet.
9. Bake for 15-20 minutes, or until golden brown.
If you divide this into 20, each cookie is 2.5 Syns each. If you roll out the dough thicker and only cut 10 out, each one is 5 syns. For a more rustic look, you could just shape them by hand.
Add-ins: Make Cheese & Onion scones by adding some chopped spring onions after adding the cheese. Make Cheese & Bacon by adding drained chopped bacon (use lardons for no added syns) to the dough. Try adding chilli powder for a kick. The possibilities are endless!
*You can use another type of cheese, but you will need to recalculate the syns.
***
DISCLAIMER: I do not work for Slimming World, I am not affiliated with Slimming World beyond being a paying customer/member, I get no personal benefit from writing this post other than the joy of sharing.
Please note: Syn values are based on my exact ingredients using the online calculator. Your Syn value may vary based on your ingredients and the size of your baking containers and portions, so use this number as a guide only. Syn values also frequently change, but these values are correct at the time of publication.
The contents of this post, including images are © Rebecca J Lockley and Tim Lockley unless otherwise stated and should not be reproduced without permission. If you are not reading this on http://blog.beccajanestclair.com, my facebook page, Networked Blogs, the RSS feed(s), or through an e-mail subscription, please notify me.
[LJ readers reading this on the LJ RSS feed: Please click on the link at the top of the entry to go directly to my blog to leave a comment, as comments left on the LJ RSS do not get seen by me. Facebook users reading this from my Networked Blogs link can either comment on facebook or on my blog. If you are reading this through an e-mail subscription, you might need to go directly to my blog to view videos and images.]
For full Copyright and Disclaimer, please read http://www.blog.beccajanestclair.com/copyright/
[Recipe] Stuffed French Toast
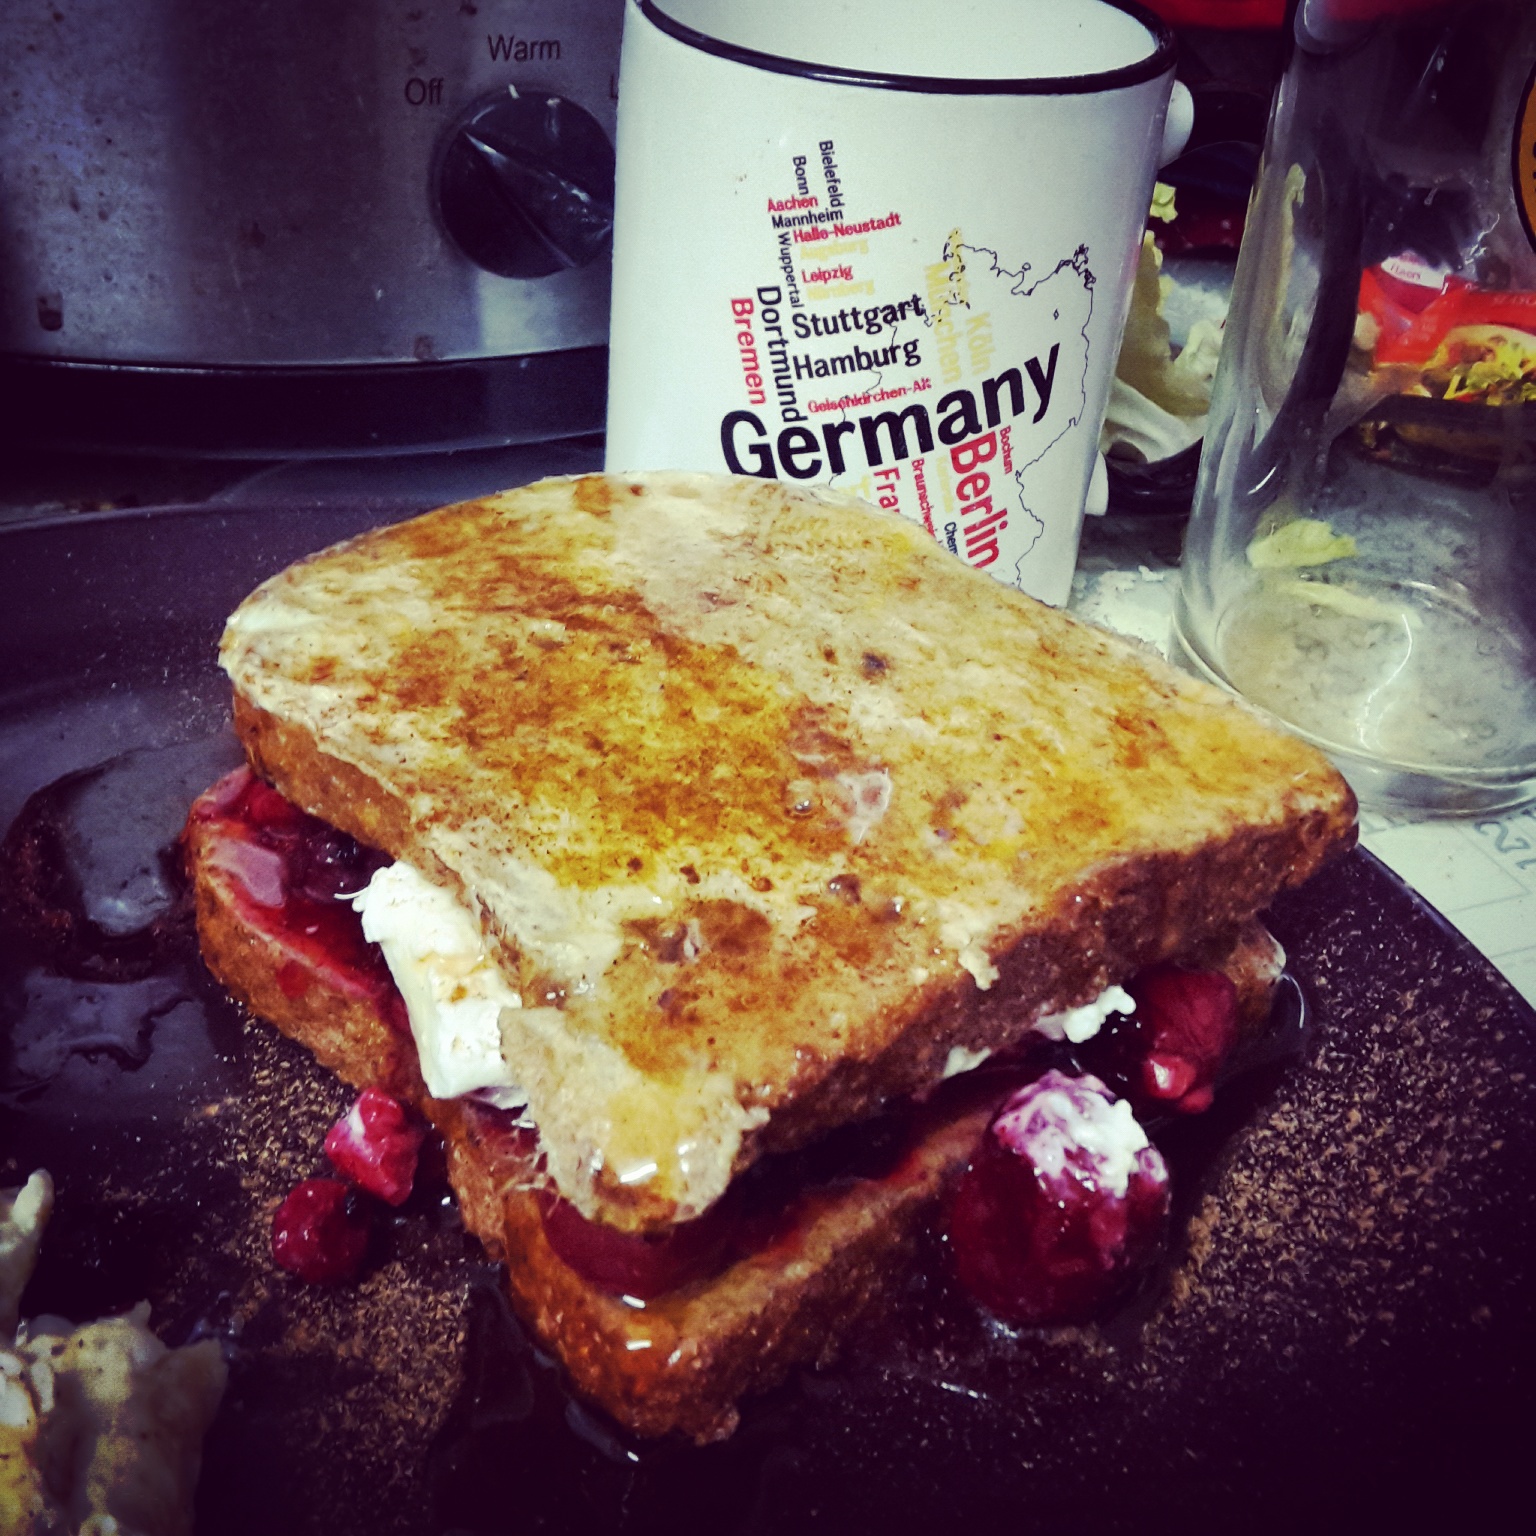 Walk into an American diner, and one thing you’ll spot on the menu is French Toast, and about a half dozen (or more!)) ways to have it , including stuffed.
French toast is known as eggy bread in the UK, the only difference being that eggy bread is more of a savory dish, and French toast is usually a sweet. And to further confuse things, in the UK we also have something called fried bread, which you would think would be similar, but nope. Fried bread kind of grosses me out.
If you order Stuffed French Toast in a diner, you will usually get two really thick slices of white bread, dipped in a mixture of egg and milk, and fried. Between the two pieces of bread they lay on the sweet cream cheese and then it’s topped with fruit mixed in a sugary syrup. Sounds disgustingly delicious, doesn’t it?
Since Tim was swapping over to night shift on Saturday, I knew we would be up late on Friday night (to try to sleep in on Saturday to help him switch over) and Saturday by the time we got up we would be having Brunch instead of Breakfast, and I decided to make French Toast. Then, when I was getting the milk out for my coffee, I spotted the dish of thawed out frozen berries and a container of quark, so I decided to make mine stuffed!
Stuffed French Toast
Syns: 0, but this will count as your HEB. If you’re not having it as your HEB, you will need to syn the bread.
You will need:
2 slices of any Healthy Extra B bread option
2 eggs
1 tsp cinnamon
100g frozen mixed berries, thawed (or fresh berries)
2 TBS quark
Fry Light
1. Spray a frying pan with Fry Light and pre-heat it on the hob (that’s stove for my American readers!).
2. Whisk the eggs with the cinnamon in a bowl or dish large enough to fit a slice of bread.
3. Soak one slice of bread in the mixture and fry until golden brown (3-4 minutes per side). Repeat with the second slice of bread (you might need to give the pan another spray of Fry Light too). If your frying pan is large enough, you could do both slices at once.
4. Spread one slice of French toast with quark, top with mixed berries, and place the second slice of French toast on top.
5. Optional: top the whole thing with some agave syrup, treacle, American pancake syrup, or golden syrup (and make sure you calculate the syns for your syrup!)
Not only is this a great Slimming World brunch choice, it’s great for a diabetic! If you wanted to make a “full fat” version, use cream cheese instead of quark and you could use tinned fruit in syrup.
***
DISCLAIMER: I do not work for Slimming World, I am not affiliated with Slimming World beyond being a paying customer/member, I get no personal benefit from writing this post other than the joy of sharing.
Please note: Syn values are based on my exact ingredients using the online calculator. Your Syn value may vary based on your ingredients and the size of your baking containers and portions, so use this number as a guide only. Syn values also frequently change, but these values are correct at the time of publication.
The contents of this post, including images are © Rebecca J Lockley and Tim Lockley unless otherwise stated and should not be reproduced without permission. If you are not reading this on http://blog.beccajanestclair.com, my facebook page, Networked Blogs, the RSS feed(s), or through an e-mail subscription, please notify me.
[LJ readers reading this on the LJ RSS feed: Please click on the link at the top of the entry to go directly to my blog to leave a comment, as comments left on the LJ RSS do not get seen by me. Facebook users reading this from my Networked Blogs link can either comment on facebook or on my blog. If you are reading this through an e-mail subscription, you might need to go directly to my blog to view videos and images.]
For full Copyright and Disclaimer, please read http://www.blog.beccajanestclair.com/copyright/
[Recipe] Self Saucing Chocolate Cake
 Today is our 6th wedding anniversary! Since we’ve had a pretty amazing year already between 3 weeks in the US in May and a spur of the moment 10 days in Austria, we decided to keep our anniversary low-key. When I asked Tim what he wanted, he asked for pulled pork and a gooey dessert, the kind like you can get a Frankie and Benny’s. A dish my Aunt Barb made came to mind, which was like a brownie baked in a pie pan that made it’s own sauce and I remembered it was out of the Betty Crocker cookbook. It’s on Page 200 of the spiral bound (US) version and is called a Hot Fudge Sundae Cake. I’ve made it once before, but this time I wanted to scale it down to 2 servings, convert it to UK measurements, and work out the syns for Slimming World. As listed in the cookbook, the original serves 9 and has 10 Syns per serving (basing it on calories only as I don’t have the size of a serving to plug it into the calculator). I wanted to scale this down to serve 2 (no leftovers means no temptation!) and I also wanted to make it diabetic friendly and use some sugar substitutes. It still comes out to 10 syns, so changing the sugar didn’t matter and I will list the recipe using both regular sugar and sweeteners.
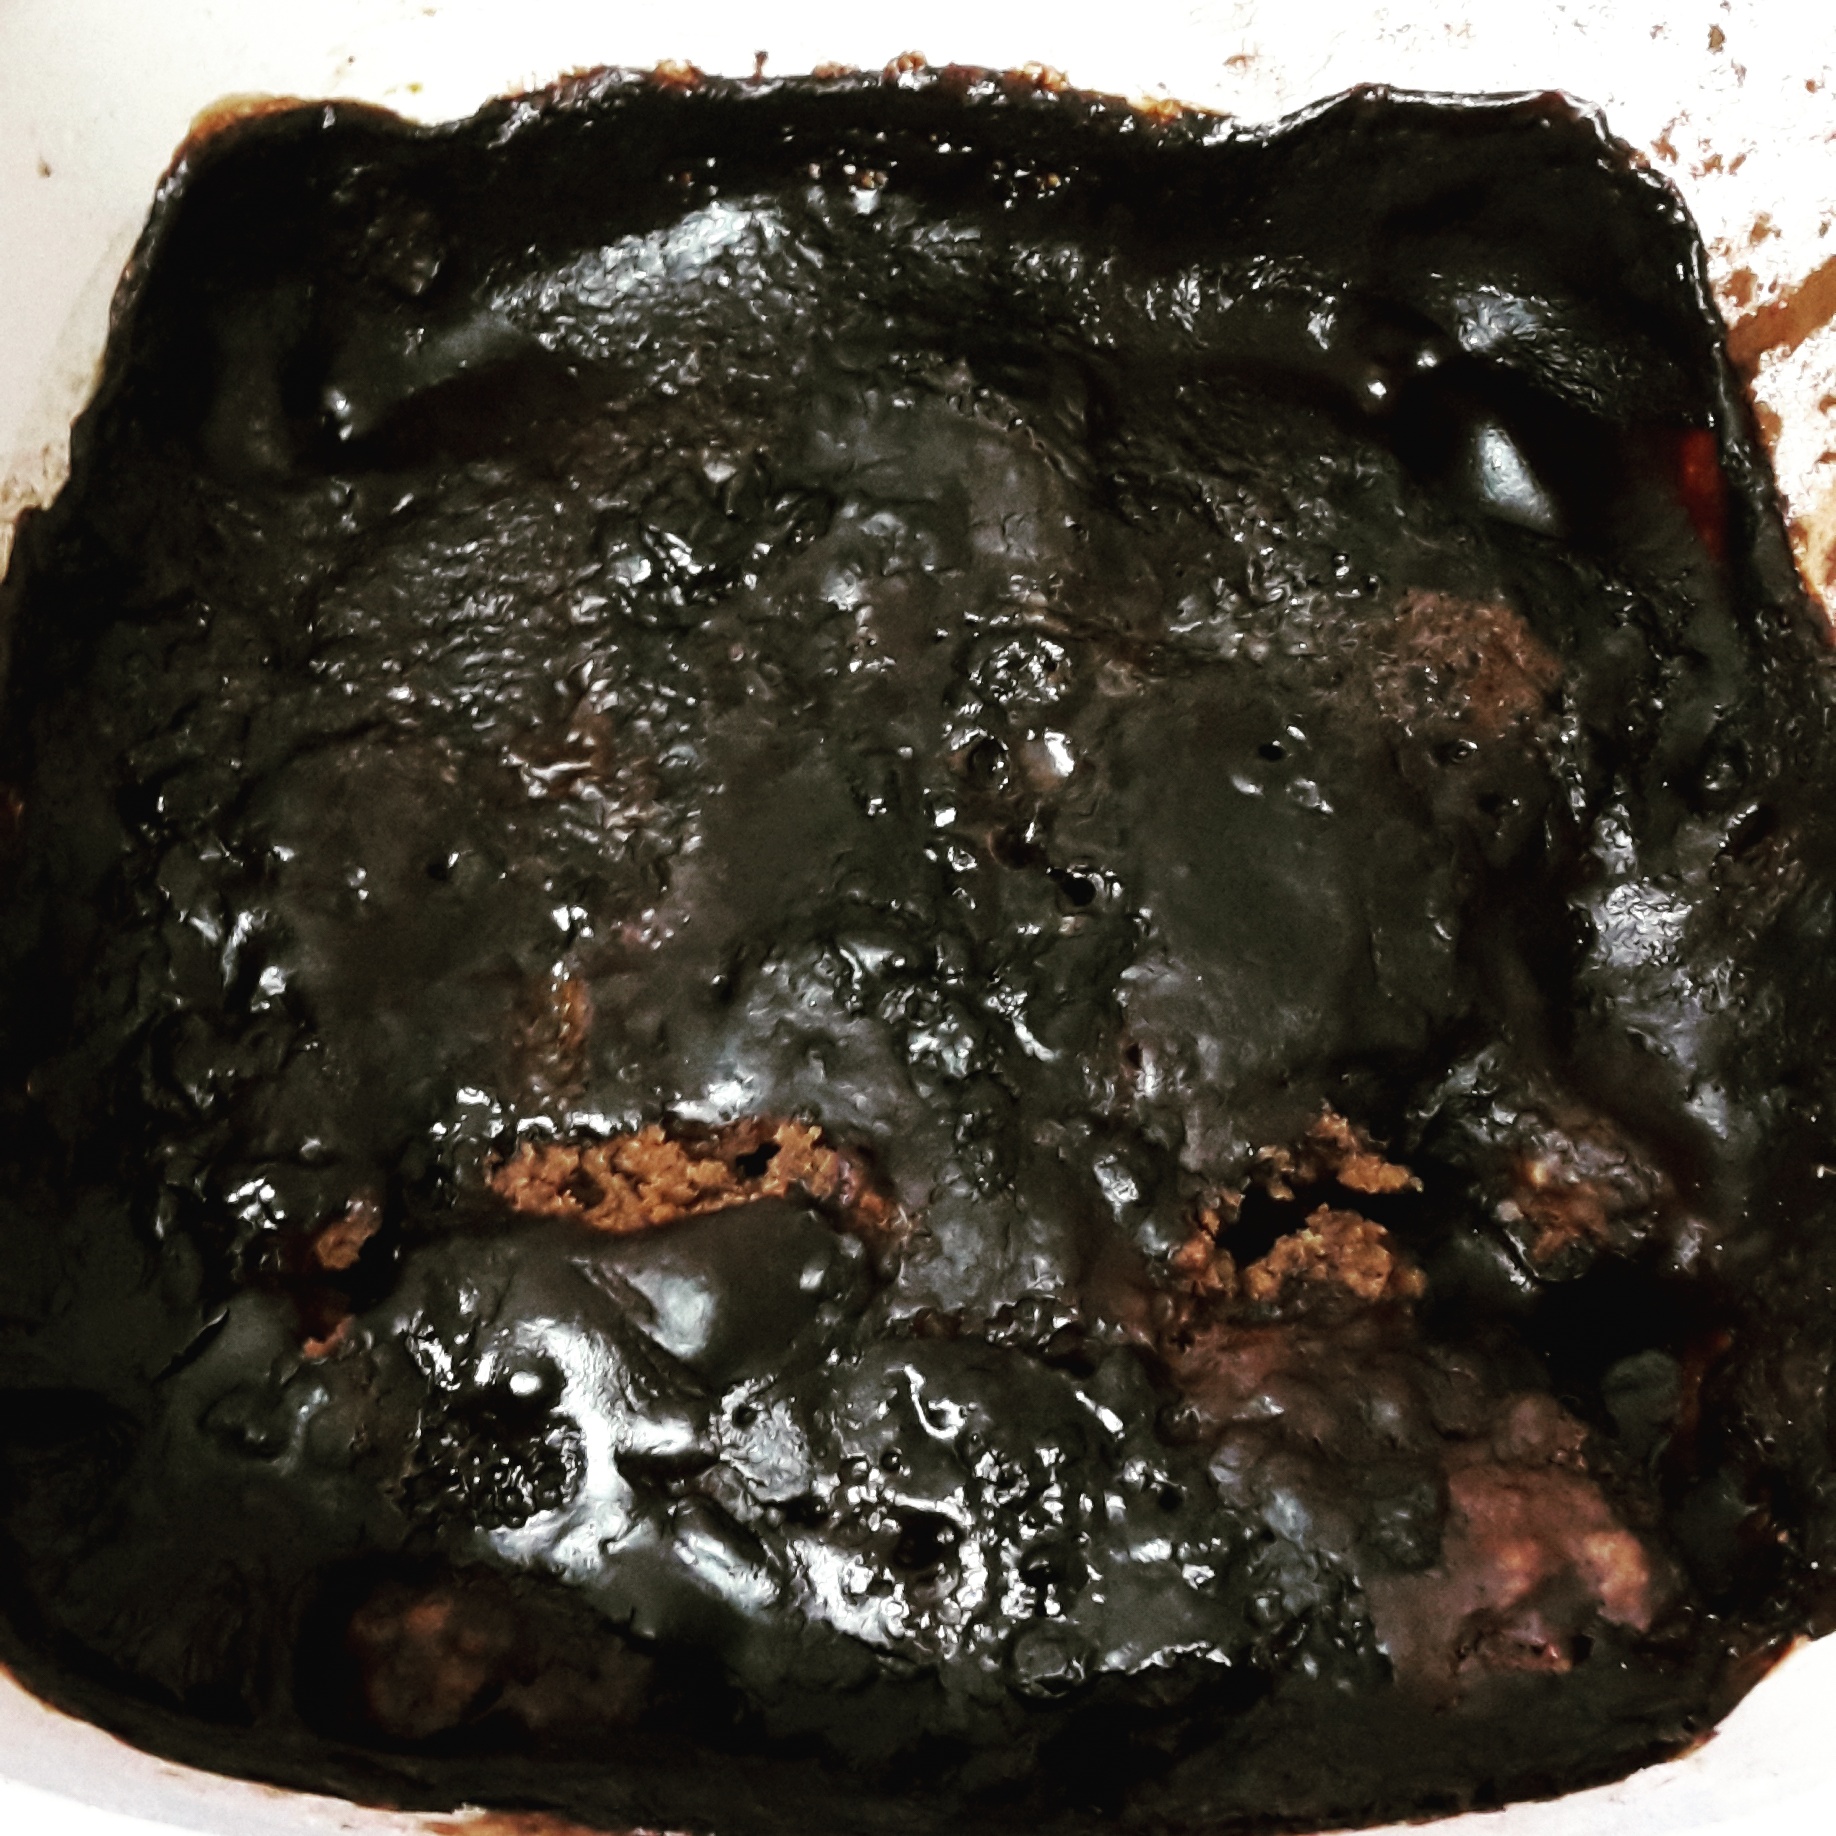
I baked this in a small Corningware dish my mom gave me when I moved. It’s an individual casserole size, so an individual pie dish would work for this or possibly dividing it in half into two ramekins (but then you would need to adjust cooking time). There also is a recipe for a Melting Chocolate Pudding on the Slimming World website which has 9 syns per serving, but I didn’t have individual microwaveable pudding containers and I wanted to be a bit more creative.
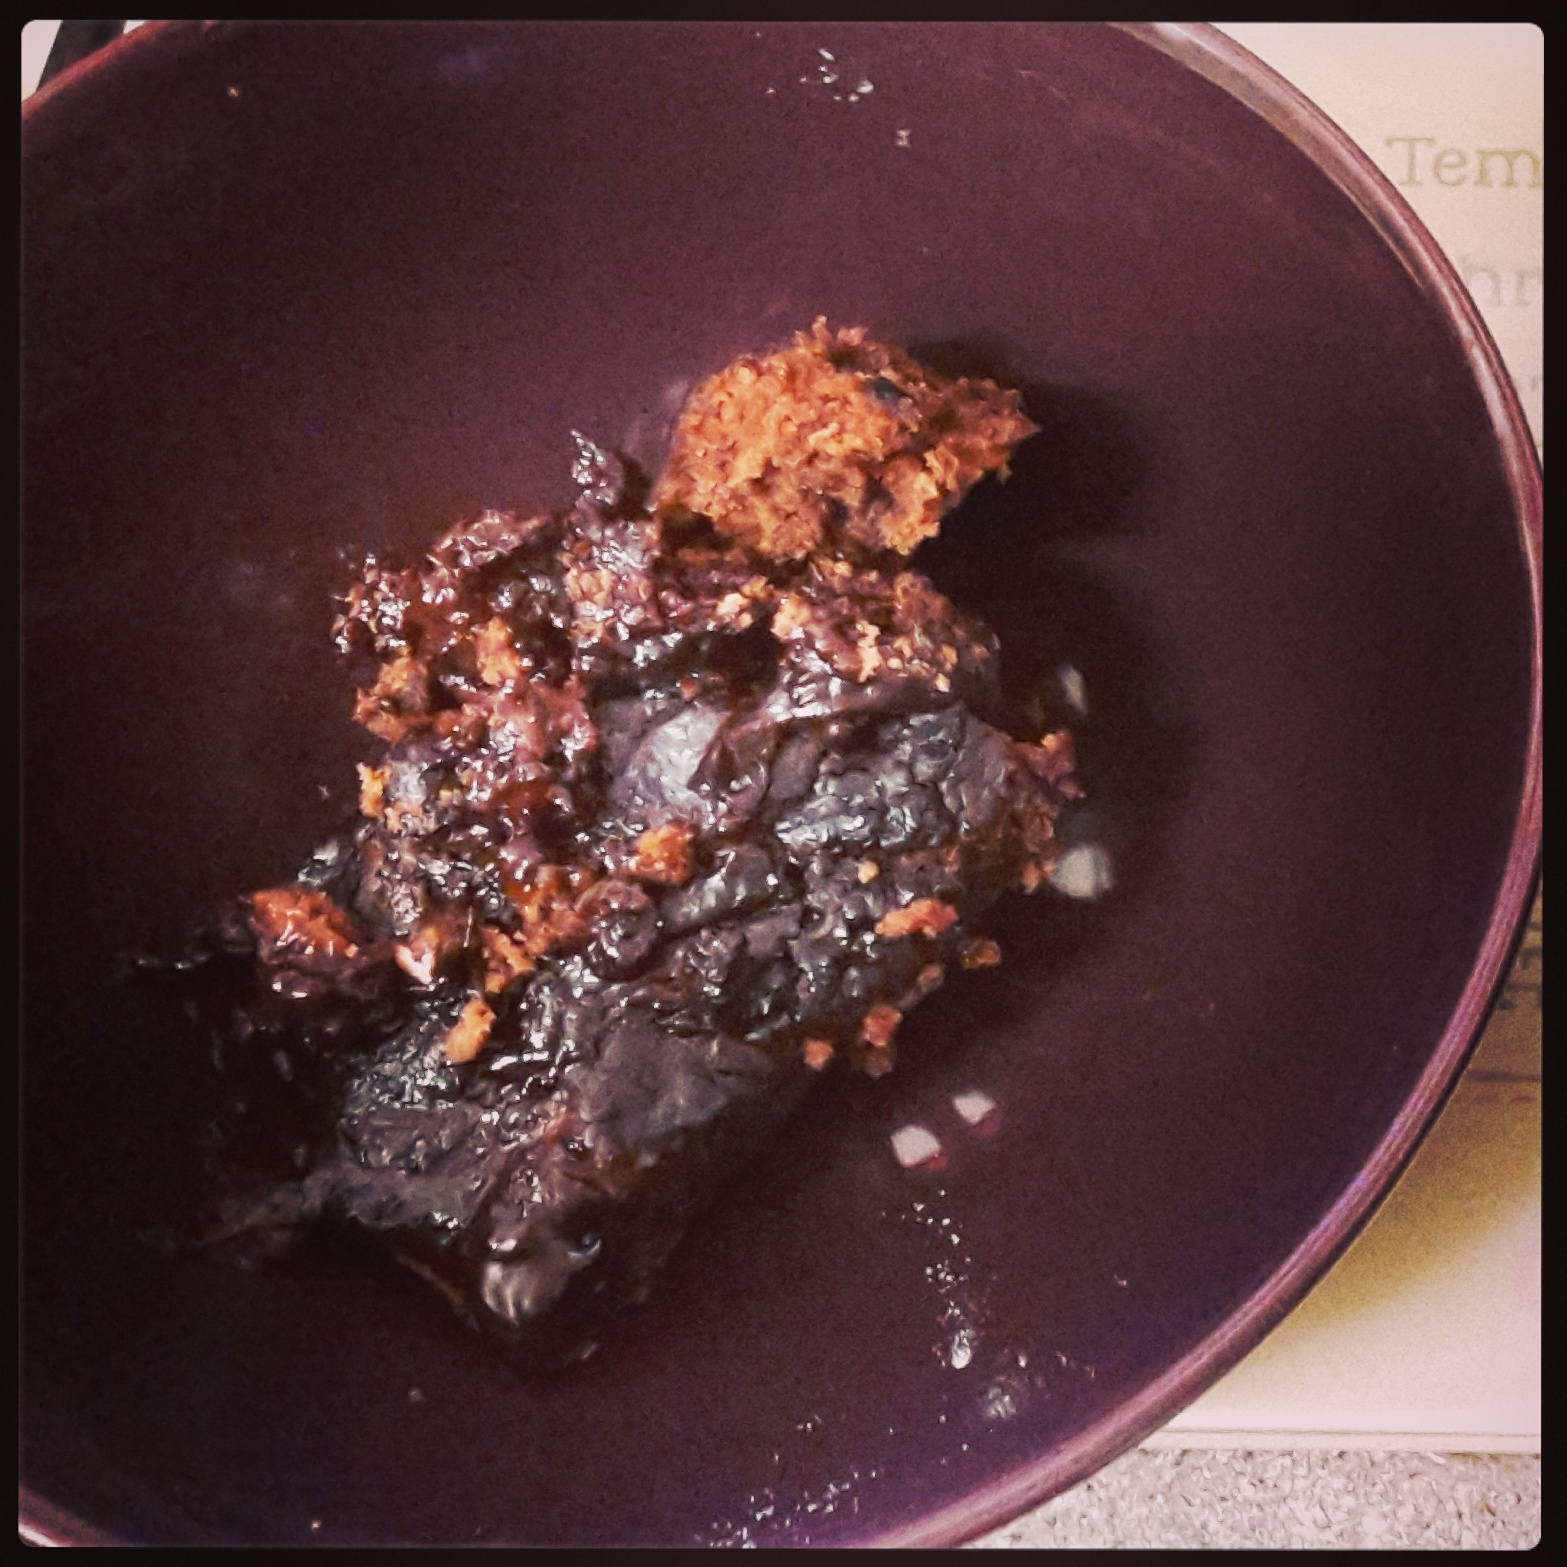
Self Saucing Chocolate Cake
Serves: 2
Syns: 10 per serving (it’s 9.25 if you use sweetener products)
You Will Need:
Cake –
50g self-rising flour
15g Truvia baking blend OR 30g caster sugar
1/2 TBS cocoa (I used Green & Black’s Organic)
25ml semi-skim milk
1-2 TBS water
1/2 TBS vegetable oil
1/2 tsp vanilla essence
Topping –
25g Splenda for baking Brown (or 50g brown sugar)
1 TBS cocoa
100ml very hot water (from the kettle)
1) Preheat oven to 180C (350F)
2) Combine flour, Truvia, and 1/2 TBS cocoa in the ungreased small casserole dish.
3) Mix in milk, vegetable oil, vanilla, and 1TBS of water. If mixture is still dry, add an additional Tablespoon water.
4) Spread mix evenly in dish.
5) Sprinkle batter with 1 TBS cocoa and brown sugar.
6) Pour hot water evenly over the top.
7) Bake 25-30 minutes until cake is cooked (Will be gooey on top. Stick a spoon in to check the cake)
Serve hot with custard or ice cream!
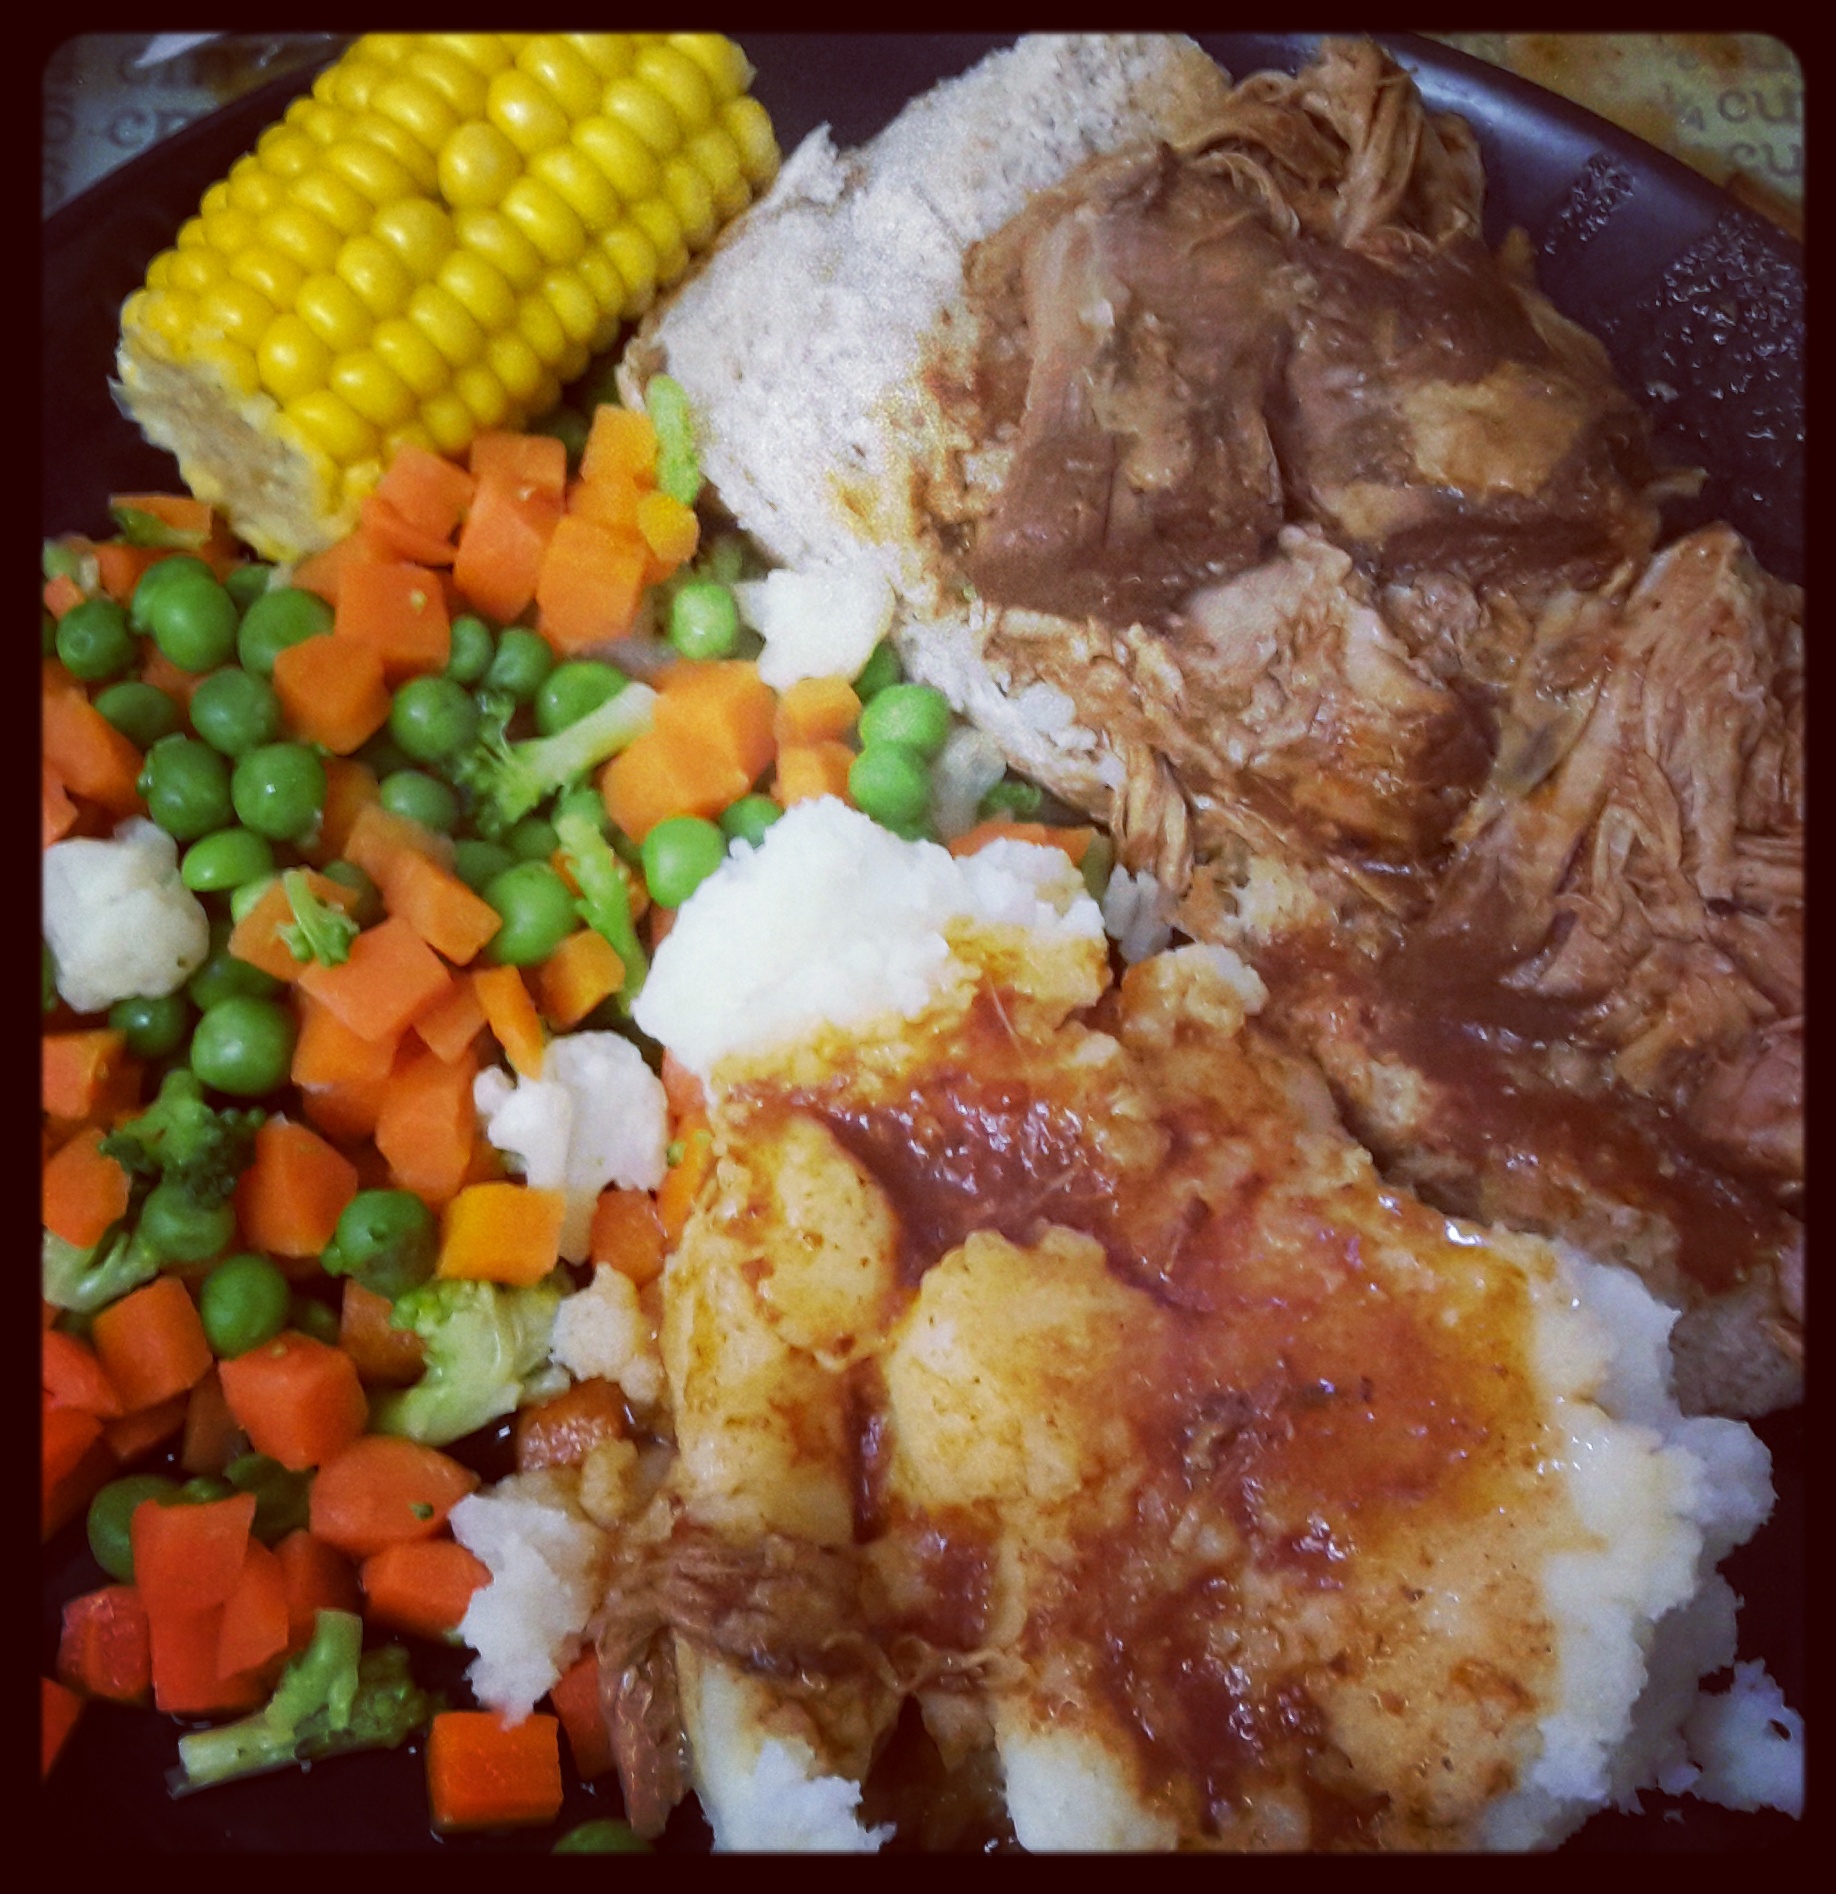
For the pulled pork, all you need is a piece of pork butt or shoulder (cut off all visible fat) and a batch of Slimming World Barbecue Sauce. Just toss it all in a crock pot and let it cook on low for 8-10 hours. I put ours in the crock pot last night before we went to bed and it was ready by the time we woke up and then I left it on warm until Lunch. We served it on top of wholemeal rolls (my HEB for the day) with smash, corn on the cob, and mixed vegetables.
***
DISCLAIMER: I do not work for Slimming World, I am not affiliated with Slimming World beyond being a paying customer/member, I get no personal benefit from writing this post other than the joy of sharing.
Please note: Syn values are based on my exact ingredients using the online calculator. Your Syn value may vary based on your ingredients and the size of your baking containers and portions, so use this number as a guide only. Syn values also frequently change, but these values are correct at the time of publication.
Photo of Tim and I taken by Eric Stocklin
The contents of this post, including images are © Rebecca J Lockley and Tim Lockley unless otherwise stated and should not be reproduced without permission. If you are not reading this on http://blog.beccajanestclair.com, my facebook page, Networked Blogs, the RSS feed(s), or through an e-mail subscription, please notify me.
[LJ readers reading this on the LJ RSS feed: Please click on the link at the top of the entry to go directly to my blog to leave a comment, as comments left on the LJ RSS do not get seen by me. Facebook users reading this from my Networked Blogs link can either comment on facebook or on my blog. If you are reading this through an e-mail subscription, you might need to go directly to my blog to view videos and images.]
For full Copyright and Disclaimer, please read http://www.blog.beccajanestclair.com/copyright/
[Recipe] Orange Chicken [Slimming World]
 I love Chinese food. But Chinese food isn’t very Slimming World friendly unless you make it yourself…and the biggest hurdle for me has always been making a tasty sauce. My husband and I like gooey Chinese food, and lots of the recipes I’ve found online just aren’t gooey enough. I have tried using orange Fanta, and while that was good, it still wasn’t satisfying. The other day I was looking at a recipe for orange chicken and suddenly it dawned on me to use orange squash (which is free on Slimming World).
If you follow my exact recipe, this is a syn free meal that serves two comfortably, three if you bulk it out further. The nice thing about a stir fry is you can make it as big as you need it to be. Because all the ingredients are free on Slimming World, you also can play around with the taste of the sauce to get it to fit your specifications. I’ve made this three times, and the first time I didn’t do any measuring other than the squash, the second time I did measurements so I could blog the recipe accurately, and the third time I did a combination of measuring and estimating. All three times it turned out quite tasty!
You will need:
400G diced chicken (or there about. I sometimes cut up two breast portions, and I also used a packet of stir fry turkey last time)
6 TBS double concentrate orange squash (I used Robinson)
4 TBS soy sauce
3 TBS tomato puree (called paste in the US)
2 TBS red wine vinegar (I’m sure other vinegars could be used)
1 TBS Chinese five spice
2 Oranges, broken into segments (I used satsumas)
(optional 1 TBS sweetener)
Stir-fry vegetables of your choice
Dried Chinese noodles or rice (whichever you prefer. I prefer noodles)
Fry light
1. Spray a wok with fry light and pre-heat on the hob
2. Toss diced chicken with Chinese five spice to coat, then stir-fry chicken for 5-10 minutes.
3. Add squash, soy sauce, puree, and vinegar. Give it a stir and let it come to a boil.
4. Add vegetables and stir-fry an addtional 5-10 minutes or until vegetables are to your liking.
5. Cook noodles or rice according to package instructions.
6. Give your sauce a quick taste test. Too sweet? Add a splash more vinegar. Too sour? Add the sweetener. Not enough orange flavor? add another splash of squash. Not spicy enough? Add more five spice.
7. Divide noodles or rice between bowls and top with stir-fry. Garnish with fresh orange segments.
***
DISCLAIMER: I do not work for Slimming World, I am not affiliated with Slimming World beyond being a paying customer/member, I get no personal benefit from writing this post other than the joy of sharing.
Please note: Syn values are based on my exact ingredients using the online calculator. Your Syn value may vary based on your ingredients and the size of your baking containers and portions, so use this number as a guide only. Syn values also frequently change, but these values are correct at the time of publication.
The contents of this post, including images are © Rebecca J Lockley and Tim Lockley unless otherwise stated and should not be reproduced without permission. If you are not reading this on http://blog.beccajanestclair.com, my facebook page, Networked Blogs, the RSS feed(s), or through an e-mail subscription, please notify me.
[LJ readers reading this on the LJ RSS feed: Please click on the link at the top of the entry to go directly to my blog to leave a comment, as comments left on the LJ RSS do not get seen by me. Facebook users reading this from my Networked Blogs link can either comment on facebook or on my blog. If you are reading this through an e-mail subscription, you might need to go directly to my blog to view videos and images.]
For full Copyright and Disclaimer, please read http://www.blog.beccajanestclair.com/copyright/
[Recipe] One Syn Yorkshire Puds [Slimming World]

One thing my husband has missed with his Sunday dinners since I started on Slimming World has been Yorkshire Puddings. Especially after I got good at making them. Today, someone shared a one syn Yorkshire Pud recipe on one of the Slimming World Facebook groups and I decided to try it. The result was light and airy Yorkies with no guilt!
[DISCLAIMER: I do not work for Slimming World, I am not affiliated with Slimming World beyond being a paying customer/member, I get no personal benefit from writing this post other than the joy of sharing.]
[Please note: Syn values are based on my exact ingredients using the online calculator. Your Syn value may vary based on your ingredients and the size of your baking containers and portions, so use this number as a guide only. Syn values also frequently change, but these values are correct at the time of publication.]
You will need:
50g flour
120ml semi-skim milk
40ml water
2 eggs
Pinch of salt
Frylight
– Pre-heat the oven to 200C. While the oven is pre-heating, put in a 12-cup yorkie tin (I used a cupcake tin) so it can get nice and hot.
– Whisk (or use a hand blender) together all ingredients, until foamy.
– Carefully remove tin from the oven and spray each cup with Frylight.
– Evenly distribute mix between the cups. I found measuring spoons helped.
– Bake for 18-20 minutes or until puffy and golden brown.
Serve with your favourite roast dinner for only one syn each!

***
The contents of this post, including images are © Rebecca J Lockley and Tim Lockley unless otherwise stated and should not be reproduced without permission. If you are not reading this on http://blog.beccajanestclair.com, my facebook page, Networked Blogs, the RSS feed(s), or through an e-mail subscription, please notify me.
[LJ readers reading this on the LJ RSS feed: Please click on the link at the top of the entry to go directly to my blog to leave a comment, as comments left on the LJ RSS do not get seen by me. Facebook users reading this from my Networked Blogs link can either comment on facebook or on my blog. If you are reading this through an e-mail subscription, you might need to go directly to my blog to view videos and images.]
For full Copyright and Disclaimer, please read http://www.blog.beccajanestclair.com/copyright/
Adventures in Cooking: I Made Risotto!
 At our recent Slimming World taster evening, one of the ladies made the risotto out of the August Slimming World magazine. It was delicious, and it was the first time I had ever had risotto. I just don’t like rice a whole lot so I don’t eat it often and I rarely make it. Even when we have a Chinese or Indian takeaway, it’s a struggle to eat the rice (even though it’s a fabulous free food!). When I got home, I mentioned this recipe to Tim and he asked if I would try it……ah, the things we do for love.
The original recipe was called (I think) Butternut Squash Risotto. Naturally, it called for a butternut squash. Which I didn’t have. But I did have something called an “onion squash” (called that, I’m guessing because it looked like a giant orange onion) I bought at Waitrose a few weeks ago, so I decided to use that. Cutting into it was tough…so tough my big knife slipped and took a slice out of my knuckle. Ow. Disaster #1. I decided to pull out some pumpkin puree from the freezer instead. I also decided to add some chicken to the recipe, as that’s how we had it at group and it was really good. The recipe also called for onion and garlic (which I omit always due to allergies) and a red chili…which I didn’t have, but I had some dried red chili flakes, so those would have to do.
After cooking the chicken and the veg, the next step is adding the risotto rice and BOILING HOT STOCK one ladleful at a time. The dish has to be kept constantly stirred and the idea is you add a ladle of stock, stir, let it absorb, and repeat until you have one last ladleful of stock to put in. So, ladle in one hand and wooden spoon in the other I began. After 2-3 ladlefuls, my wooden spoon slipped and >SPLAT< a spoonful of boiling hot stock and rice landed on my hand. Ow. I dropped the spoon into the dish and ran my hand under cold water. Disaster #2. I carried on, though I only used 700ml of stock when the recipe called for a full Litre. I can only assume this is because I used pureed pumpkin instead of chunks of squash. Since it looked awfully goey, I took it off the heat, didn't bother adding the last of the stock and stuck a lid on it for 3 minutes.
As I was dishing it out I discovered that when I stopped stirring it to tend to my burnt hand it caused some of the rice to stick to the bottom of my cast iron dutch oven. Disaster #3.
But the risotto was yummy, and Tim even went back for seconds!
I decided the best way to try to clean this would be to add some water to the pot, squirt in some Fairy Platinum, and boil it for 20 minutes to hopefully loosen the stuck on rice. After 20 minutes I took the pot off the heat, grabbed a scrubber and started scraping....and splashed my other hand with boiling hot water. Disaster #4. Fortunately, I was able to shift all the cooked on rice and have rescued my pot. Would I make this again? Sure! But I think I'll be more careful....maybe wear some gloves.
Would you like the recipe?
You will need:
Diced chicken breast (I used one, but you could buy a pack of pre-diced)
250g pumpkin puree
275g risotto rice
700ml boiling hot vegetable stock
Pinch of red pepper flakes
Fry light
Salt & pepper
heavy pot with lid
1. Spray the bottom of a heavy pot with fry light and add the chicken and cook until the chicken is browned on all sides.
2. Add pumpkin puree and the pinch of red pepper flakes.
3. Add risotto rice and simmer for 2-3 minutes.
4. Add a ladle of stock, and cook for 2 minutes (or until stock is absorbed), stirring constantly.
5. continue to add stock in two minute intervals and continually stir.
6. About 15 minutes later, you should be on the last ladleful. Remove pot from heat, stir in the last ladle of stock, season with salt and pepper, and cover for 3 minutes.
Enjoy!
(and if you're on Slimming World, this Risotto is free on EE!)
***
Please note: Syn values are based on my exact ingredients using the online calculator. Your Syn value may vary based on your ingredients and the size of your baking containers and portions, so use this number as a guide only. Syn values also frequently change, but these values are correct at the time of publication.
The contents of this post, including images are © Rebecca J Lockley and Tim Lockley unless otherwise stated and should not be reproduced without permission. If you are not reading this on http://blog.beccajanestclair.com, my facebook page, Networked Blogs, the RSS feed(s), or through an e-mail subscription, please notify me.
DISCLAIMER: I do not work for Slimming World, I am not affiliated with Slimming World beyond being a paying customer/member, I get no personal benefit from writing this post other than the joy of sharing.
[LJ readers reading this on the LJ RSS feed: Please click on the link at the top of the entry to go directly to my blog to leave a comment, as comments left on the LJ RSS do not get seen by me. Facebook users reading this from my Networked Blogs link can either comment on facebook or on my blog. If you are reading this through an e-mail subscription, you might need to go directly to my blog to view videos and images.]
For full Copyright and Disclaimer, please read http://www.blog.beccajanestclair.com/copyright/
[Recipe] Pumpkin Pie Tarts [Slimming World Friendly]
 My Slimming World group had a taster evening right before Halloween and I decided to bring an American-style treat. I knew I wanted to make something with pumpkin, since it’s the season for pumpkin everything in the US, and so I came up with these tarts based on my mince pie tarts from Christmas. Because pumpkin is a vegetable, it’s free no matter what you do to it so you only need to syn the pastry, in this case two of these little tarts come in at 1.5 Syns. The filling and pastry are egg-free, and I’m sure you could substitute in gluten free flour (but please recalculate your syns!) to make a gluten free treat.
[DISCLAIMER: I do not work for Slimming World, I am not affiliated with Slimming World beyond being a paying customer/member, I get no personal benefit from writing this post other than the joy of sharing.]
This will make 38 tarts. If you follow this recipe exactly, your Syn value is .75 per tart, or two tarts for 1.5 Syns.
[Please note: Syn values are based on my exact ingredients using the online calculator. Your Syn value may vary based on your ingredients and the size of your baking containers and portions, so use this number as a guide only. Syn values also frequently change, but these values are correct at the time of publication.]
You will need:
For the pastry:
225g wholemeal flour (I used Alinson’s)
100g Flora light (blue container)
pinch of salt
water
(if you prefer a sweeter base, add some sugar substitute)
For the filling:
400-500g pureed pumpkin (you also can use tinned pumpkin)
1/4C sugar substitute (I used Truvia)
1/8 tsp nutmeg
1/8 tsp ginger
1/4 tsp cinnamon
1/4 tsp mixed spice
tart pans
biscuit cutter
fry light
1. Combine flour and salt and rub Flora until crumbs are formed.
2. Add a little water until dough sticks together and form into a ball.
3. Refrigerate pastry for 30 minutes.
4. While the pastry chills, combine all filling ingredients and set aside and pre-heat the oven to 180C.
5. Roll out your pastry as thinly as possible and use the middle-sided biscuit cutter to cut out 38 rounds.
6. Spray a tart pan and gently press the rounds of pastry into the cups, shaping it up the sides. Fill with approximately 1TBS pumpkin filling. (I eyeballed it)
7. Bake for 20 minutes or until tart bases are firm and slightly browning. Filling will not be solid.
8. Turn out onto a cooling rack for about 10 minutes before serving.
Enjoy!
I can’t wait to make these for Ex-pat Thanksgiving!
***
The contents of this post, including images are © Rebecca J Lockley and Tim Lockley unless otherwise stated and should not be reproduced without permission. If you are not reading this on http://blog.beccajanestclair.com, my facebook page, Networked Blogs, the RSS feed(s), or through an e-mail subscription, please notify me.
[LJ readers reading this on the LJ RSS feed: Please click on the link at the top of the entry to go directly to my blog to leave a comment, as comments left on the LJ RSS do not get seen by me. Facebook users reading this from my Networked Blogs link can either comment on facebook or on my blog. If you are reading this through an e-mail subscription, you might need to go directly to my blog to view videos and images.]
For full Copyright and Disclaimer, please read http://www.blog.beccajanestclair.com/copyright/
Recipe: Squash Stoup [Slimming World Friendly]

[DISCLAIMER: I do not work for Slimming World, I am not affiliated with Slimming World beyond being a paying customer/member, I get no personal benefit from writing this post other than the joy of sharing.]
Last week I was on the Slimming World website, when I spotted a recipe for Squash, Potato, and Bacon stew. It looked like a great idea, but I wasn’t a fan of several of the ingredients. So, like I tend to — I changed up the recipe to fit my own likes/needs and what I had in the kitchen. It turned out more like a cross between a stew and a soup – a stoup, really. It was really good, but I think next time I might chop up the squash a little bit smaller so it’s easier to eat with a spoon. This recipe is Syn free on the Extra Easy (Orange) plan. You could omit the bacon to make it free on Green. If you follow Red, you will need to work out your Syn values.
[Please note: Syn values are based on my exact ingredients using the online calculator. Your Syn value may vary based on your ingredients and the size of your baking containers and portions, so use this number as a guide only. Syn values also frequently change, but these values are correct at the time of publication.]
This recipe will take about an hour and half from prep to finish, though steps one and two can be prepared ahead of time and the squash and potato stored in the fridge for up to a day.
You Will Need:
2 small squash, or 1 butternut squash. I took advantage of the season (and the fact that I love squash!) and picked up two random looking squashes – one orange (looked like a mini pumpkin) and one with yellow stripes. Both were about the size of a softball.
1 sweet potato (mine was huge, so I actually only used half)
1 pack of bacon medallions (There are either 8 or 10 in the pack, depending on the brand or just use regular bacon with the fat trimmed off. My husband wondered if we could use chicken or pork instead next time and I don’t see why not)
1 pint of vegetable broth (made with bouillon, could probably use chicken if that’s all you have)
1 tin chopped tomatoes
200g frozen peas
6 Tablespoons tomato passata
2 Tablespoons dried parsley
1 Tablespoon each of Sage and Thyme
Fry Light
1 – Pre-heat the oven to 180C.
2 – First, you will need to roast your squash and potato. Cut your squash in half lengthways and scoop out all the seeds, then lay cut side up on a baking tray sprayed with frylight. Cut the sweet potato in half lengthways and add it to the tray cut side up. Spray the tops with Fry Light and roast for 45 minutes. If your squash was large, it might take longer. Poke your squash with a fork and if it feels tender, it’s done. Take it out of the oven and let it cool slightly. (optional: peel the skin off while it’s still hot if you don’t want or like the skin. I left mine on). Once you are able to handle the squash and potato, cut them into chunks (size is up to you).
3 – Chop up the bacon and spray the bottom of a deep stove-top safe casserole dish with fry light (I used my Le Cruset dutch oven for this, but a large saucepan will do). Add the bacon to the pan and lightly fry. You don’t need the bacon to go crispy (unless you like it that way!).
4 – Once the bacon is cooked, add the tinned tomato, vegetable broth, passata, and herbs and bring to a boil. Add in your chopped squash and sweet potato and simmer for about 20 minutes.
5 – Add the frozen peas and cook until the peas are done (about 10 minutes).
I might try this in my crock pot sometime. If I do that, I won’t pre-roast the squash or potato, but I will still pre-fry the bacon.
Enjoy!
***
The contents of this post, including images are © Rebecca J Lockley and Tim Lockley unless otherwise stated and should not be reproduced without permission. If you are not reading this on http://blog.beccajanestclair.com, my facebook page, Networked Blogs, the RSS feed(s), or through an e-mail subscription, please notify me.
[LJ readers reading this on the LJ RSS feed: Please click on the link at the top of the entry to go directly to my blog to leave a comment, as comments left on the LJ RSS do not get seen by me. Facebook users reading this from my Networked Blogs link can either comment on facebook or on my blog. If you are reading this through an e-mail subscription, you might need to go directly to my blog to view videos and images.]
For full Copyright and Disclaimer, please read http://www.blog.beccajanestclair.com/copyright/
[Recipe] Tuna Casserole [Slimming World Friendly]

Firstly, please excuse any typos I don’t catch. I’m on our wireless keyboard, and it has problems with the letters h, j, and k.
[DISCLAIMER: I do not work for Slimming World, I am not affiliated with Slimming World beyond being a paying customer/member, I get no personal benefit from writing this post other than the joy of sharing.]
For reasons unknown, today I really wanted my mom’s Tuna Noodle Casserole. It was a staple of growing up and probably my second favourite tuna based casserole (the first one is Captain’s Casserole, a recipe I’m sure I’ll Slimming World-ize at some point). So I asked my mom to send it to me and I took a look at it. Butter, flour, and milk were going to shoot the Syn value pretty high, but then I remembered a recipe for a white sauce in the little book of sauces, so out it came for research purposes.
Now, I didn’t ave any noodles, so I used whole grain pasta. You can use noodles or pasta, whatever you happen to have on hand. We also never measure out the noodles, just cooked a few handfuls!
[Please note: Syn values are based on my exact ingredients using the online calculator. Your Syn value may vary based on your ingredients and the size of your baking containers and portions, so use this number as a guide only.]
You Will Need:
Noodles (or pasta)
2 tins of tuna fish in brine/water
125ml skim milk
100g fat free fromage frais (US friends: I recently discovered you can substitute greek yogurt as fromage frais is hard to find!)
1 tsp cornflour
1/4 tsp mustard powder (I used Coleman’s)
1 slice of whole grain bread from a 400g loaf
100g peas (optional)
salt & pepper
1. cook pasta according to directions on package and pre-heat the oven to 175C.
2. While the pasta is cooking, make your sauce by gently heating the milk and cornflour, removing it from the heat just before it starts to boil, and whisking in the fromage frais, mustard powder, salt, and pepper. Add both tins of drained tuna to the sauce mixture.
3. Spray a casserole dish with frylight and begin layering your casserole with a layer of pasta, some peas, then the tuna mixture. Repeat layers, making sure the tuna is the final layer.
4. You have two options with your bread. You can either cut it into cubes and put the cubes on top, or blitz it in a blender to top with breadcrumbs.
5. Give the layer of bread a squirt of frylight and bake for 25-30 minutes until thoroughly heated and the breadcrumbs/cubes are golden.
Total Syns in this recipe: 6 Syns for the whole thing. It makes plenty for 2 or 3, and probably enough for 4 if you have lots of sides with it.
This version wasn’t as saucy as what my mom would make, but you could always make more sauce (but remember to recalculate your Syns if you add extra milk or cornflour).
***
The contents of this post, including images are © Rebecca J Lockley and Tim Lockley unless otherwise stated and should not be reproduced without permission. If you are not reading this on http://blog.beccajanestclair.com, my facebook page, Networked Blogs, the RSS feed(s), or through an e-mail subscription, please notify me.
[LJ readers reading this on the LJ RSS feed: Please click on the link at the top of the entry to go directly to my blog to leave a comment, as comments left on the LJ RSS do not get seen by me. Facebook users reading this from my Networked Blogs link can either comment on facebook or on my blog. If you are reading this through an e-mail subscription, you might need to go directly to my blog to view videos and images.]
For full Copyright and Disclaimer, please read http://www.blog.beccajanestclair.com/copyright/
[Recipe] Black & Blue Pasta [Slimming World Friendly]
 [DISCLAIMER: I do not work for Slimming World, I am not affiliated with Slimming World beyond being a paying customer/member, I get no personal benefit from writing this post other than the joy of sharing.]
A few years ago, Tim and I were planning on celebrating our birthdays (they’re only three days apart) at our favourite Italian American restaurant here in the UK. Due to Tim’s work schedule, we went out for Lunch instead of Dinner, and got the chance to order off the Lunch menu. Tim ordered something called “black and blue pasta”. He loved it and has been disappointed that it’s not a Dinner option at the restaurant. I kept saying I would try to re-create it at home, but I’m really picky about my blue cheeses and I worried it wouldn’t melt very well and it would be swimming in fat. A few weeks ago, we were talking at my local Slimming World group (Consultant Rebecca Stones!) about melting Laughing Cow wedges. Now, I had melted the regular ones to make a poor woman’s mac n cheese, but hadn’t tried it with the flavoured ones, so an experiment was conducted, and Tim tells me it tastes just as good (better!) than what we could get at Frankie and Benny’s!
I’m posting this recipe because two of my friends saw my Instagram picture on Facebook and couldn’t believe this was “diet food”!!
Black and Blue pasta (serves one)
Syn Values: FREE if counting the cheese as your HEA, otherwise one serving is 6 Syns (each triangle is 1.5 Syns)
[Please note: Syn values are based on my exact ingredients using the online calculator. Your Syn value may vary based on your ingredients and the size of your baking containers and portions, so use this number as a guide only. Syn values also frequently change, but these values are correct at the time of publication.]
You Will Need:
1 Chicken breast, cut up into bite sized pieces
1 TBS Cajun or Jerk spice (optional. Add more for extra spice!)
4 Laughing Cow Light Cheese Triangles with Blue Cheese
1 TBS Fat Free Fromage Frais
Pasta (As much as you want)
Frylight
1. Pre-heat a griddle pan (or frying pan) over high heat, sprayed with Frylight. While the pan is pre-heating, start cooking your pasta according to the package directions in a separate pot (I always pre-boil the water in the kettle to give it a head start to cut down on cooking time).
2. Toss the chicken with the spices and add to the griddle pan. Cook on high for about 5 minutes, then turn over and cook for an additional 5. continue to turn the bites of chicken until they are cooked through and browned (starting to char a little!).
3. Drain the pasta and add it back to the pot. Add the 4 blue cheese triangles and the fromage frais and mix over low heat and keep stirring until the cheese is melted and smooth.
4. Serve with a salad or vegetables of your choosing (I made a dressing with Fromage Frais and herbs).
This is so good, I want to make it again tonight…..
***
The contents of this post, including images are © Rebecca J Lockley and Tim Lockley unless otherwise stated and should not be reproduced without permission. If you are not reading this on http://blog.beccajanestclair.com, my facebook page, Networked Blogs, the RSS feed(s), or through an e-mail subscription, please notify me.
[LJ readers reading this on the LJ RSS feed: Please click on the link at the top of the entry to go directly to my blog to leave a comment, as comments left on the LJ RSS do not get seen by me. Facebook users reading this from my Networked Blogs link can either comment on facebook or on my blog. If you are reading this through an e-mail subscription, you might need to go directly to my blog to view videos and images.]
For full Copyright and Disclaimer, please read http://www.blog.beccajanestclair.com/copyright/
[Recipe] Chocolate Flapjack
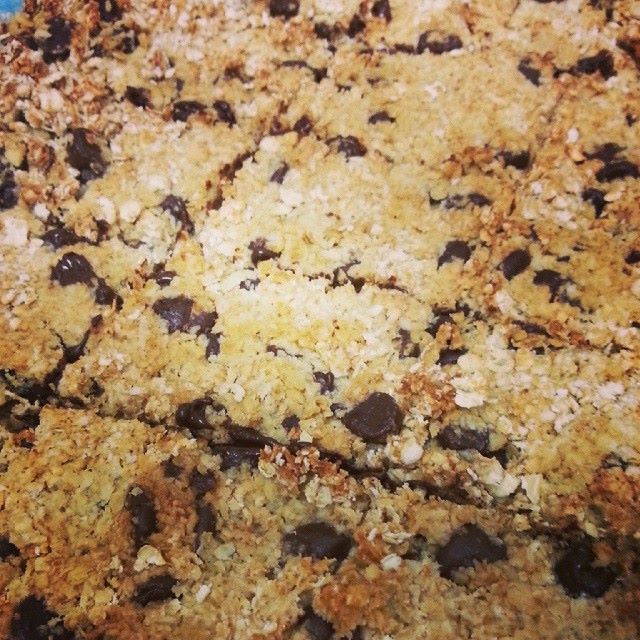 When I first moved to the UK and I would hear the word “flapjack”, I would automatically think of a pancake and I kept being confused as to why bakeries, tea shops, and coffee shops would offer a pancake with your cuppa. Well, I finally found out that a flapjack in the UK is a sweet oaty bar….kind of like a granola bar, but not quite so wholesome. The primary ingredients are oats, butter, and sugar. I did enjoy the few times I tried flapjack, but I had never tackled baking my own, until today.
And since I’m on Slimming World, I of course had to create my own version of a flapjack that come in at 4.5 Syns per square (if it’s divided into 18).
[Please note: Syn values are based on my exact ingredients using the online calculator. Your Syn value may vary based on your ingredients and the size of your baking containers and portions, so use this number as a guide only.]
You Will Need:
225g Quaker Rolled Oats
100g Flora Lightest (purple container)
40g Splenda
4 tsp The Groovy Food Company agave
100g Dr Öatker plain chocolate chips
Pre-heat your oven to 180C. I mixed these up in the same tray I baked them in, which was a small glass roasting tray. All you need to do is smoosh all the ingredients together in your dish (the girl who hates getting her hands dirty sprayed her hands with Frylight and squished it together by hand!) and bake for 25 minutes! You can score them before they go in to make it easier to cut apart, or cut them once they are cool. I made two horizontal cuts (to make three long strips of flapjack) and then cut each strip into 6 squares.
Not only is this Slimming World friendly, but it’s also safer for diabetics!
***
[DISCLAIMER: I do not work for Slimming World, I am not affiliated with Slimming World beyond being a paying customer/member, I get no personal benefit from writing this post other than the joy of sharing.]
The contents of this post, including images are © Rebecca J Lockley and Tim Lockley unless otherwise stated and should not be reproduced without permission. If you are not reading this on http://blog.beccajanestclair.com, my facebook page, Networked Blogs, the RSS feed(s), or through an e-mail subscription, please notify me.
[Recipe] Slimming World Friendly Chilli
 I made this for dinner tonight and put this photo on Facebook. My friend Jess asked for the recipe, so I thought I would share it here too.
This makes a mild, sweet vegetarian* chilli and it’s FREE.
[Please note: Syn values are based on my exact ingredients using the online calculator. Your Syn value may vary based on your ingredients and the size of your baking containers and portions, so use this number as a guide only.]
You Will Need:
300g Quorn Mince
500g/ml (one carton) Passata
1 tin chopped tomatoes
1 tin kidney beans
dash of Worcester sauce
1 tsp chilli powder
2 tsp cinnamon
pinch of red pepper flakes
pinch of Splenda or other sweetener
To serve:
fat free Fromage Frais or fat free Greek yoghurt
grated reduced fat cheddar cheese**
Simply combine all ingredients in a heavy pot with a lid (I used my Le Creuset) and heat on high until it boils, then put the lid on and simmer it for 30-45 minutes. OR, you could put all the ingredients in a crock pot and cook on low. The longer this cooks, the better the flavours get.
Then just dish it up and add a sprinkle of cheese and a dollop of fromage frais or Greek yoghurt. Yum.
~~*~~
*You could use Turkey mince or lean beef mince instead of Quorn, just remember it has to have less than 5% fat to be considered free.
**If you do not use the cheese as your HEA, you will need to look up the Syn value for your cheese.
The contents of this post, including images are © Rebecca J Lockley and Tim Lockley unless otherwise stated and should not be reproduced without permission. If you are not reading this on http://blog.beccajanestclair.com, my facebook page, Networked Blogs, the RSS feed(s), or through an e-mail subscription, please notify me.
[LJ readers reading this on the LJ RSS feed: Please click on the link at the top of the entry to go directly to my blog to leave a comment, as comments left on the LJ RSS do not get seen by me. Facebook users reading this from my Networked Blogs link can either comment on facebook or on my blog. If you are reading this through an e-mail subscription, you might need to go directly to my blog to view videos and images.]
For full Copyright and Disclaimer, please read http://www.blog.beccajanestclair.com/copyright/
[Recipe] Slimming World Syn Free Barbecue
 Barbecue sauce is a fantastic condiment/sauce that you don’t really think much of when you use it. You just grab a bottle and squirt, or grab a bottle and dump the whole thing in your crock pot with some meat. But bottled barbecue sauce is full of sugar and it can be a detriment to your weight loss. Fortunately, someone has come up with a Syn Free version of barbecue sauce! Below you will find the recipe for the barbecue sauce as well as a few recipe ideas for using it.
[Please note: Syn values are based on my exact ingredients using the online calculator. Your Syn value may vary based on your ingredients and the size of your baking containers and portions, so use this number as a guide only.]
You will need:
500g Passata (one carton)
4 TBS Balsamic Vinegar
1 TBS Worcestershire Sauce
1/2 tsp powdered mustard (Colmans)
3 TBS Splenda
1+ tsp mild chili powder
pinch of red pepper flakes (optional)
All you need to do is combine the ingredients in a pan over a medium heat and cook until it thickens. You can use as much mild chili powder as you want until you get it as hot as you prefer, and you can even add some dried flakes or use hot powder. If you’re balking at the price of Balsamic Vinegar, I found a large bottle for 99p at Lidl.
When it’s cooked, it’s ready to be stored it in the fridge for about a week.
Alternately, if you are going to use in in a recipe, you can put all the ingredients into a bottle and give it a shake.
Total Syns = 0
It goes fantastic with my family’s Kitchen Barbecue recipe, modified for Slimming World!
You will need:
500g lean turkey mince (or Quorn mince)
2 packs Quorn hot dogs, sliced into small rounds*
2 bags Uncle Ben’s boil in bag rice
200g frozen peas (or mixed veg)
1 Knorr Stock pot or stock cube (either chicken or vegetarian)
250ml hot water
one batch of Slimming World barbecue sauce
1. Cook Uncle Ben’s rice for half the time listed on the package (I think it says boil for 10 minutes, so only boil for 5)
2. Spray a wok or large frying pan with fry light and brown turkey mince.
3. Mix stock pot/cube with 250ml hot water and add to the mince along with the half-cooked rice.
4. Stir in the frozen peas or mixed vegetables. Cover, and let cook 5-10 minutes.
5. Stir in the barbecue sauce
6. Add the hot dog pieces, cover, and cook for 10 minutes or until hot dogs are warmed through, the vegetables are cooked, and sauce is bubbling.
Total Syns = 0
Or, you could use the barbecue sauce to make a SW friendly Hunter’s Chicken with chicken breasts, bacon medalions (with the fat cut off), and your HEA cheese option (or Syn the cheese).
Another idea might be to toss the sauce into a crock pot with a piece of pork for shredded pork.
The possibilities are endless as you can use this sauce exactly like you would barbecue sauce from a bottle!
~~*~~
*If you’re not following Slimming World, you can use regular deli hot dogs (not the tinned ones) or you can Syn the hot dogs.
The contents of this post, including images are © Rebecca J Lockley and Tim Lockley unless otherwise stated and should not be reproduced without permission. If you are not reading this on http://blog.beccajanestclair.com, my facebook page, Networked Blogs, the RSS feed(s), or through an e-mail subscription, please notify me.
[LJ readers reading this on the LJ RSS feed: Please click on the link at the top of the entry to go directly to my blog to leave a comment, as comments left on the LJ RSS do not get seen by me. Facebook users reading this from my Networked Blogs link can either comment on facebook or on my blog. If you are reading this through an e-mail subscription, you might need to go directly to my blog to view videos and images.]
For full Copyright and Disclaimer, please read http://www.blog.beccajanestclair.com/copyright/
[Recipe] Slimming World Friendly Weetabix Muffins

 I sometimes struggle to eat my Healthy Extra A and B each day, particularly the B choice, as I got myself out of eating carbs the year I followed a low-carb diet. Fortunately, I found this recipe for Weetabix Muffins on facebook that makes eating my Healthy B easy and spreads it out through the day (or makes a night evening snack). Since I also needed my Healthy A, I frosted the muffins with cream cheese.
[Please note: Syn values are based on my exact ingredients using the online calculator. Your Syn value may vary based on your ingredients and the size of your baking containers and portions, so use this number as a guide only.]
You will need:
for the muffins:
-2 crushed Weetabix biscuits
-2 eggs, beaten
-1/2 of a container of any flavour müllerlight yogurt (I used 3 desertspoonfuls of the Cranberry & Raspberry flavour)
-2 tsp Splenda
-1tsp vanilla essence
Silicone muffin cases
for the “frosting”:
-70g Philadelphia Lightest
-1-2 tsp Splenda
-1/2 tsp vanilla essence
1) Pre-heat the oven to 180C
2) combine Weetabix, eggs, yogurt, Splenda, and vanilla and spoon into muffin cases. you should fill the cups to nearly the top. I made 5 using my heart-shaped cups from Lakeland, but I think it would have made only 4 in regular sized ones. If you don’t have silicone cases, you could use paper liners in a cupcake pan.
3) bake 20-25 minutes, until the edges pull away slightly and they are springy.
4) If making “frosting”, combine cream cheese, vanilla, and 1 tsp Splenda. Give it a quick taste test and if it’s not sweet enough for you, add some more Splenda.
5) Spread on top of slightly cooled muffins for your HEA and HEB in one go!
Since I used a pink coloured yogurt, mine had a slight pink tinge to them and a vague taste of berry. They were slightly on the sweet side, so I might use less Splenda the next time and also try them with just vanilla yogurt.
If you have already had your A and B for the day, you would need to calculate the Syns. Philadelphia Lightest is 1.5 Syns per 25g on all plans, and Weetabix are 6.5 Syns on all plans. I would round up the cream cheese in the frosting to 75g, making the icing 4.5 Syns and the muffins 6.5, or 11 Syns total for all the muffins with frosting. Obviously, you could then divide this into your per muffin Syn value. If you made this into 5 muffins, they would be just over 2 Syns each.
~~*~~
The contents of this post, including images are © Rebecca J Lockley and Tim Lockley unless otherwise stated and should not be reproduced without permission. If you are not reading this on http://blog.beccajanestclair.com, my facebook page, Networked Blogs, the RSS feed(s), or through an e-mail subscription, please notify me.
[LJ readers reading this on the LJ RSS feed: Please click on the link at the top of the entry to go directly to my blog to leave a comment, as comments left on the LJ RSS do not get seen by me. Facebook users reading this from my Networked Blogs link can either comment on facebook or on my blog. If you are reading this through an e-mail subscription, you might need to go directly to my blog to view videos and images.]
For full Copyright and Disclaimer, please read http://www.blog.beccajanestclair.com/copyright/
[Recipe] Slimming World Individual Crustless Quiche – NO SYNS
 My mom and I had a Christmas tradition that we would always make a breakfast casserole in the crock pot since the oven usually had the turkey in it at breakfast time (my family always ate around 1PM). Tim and I don’t have our Christmas dinner until later in the day, so that leaves my oven free. Last year, I made a crustless quiche that was lovely and low-carb….but also full of fat. And it made tons. So this year, I decided to make individual quiches and to make sure I got in my Healthy Extra A for the day, I added 40G of low-fat cheese.
[Please note: Syn values are based on my exact ingredients using the online calculator. Your Syn value may vary based on your ingredients and the size of your baking containers and portions, so use this number as a guide only.]
This recipe is PER PERSON. If you are making this for more than 3 people, my suggestion would be to just make it in a regular full-size quiche dish.
You will need (PER PERSON)
3 Eggs
4 TBS fat free Fromage Frais
A handful of fresh spinach
2 bacon medallions (or rashers of bacon with all the fat trimmed off), grilled and chopped (optional. or use grilled and chopped Quorn sausages*! Or both!)
3-4 button mushrooms, quartered
5 cherry tomatoes, quartered (or half of a regular tomato diced)
40g reduced fat Cheddar cheese**
Pepper
individual pie/quiche/flan dishes (I got ours at IKEA for £2 each. Or you could use individual casserole dishes)
Fry light
1 – Pre-heat the oven to 180C.
2 – Spray the bottom and sides of your dish with Fry Light. Beat the eggs and Fromage Frais and a sprinkle of pepper. Stir in half the cheese.
3 – Scatter the spinach leaves on the bottom of the dish and sprinkle on the mushrooms, tomatoes, and bacon.
4 – Pour on the egg mixture and top with remaining cheese.
5 – Repeat steps 2-4 for each person.
6 – Bake on a baking tray (in case of spillage) for 20-30 minutes, or until eggs have risen and are cooked through. If you are making this in a full-sized dish, it might take up to 45 minutes.
This is quite tasty on its own, or with some wholegrain toast (as your Healthy Extra B!). A teaspoon of Reduced Sugar and Salt Heinz Ketchup will only add 1/2 Syn and gives it a little extra kick.
The beauty of this recipe is that you also can add whatever vegetables you want. Some chopped up green, red, yellow, or orange pepper would add some flavour, too. Or try experimenting and eliminate the Cheddar Cheese and use fat free cottage cheese instead of the fromage frais! Or add some diced potato and turn it into a Frittata!
~~*~~
*Quorn sausages are 1 Syn each. If you use any other brand, you will need to calculate the syns.
**Assuming you use the cheese as your Healthy Extra A. If you are not, you will need to calculate the syn value of your cheese. You can use any other cheese at the Healthy Extra A amount in this if you don’t have Cheddar.
The contents of this post, including images are © Rebecca J Lockley and Tim Lockley unless otherwise stated and should not be reproduced without permission. If you are not reading this on http://blog.beccajanestclair.com, my facebook page, Networked Blogs, the RSS feed(s), or through an e-mail subscription, please notify me.
[LJ readers reading this on the LJ RSS feed: Please click on the link at the top of the entry to go directly to my blog to leave a comment, as comments left on the LJ RSS do not get seen by me. Facebook users reading this from my Networked Blogs link can either comment on facebook or on my blog. If you are reading this through an e-mail subscription, you might need to go directly to my blog to view videos and images.]
For full Copyright and Disclaimer, please read http://www.blog.beccajanestclair.com/copyright/