Archive for the 'Recipes, Cooking, & Food' Category
Why I Left Slimming World
I used to post a lot about my Slimming World journey. As some of you know, I did manage to lose a bit of weight through Slimming World, then gained some of it back and struggled quite a bit. Then, the pandemic hit and I felt that there wasn’t really much support out there and I decided not to return after the pandemic, and especially after they upped their prices! I know Slimming World struggled during the pandemic and they tried creating virtual meetings via Zoom and giving us half-price meetings if we already had purchased a countdown before they had to shut down groups, but I just didn’t feel as though there was support. We obviously were expected to weigh ourselves at home, too, and I don’t even own a scale because I would honestly step on it multiple times per day to check my weight if I did. And it’s very hard to receive personal attention over a Zoom call. There was nothing personal about it. I don’t even recall our consultant contacting us if we stopped attending the Zoom calls. I certainly felt as though the £45 I paid the week before we had to stop meetings was completely wasted!
But let’s get back to my struggling. When I first joined SW, my goal was to get my weight down to a weight that a doctor told me I needed to get down to for a procedure. I got down to the weight I was told, and they basically told me I hadn’t that I actually needed to lose more and get down to an amount that I wasn’t comfortable weighing. But I returned to Slimming World anyway and I struggled whenever we would get told to “remember why you walked through that door.” or “remember your goal”, because I no longer actually had a tangible goal.
I also struggled with “do you know why you gained weight?”/”Do you know why you didn’t lose anything this week?” because I felt like it was shaming people for the choices they made throughout the week. If it was my birthday, anniversary, or heck, just a bad day and I wanted to have a piece of cake…I was going to have the piece of cake.
We got told to “eat in moderation”, yet foods like pasta, rice, and potatoes were “unlimited”…talk about a carb overload! Speaking of carbs, I actually did lose 30lbs before I joined Slimming World by cutting out carbs entirely. Even now, I don’t eat pasta as often as I used to, and rarely rice, but I do like potatoes and bread. Other “unlimited”, sorry, “free” foods included yogurt brand Mueller Light and people were not discouraged from eating an entire 6 pack of yogurts in one day. Pickled onions were also considered “free”. I’m allergic to onion so I never ate them, but you would see people posting pictures of the weirdest plates with their little onion garnish.
Packet of lunchmeat? Fine. Eggs? Fine. Apples? Fine. Banana? Fine. But don’t you dare put that banana in a blender or press the juice out of the apple. Now it’s synned. A tin of chickpeas was fine, but if you roasted chick peas, you guessed it…synned.
Now I’m not saying that the plans don’t work. I’m sure they do for some people, and I know people who have had great success on the plans. In fact, I have an entire category on my blog dedicated to my experiences on Slimming World and recipe sharing. The problem is, you pretty much have to be on the plan for life. The “maintain” part of the plan involves you weighing in every week and if you fall above or below something like 3lbs off your original goal, you either get put back on the plans, or told to eat more.
And the plans just don’t work if you have other dietary restrictions. For example, people who require Gluten Free foods will struggle on the plans. As a diabetic, I struggled because a lot of the “free” foods still had quite a bit of sugar in them, including the yogurts. I’m allergic to onions (and garlic), so that made some of the recipes hard to follow as a lot of them rely on adding a ridiculous amount of either. I’m also allergic to maple syrup, so can’t use that as a sugar alternative. If you can’t drink cow milk, you can’t use almond milk as your dairy option. In fact, I don’t even know what someone would do if they were both gluten and lactose intolerant as one of the big daily requirements is a Healthy A (dairy) and a Healthy B (Bread/Wheat).
The plans also struggle to cope with any amount of exercise or training above just going on a walk. In fact, they claim you don’t need to do any exercise at all and you will still lose weight. I recently started running, and I know that if I was still at SW I would get reprimanded for a “gain”, when actually, I’ve lost inches on my waist and hips and the fat on my calves has all been converted back into muscle.
I also know some people who developed eating disorders because of Slimming World and the idea of “binging” on pasta or potatoes. or the idea that meeting night is also “cheat night” so you could stuff your face after the meeting and it wouldn’t matter because you’d get right back on the plan on the following morning. We were encouraged instead of using our 15 “syns” per day, that it was ok to save them up for one big meal during the week instead. My own view of food is pretty skewed and I barely make pasta anymore because I feel like I used to make too much pasta but I ate it anyway because it was “free”.
But no, I shouldn’t completely poo poo on Slimming World. I have made several really good friends through the group who I still talk to regularly. I gained confidence in cooking and creating recipes. And yes, I did lose some weight, even if I’ve put some of it back on.
But I won’t be returning to Slimming World, or Weight Watchers, or any of the other “weight loss plans” that claim they aren’t diets while being diets.
***
DISCLAIMER: I do not work for Slimming World, I am not affiliated with Slimming World beyond being a paying customer/member, I get no personal benefit from writing this post other than the joy of sharing.
The contents of this post, including images are © Rebecca J Lockley and Tim Lockley unless otherwise stated and should not be reproduced without permission.
I have not received compensation from any companies mentioned in my post.
For full Copyright and Disclaimer, please read http://www.blog.beccajanestclair.com/copyright/
Facebook: https://www.facebook.com/blog.beccajanestclair
Twitter: https://twitter.com/annaonthemoon
Instagram: https://www.instagram.com/annaonthemoon79
Blog: http://blog.beccajanestclair.com
YouTube: https://www.youtube.com/channel/beccajanestclair

[Recipe] Quick and Simple Egg Fried Rice
 The lockdown has me reaching for easy and quick recipes since I haven’t been able to get a delivery slot in over 2 months and my husband’s been doing the shopping. I like to find recipes that don’t have a lot of specialist ingredients or that can use plenty of substitutes to make the shopping easier and this egg fried rice has so many possible ways to make it!
You will need:
bite sized meat or meat substitute of your choice, enough for 2. (I’ve used chicken, quorn chicken, and pork in the past)
1 packet of Bachelor’s Golden Vegetable Super Rice or generic version (or other flavour)
1 bag of mixed vegetables
3 eggs
soy sauce
Directions:
1. Stir-fry meat with soy sauce.
2. Check rice packet for instructions and add required amount of water and rice packet to the frying pan with chicken and bring to a boil.
3. Steam vegetables (unless you want a crunchy stir-fry, then skip this step)
4. Add steamed vegetables to the pan.
5. Whisk the eggs with a little soy sauce and once the rice has absorbed all the water, add the egg mixture and constantly stir until eggs are cooked.
6. Divide between two plates, use more soy sauce as needed.
If you are following Slimming World, the only syns are the syns in the packet of rice, which depending on brand range from 1/2 to 1.5 Syns per serving.
###
Facebook: https://www.facebook.com/blog.beccajanestclair
Twitter: https://twitter.com/annaonthemoon
Instagram: https://www.instagram.com/beccajanestclair
Blog: http://blog.beccajanestclair.com
YouTube: https://www.youtube.com/beccajanestclair
DISCLAIMER: I do not work for Slimming World, I am not affiliated with Slimming World beyond being a paying customer/member, I get no personal benefit from writing this post other than the joy of sharing.
Please note: Syn values are based on my exact ingredients using the online calculator. Your Syn value may vary based on your ingredients and the size of your baking containers and portions, so use this number as a guide only. Syn values also frequently change, but these values are correct at the time of publication.
The contents of this post, including personal images are © Rebecca J Lockley and Tim Lockley unless otherwise stated and should not be reproduced without permission.
For full Copyright and Disclaimer, please read http://www.blog.beccajanestclair.com/copyright/
Gluten Free Christmas Pudding
 This year, I was presented with an interesting challenge for our Christmas celebration. My friend, Jen, is gluten free. After some quick consulting with her and reading through both of my previous pudding recipes and a few more online, I came up with a Gluten Free Pudding that honestly tasted no different from a pudding full of gluten.
Please note: This recipe contains dairy and eggs.
You will need:
550-600g dried mixed fruit (I used a whole bag of mixed fruit, a small bag of dried cranberries, and chopped up dried apricots)
250ml alcohol (I used the last of my brandy and topped it up with gin, rum, and krauterlikor)*
75g butter
85g dark muscovado sugar (aka brown sugar)
100g Gluten Free Flour (I used Freee by Dove Farms)
3 eggs
2 1/2 tsp mixed spice
1 tsp ground nutmeg
1/2 tsp ground cinnamon
110g Gluten Free bread crumbs (I bought seeded buns by Genius and used 2)
85g suet (I used veggie suet)
50 ml orange juice (this is in lieu of the peel ad juice of an orange that many recipes call for. I’m lazy.)
150ml Gluten Free IPA (Easy to locate in the GF section of Tesco)*
2 x 2 Pint Pudding basins
1. Soak the fruit in the alcohol. Overnight is best.
2. Cream together the butter, sugar, and eggs. Add the GF flour, spices, and breadcrumbs.
3. Using a spoon (I have one dedicated to GF cooking!), stir in the suet and soaked fruit adding in any leftover alcohol from soaking the fruit. Add in the orange juice and Gluten Free IPA.
4. Cover and sit overnight.
5. In the morning, check the mixture. If it looks dry, add more beer, booze, or juice.
6. Prepare the basins by cutting rounds of parchment paper for the bottoms and tops and butter the sides.
7. Spoon in the mixture and steam the puddings as usual. I use my crock pot and steam for 8-12 hours. I had enough mixture for 2 large puddings and one small tester pudding, which I cooked in the microwave for 2 minutes to test the flavour.
8. Serve flaming (if you’d like) with brandy sauce or cream.
*You can make this alcohol free. Soak the fruit in fruit juice and use strong tea instead of the IPA.
And it was a hit with both Gluten Free and non-Gluten Free folks!
***
The contents of this post, including images are © Rebecca J Lockley and Tim Lockley unless otherwise stated and should not be reproduced without permission.
I have not received compensation from any companies mentioned in my post.
For full Copyright and Disclaimer, please read http://www.blog.beccajanestclair.com/copyright/
Facebook: https://www.facebook.com/blog.beccajanestclair
Twitter: https://twitter.com/annaonthemoon
Instagram: https://www.instagram.com/beccajanestclair
Blog: http://blog.beccajanestclair.com
YouTube: https://www.youtube.com/channel/beccajanestclair
[Recipe] Eggs Benedict without the Muffin
 I became inspired by a fellow Slimming World member who used a giant mushroom as a pizza base, so when I spotted big field mushrooms in Asda, I had to get them and this became Sunday Brunch.
Mushroom Benedict (SP)
You Will Need:
2 Large field mushrooms (look for mushrooms the size of muffins)
2 Thick tomato slices
2 Slices smoked salmon
2 eggs
(I added a handful of sliced gherkins because I like them, but they’re optional!)
1. Remove the stem from the mushrooms and put them under the grill for 10-15 minutes until tender.
2. While you’re grilling the mushrooms, put a pot of water on to boil.
3. Grill tomato slices for 5 minutes.
4. While you’re grilling the veggies, bring a pot of water to the boil. Once it reaches the boiling point, carefully crack in two eggs and poach for 3 minutes.
5. Layer each mushroom with a tomato slice and smoked salmon.
6. Top with a poached egg.
If you follow Slimming World, this recipe is FREE and can be used on an SP day!
***
DISCLAIMER: I do not work for Slimming World, I am not affiliated with Slimming World beyond being a paying customer/member, I get no personal benefit from writing this post other than the joy of sharing.
Please note: Syn values are based on my exact ingredients using the online calculator. Your Syn value may vary based on your ingredients and the size of your baking containers and portions, so use this number as a guide only. Syn values also frequently change, but these values are correct at the time of publication.
The contents of this post, including images are © Rebecca J Lockley and Tim Lockley unless otherwise stated and should not be reproduced without permission.
For full Copyright and Disclaimer, please read http://www.blog.beccajanestclair.com/copyright/
Facebook: https://www.facebook.com/blog.beccajanestclair
Twitter: https://twitter.com/annaonthemoon
Instagram: https://www.instagram.com/beccajanestclair
Blog: http://blog.beccajanestclair.com
YouTube: https://www.youtube.com/channel/beccajanestclair
The Best Cheesesteaks This Side of Philly

About a week ago I started hearing about a new Philadelphia Cheesesteak restaurant opening up in London. I was skeptical, as previous attempts were not very good, until I read that the owner hails from the same area of New Jersey I do. I was sure this would mean decent and authentic cheesesteaks, and I was not disappointed.

After the debacle at the railway show, Tim and I headed into London specifically to make a pilgrimage to Passyunk Avenue.

Passyunk Avenue can be found on small street in Fitzrovia (80 Cleveland Street), which is super easy to get to from the Warren Street tube stop. The restaurant is small, but I was told they do have a lower floor with additional seating for when it gets busy.

The atmosphere was amazing. All of the staff (that I spoke to) are from Philly or New Jersey, and ironically, all the patrons I spoke to were as well! It was almost like we were back in Center City Philadelphia. And speaking with the patrons who had eaten before us, the food was getting rave reviews for authenticity.

We were given seats in the back corner. My only complaint was the chairs were a bit low for the table, and I wound up sitting on the bench at the back next to Tim, which always makes me feel kinda awkward! But the food….

Sandwich prices were around £10-11. Really not bad. Sides started around £4. Tim and I spent £30 between two cheesesteaks, an order of Old Bay cheese fries, a beer, and a diet coke. Which frankly, we probably would have spent £50 or more going to a different restaurant in London, so I found the prices pretty good. Even a trip to Five Guys or Ed’s Easy Diner (my other two favourite American style places) would have cost us well into the £30-40 mark.
We both ordered Chicken Cheesesteaks. Well, I actually wanted to order Chicken Cheesesteak Hoagies, but I think I confused our server when I said no onions (as in raw) and she assumed I meant not cooked (I’m allergic). It didn’t really matter so we ate what was put in front of us and they were tasty. The bread was softer than you would expect if you were in Philly (or NJ), but decent for the United Kingdom. The homemade wiz is what really makes the sandwich though. Many restaurants that try to serve a Philly Cheesesteak either use sliced cheese or they get confused and use Philadelphia cream cheese (ew!). So while it wasn’t bright orange like traditional Chez Wiz…it was really good!

I absolutely recommend visiting if you’re an ex-pat from PA/NJ missing the tastes of home, or even if you’re curious as to what an authentic Philly cheesesteak tastes like. I know I have a new favourite place to eat in Philly, that’s for sure!

The only thing missing was an ice cold Yuengling!
***
The contents of this post, including images are © Rebecca J Lockley and Tim Lockley unless otherwise stated and should not be reproduced without permission.
For full Copyright and Disclaimer, please read http://www.blog.beccajanestclair.com/copyright/
Facebook: https://www.facebook.com/blog.beccajanestclair
Twitter: https://twitter.com/annaonthemoon
Instagram: https://www.instagram.com/beccajanestclair
Blog: http://blog.beccajanestclair.com
YouTube: https://www.youtube.com/channel/beccajanestclair
Support me on Patreon: https://www.patreon.com/annaonthemoon
[Recipe] Slimming World Style Japanese Ramen (Wagamama Fakeaway)
 A few days ago, a member of my slimming world group posted a picture of a delicious looking Japanese Ramen style soup her husband had made. Based on her photo, and a recipe I found on BBC Good Food, I came up with this. It reminds me of the kinds of meals you can get at Wagamama.
Japanese Ramen, Serves 2. SYNS: 0
You Will Need:
2 blocks of Ramen noodles (medium chinese noodles)
2L water
2 chicken stock cubes
6 sprigs purple broccoli
1 carrot, diced
200g baby corn, sliced into rounds
1 spring onion stalk, sliced
2 boneless chicken breasts
2TBS Chinese 5 spice
1TBS soy sauce
2 handfuls spinach
2 eggs, hardboiled and sliced in half
1. Slice chicken breasts into strips and coat with the Chinese five spice. Spray a pan with fry light, and fry strips until golden, or use a griddle pan. Set aside.
2. Add the water, stock cubes, soy sauce, purple broccoli, baby corn, spring onion, and carrot to a pot and bring to a boil. Allow vegetables to cook through.
3. Add Ramen and cook according to package.
4. Place one handful of uncooked spinach in the bottom of each bowl and slowly ladle the broth and vegetables on top. Use tongs to extract 3 broccoli sprigs per bowl. Evenly divide the noodles and chicken between the bowls and garnish with egg.
***
DISCLAIMER: I do not work for Slimming World, I am not affiliated with Slimming World beyond being a paying customer/member, I get no personal benefit from writing this post other than the joy of sharing.
Please note: Syn values are based on my exact ingredients using the online calculator. Your Syn value may vary based on your ingredients and the size of your baking containers and portions, so use this number as a guide only. Syn values also frequently change, but these values are correct at the time of publication.
The contents of this post, including images are © Rebecca J Lockley and Tim Lockley unless otherwise stated and should not be reproduced without permission.
For full Copyright and Disclaimer, please read http://www.blog.beccajanestclair.com/copyright/
Facebook: https://www.facebook.com/blog.beccajanestclair
Twitter: https://twitter.com/annaonthemoon
Instagram: https://www.instagram.com/beccajanestclair
Blog: http://blog.beccajanestclair.com
YouTube: https://www.youtube.com/channel/beccajanestclair
[Travel] Grocery Shopping
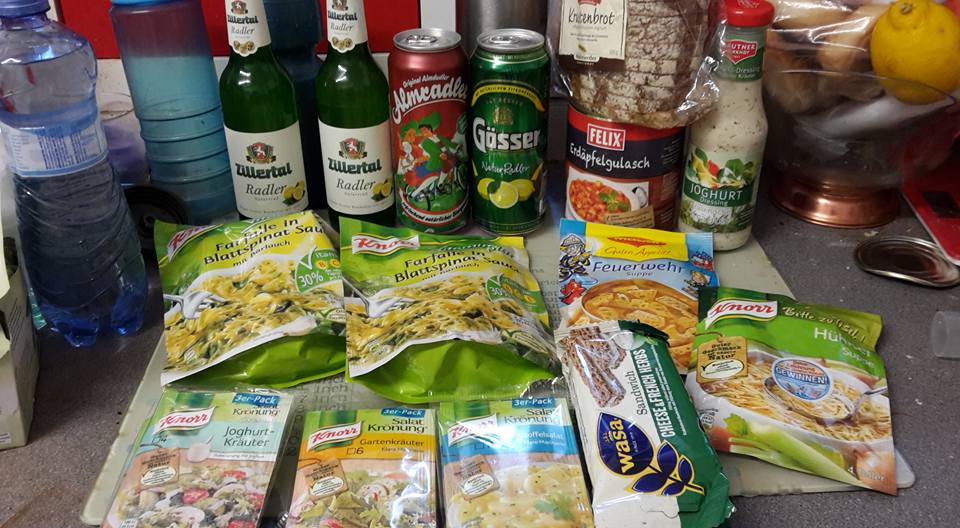
A selection of food and drink souvenirs from Austria.
One of the things I love to do when we travel is to hit up the local grocery store even if we’re not self-catering. On our recent day trip to Rotterdam, I went into a grocery store and purchased a bunch of foods to try, but my pic of everything turned out too blurry to use for anything (sorry!)
Going to a local grocery store first of all can cut down on food costs while travelling. Even if you’re not self-catered, you can pick up snacks for your visit or in your room – a box of cereal bars that will last for 5 days is going to be cheaper than buying them in singles from the corner shop. Same with a bag of apples. Buying beer or other alcohol to drink in your room can cut down on your bar bills tremendously, and if your room has a kettle, you can stock up on tea, cups of soup, etc. And if you packed a spork and a set of nesting plastic boxes, you can even pack up your own lunches to take with you when you’re on the go.
Second, you get a better feel for the language if you’re in a foreign country and don’t have knowledge of the native language. Everything in a grocery store is labelled and sometimes there are even pictures of the item. For example, with a pile of lemons in Germany, you will see the word “Zitrone”. Now you know when you go out to a restaurant and see the word “Zitrone” on a menu the dish contains lemon.

I bought zitrone wafer cookies in Austria, and other flavours.
Third, it can help to get a flavour for local food. Check out the bakery section to see what breads and pastries the locals buy. Head to the deli section and see what meat (if you’re a meat eater) is popular. Look at the local beer options if you’re a drinker. And check out the chocolate aisle! Don’t forget buying chocolate at the grocery store will be a lot cheaper than buying it at a convenience store.
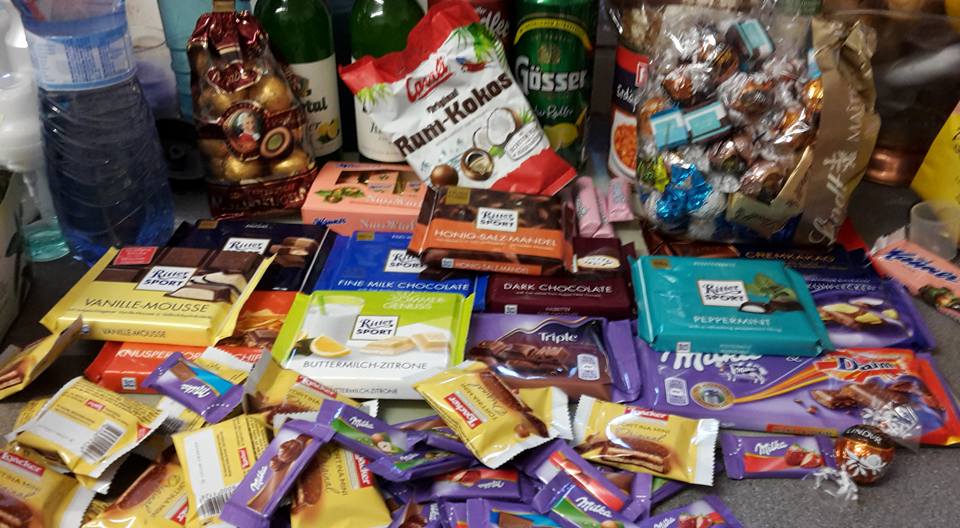
Our chocolate haul from Austria
Fourth, as you can see from my photos, bringing back food as souvenirs is fun! Feeling glum in the middle of Winter knowing your next holiday is months away? Break into some chocolate or make a bowl of soup. Giving food to friends and family is great too – everyone loves cookies and chocolate! Need a gift for a beer drinker? How about a few bottles of a local brew (space permitting, of course!)?
Fifth, if you’re really feeling homesick, or are travelling with children who might need a dose of “home”, you can always head to the grocery store and look to see if they stock a similar product or if they have an import aisle. Imported items will be expensive, but sometimes, you just need it. As an American now living in the UK, I can vouch for sometimes just needing a dose of “home” and yes, I have paid £2 for a single can of Root Beer.
And lastly, shopping in a grocery store can be fun! Check out this short video I made while Tim and I were shopping in a Billa store in Gmünd and at a MPREIS in Werfen.
Follow along on our Austria trip: http://www.blog.beccajanestclair.com/2016/08/travel-austrian-road-trip-summer-2016/
Watch the rest of the videos here: https://www.youtube.com/playlist?list=PLDUaor7uXZQfPu6Un77YGHRkLMlPgKFp-
***
Disclaimer: I received no compensation from products pictured in my photos or video, nor did I receive compensation from the shops visited.
The contents of this post, including images are © Rebecca J Lockley and Tim Lockley unless otherwise stated and should not be reproduced without permission. If you are not reading this on http://blog.beccajanestclair.com, my facebook page, Networked Blogs, the RSS feed(s), or through an e-mail subscription, please notify me.
[LJ readers reading this on the LJ RSS feed: Please click on the link at the top of the entry to go directly to my blog to leave a comment, as comments left on the LJ RSS do not get seen by me. Facebook users reading this from my Networked Blogs link can either comment on facebook or on my blog. If you are reading this through an e-mail subscription, you might need to go directly to my blog to view videos and images.]
For full Copyright and Disclaimer, please read http://www.blog.beccajanestclair.com/copyright/
[Recipe] IKEA Swedish Meatballs Fakeaway
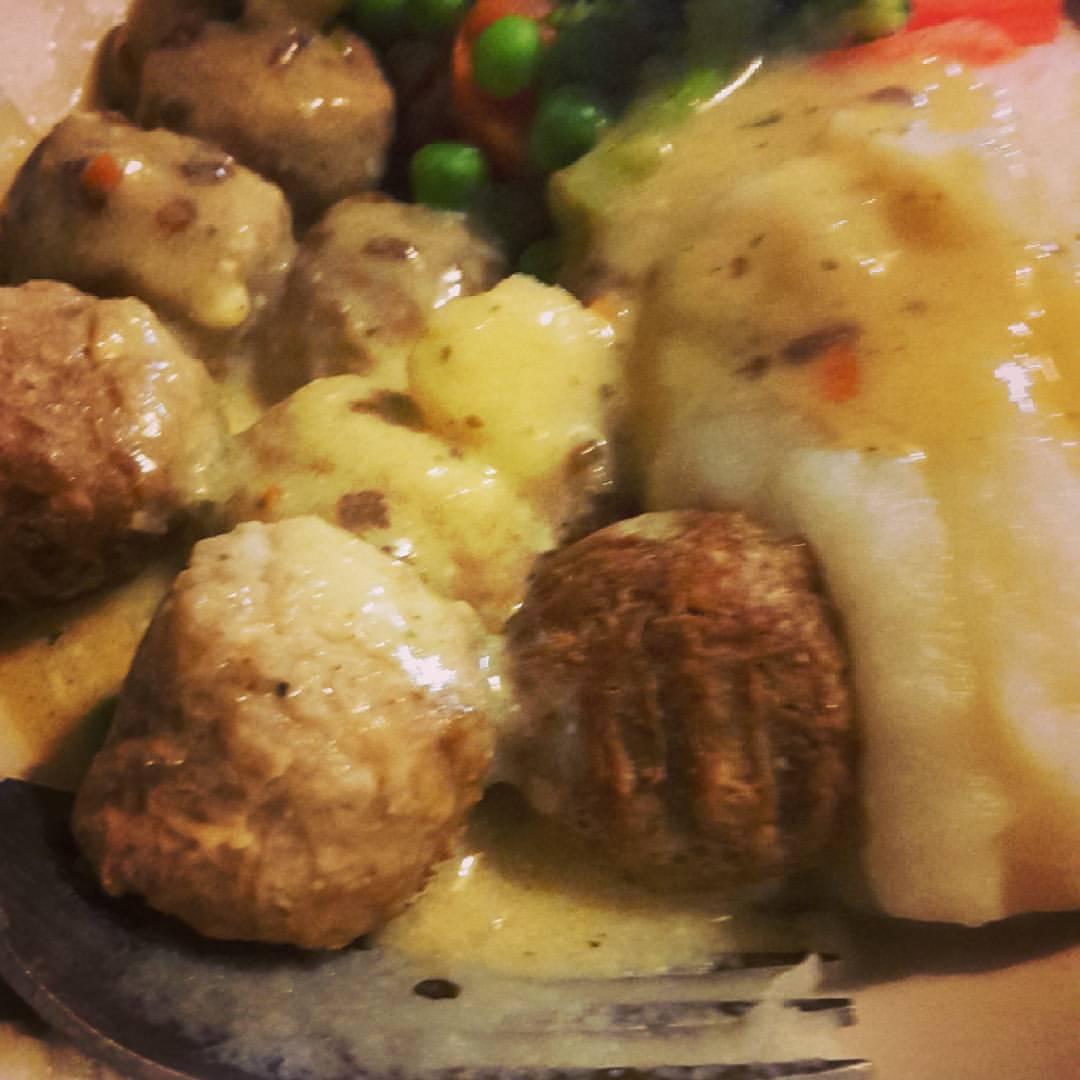 Ah, so who doesn’t use a trip to IKEA as an excuse to eat Swedish Meatballs? Just us, then?
We love the Swedish meatballs, and we love that now you can even buy frozen meatballs and sauce packets to take home with you. I always buy 2 bags of frozen meatballs and at least a half dozen packets of sauce mix to keep us going between visits….but eventually, we run out. And as we haven’t had time or a need to go to IKEA in about a year, I needed to get creative. I found this recipe on a facebook group page for Slimming World, so this recipe also is Slimming World friendly. The sauce itself is free, and the meatballs can also be syn free depending on what you use.
You will need:
Your favourite meatballs or meatball recipe
4 vegetable stock cubes or pots (I used 1 pot and 3 cubes)
Enough water for half the stock cubes (this varies from type of cube. The ones I used needed 500ml of water per cube, so I used 1L water)
3-4 TBS fromage frais
I know, I know, the recipe sounds a little vague. But really, hear me out.
1. Cook meatballs as directed on their packaging or per your recipe. This time around I used Quorn Swedish style meatballs, but you can use the Slimming World meatballs (FREE) or any other type of meatball. Even make your own from mince if you prefer.
2. Add stock cubes and water to a sauce pan and bring to a boil until the cubes are dissolved. Continue to boil the stock for an additional 10 minutes.
3. Remove concentrated stock from heat and allow to cool for a few minutes before stirring in 3-4 TBS of Fromage Frais. This should make your sauce creamy and a little thick. If it’s not thick enough, add more Fromage Frais.
I served ours with Smash and some frozen mixed vegetables. While it’s not exactly the same as what you will get at IKEA, it’s still pretty tasty as a mock Swedish meatball sauce. I’m sure any Swedish friends reading this are shaking their heads in horror now….
***
Please note: While I used to work for IKEA (in 1998 and then again in 2006), I do not currently work for IKEA and they have not compensated me for writing this blog post. Nor have any of the brands mentioned in this post.
DISCLAIMER: I do not work for Slimming World, I am not affiliated with Slimming World beyond being a paying customer/member, I get no personal benefit from writing this post other than the joy of sharing.
Please note: Syn values are based on my exact ingredients using the online calculator. Your Syn value may vary based on your ingredients and the size of your baking containers and portions, so use this number as a guide only. Syn values also frequently change, but these values are correct at the time of publication.
The contents of this post, including images are © Rebecca J Lockley and Tim Lockley unless otherwise stated and should not be reproduced without permission. If you are not reading this on http://blog.beccajanestclair.com, my facebook page, Networked Blogs, the RSS feed(s), or through an e-mail subscription, please notify me.
[LJ readers reading this on the LJ RSS feed: Please click on the link at the top of the entry to go directly to my blog to leave a comment, as comments left on the LJ RSS do not get seen by me. Facebook users reading this from my Networked Blogs link can either comment on facebook or on my blog. If you are reading this through an e-mail subscription, you might need to go directly to my blog to view videos and images.]
For full Copyright and Disclaimer, please read http://www.blog.beccajanestclair.com/copyright/
[Recipe] 2.5 Syn General Tso’s Chicken
 Ah, the great American Chinese staple. Full disclaimer – I can’t actually remember what General Tso’s Chicken is supposed to taste like, as it’s been almost 9 years since I had any, but I do remember the first time Tim and I ordered Chinese food here in the UK and I wanted to know where the General Tso’s chicken was on the menu! Chinese food in the UK and the US is very different. A friend of mine explained that a lot of British Chinese food recipes are from Hong Kong, whereas American Chinese food is…well, American. (kind of like how Italian food in the US is different from Italian food from Italy). So I swapped my General Tso for Sweet & Sour Chicken Cantonese style, but I always wanted to know how to make my own General Tso’s Chicken. And naturally, since I follow Slimming World, I also wanted to find something that was low in syns, especially since your average takeaway can be 10+ syns.
I originally found this recipe on a Beach Body blog, but modified it for Slimming world.
You will need:
450g diced chicken breast
2 TBS cornflour/cornstarch
1/2 tsp salt
small piece of fresh ginger, about the size of your thumbnail finely chopped
2 spring onion sprigs, chopped
150ml chicken or vegetable stock
2 TBS passata (or for a thicker sauce, use tomato puree)
1 TBS Hoisin Sauce
1 tsp Agave syrup (or use sweetener)
1. Preheat the oven to 180C.
2. Coat the chicken in the cornflour and place on a lined baking tray and bake 15-20 minutes*
3. while the chicken is cooking, combine together all other ingredients and bring to a boil, then simmer 10 minutes.
4. When the chicken is cooked, toss it with the sauce.
I served ours with broccoli, peas, and egg-fried cous cous. Divided into 2 portions, this comes out at 2.5 syns per person.
*for crispier but still low syns you could fry them in fry light!
***
DISCLAIMER: I do not work for Slimming World, I am not affiliated with Slimming World beyond being a paying customer/member, I get no personal benefit from writing this post other than the joy of sharing.
Please note: Syn values are based on my exact ingredients using the online calculator. Your Syn value may vary based on your ingredients and the size of your baking containers and portions, so use this number as a guide only. Syn values also frequently change, but these values are correct at the time of publication.
The contents of this post, including images are © Rebecca J Lockley and Tim Lockley unless otherwise stated and should not be reproduced without permission. If you are not reading this on http://blog.beccajanestclair.com, my facebook page, Networked Blogs, the RSS feed(s), or through an e-mail subscription, please notify me.
[LJ readers reading this on the LJ RSS feed: Please click on the link at the top of the entry to go directly to my blog to leave a comment, as comments left on the LJ RSS do not get seen by me. Facebook users reading this from my Networked Blogs link can either comment on facebook or on my blog. If you are reading this through an e-mail subscription, you might need to go directly to my blog to view videos and images.]
For full Copyright and Disclaimer, please read http://www.blog.beccajanestclair.com/copyright/
[Recipe] Cauliflower Cheese & Bacon
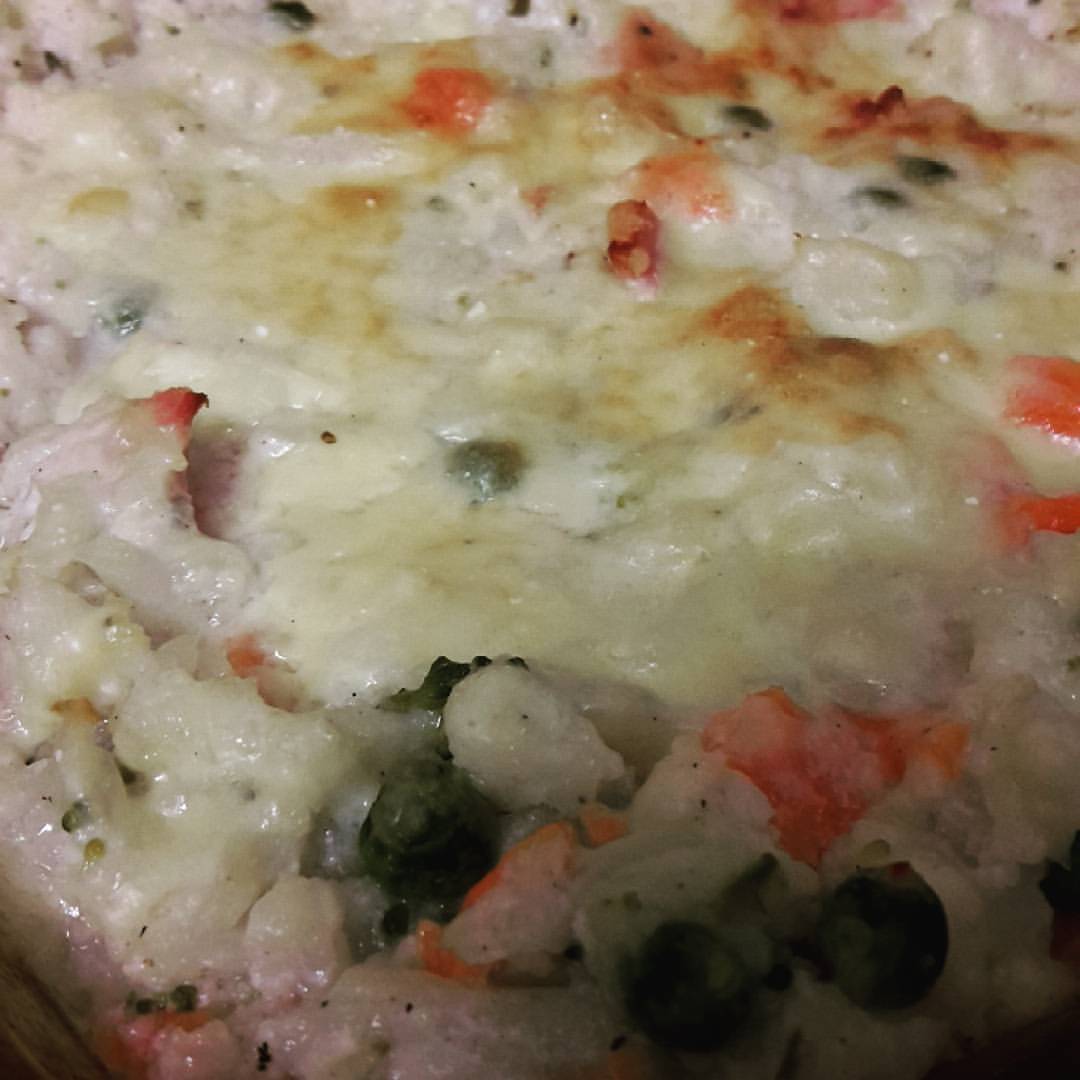 Do you ever watch those recipe videos on Facebook and get really hungry? Me too. Last night, one of my friends linked to a video for Loaded Cauliflower Casserole and it got me hungry and wanting to create this dish to be Slimming World friendly. So I went out shopping today and picked up a Cauliflower and we had this for Tea tonight.
You Will Need:
1 Head of Cauliflower (chopped into florets)
300g frozen mixed vegetables
200g bacon medallions
250g Quark
3 heaped spoonfuls Fromage Frais
1 TBS dried or fresh chives (or use spring onion if you have them. I forgot to buy some but had chives)
1/4 tsp pepper
1/4 tsp mustard powder
45g reduced fat cheddar cheese
1. Boil or steam the cauliflower florets until tender and cook the frozen vegetables. Drain both.
2. Grill bacon. Chop bacon into bite sizes bits.
3. Combine quark, fromage frais, chives, pepper, and mustard.
4. Stir quark mixture into vegetables, add chopped bacon.
5. Spread into a casserole dish and top with 45g cheddar cheese
6. Bake at 200C 25 minutes or until bubbly and cheese is golden.
Syns per recipe: 6 (for the cheese).
This recipe is easy to adapt for vegetarians, just omit the bacon or use veggie bacon. If you are following a Low Carb High Fat diet, use full fat cream cheese and sour cream instead.
***
DISCLAIMER: I do not work for Slimming World, I am not affiliated with Slimming World beyond being a paying customer/member, I get no personal benefit from writing this post other than the joy of sharing.
Please note: Syn values are based on my exact ingredients using the online calculator. Your Syn value may vary based on your ingredients and the size of your baking containers and portions, so use this number as a guide only. Syn values also frequently change, but these values are correct at the time of publication.
The contents of this post, including images are © Rebecca J Lockley and Tim Lockley unless otherwise stated and should not be reproduced without permission. If you are not reading this on http://blog.beccajanestclair.com, my facebook page, Networked Blogs, the RSS feed(s), or through an e-mail subscription, please notify me.
[LJ readers reading this on the LJ RSS feed: Please click on the link at the top of the entry to go directly to my blog to leave a comment, as comments left on the LJ RSS do not get seen by me. Facebook users reading this from my Networked Blogs link can either comment on facebook or on my blog. If you are reading this through an e-mail subscription, you might need to go directly to my blog to view videos and images.]
For full Copyright and Disclaimer, please read http://www.blog.beccajanestclair.com/copyright/
[Recipe] Easy Carbonara Slimming World Style
 Breaking up the Austria posts to bring you a recipe, because I am trying to be back on the SW train. I actually managed to lose 3 pounds over the three weeks I was away, but then since being back I actually gained a half stone. Grrrr. But I’ve got my SW planning journal and a new countdown and I’m trying to be ON IT. FOCUS! I’ve regained so much weight after my great success and it really upsets me a lot. Anyway….
Tim asked me a while ago to come up with a carbonara, and it took me age, but I finally have come up with one that’s really tasty!
This recipe serves 2 (so double it for 4) and it is FREE on Slimming World (Extra Easy)
You will need:
6 bacon medallions, diced
3 spring onion sprigs, chopped
150g frozen sliced mushrooms
4-5 balls of frozen spinach
200g diced lean ham (or deli ham)
200g dried pasta
300g Quark
1 TBS Fromage Frais (could be omitted)
Salt
Pepper
1. Cook the pasta according to the directions on the package and add the frozen spinach the last 5 minutes.
2. Spray a wok or large frying pan with fry light and fry the bacon, spring onions, and frozen mushroom for about 10 minutes
3. Add the ham and while the ham is heating up, drain the pasta and spinach and rinse in hot water.
4. Tip the pasta and spinach into the wok and stir in the quark and the fromage frais. Season with the salt & pepper
5. Divide between two plates and serve with a large salad.
We both loved this, but it did make a lot for even the two of us and I couldn’t eat all of it. I wouldn’t freeze this because I’m not sure how quark would freeze. If you wanted, you could use your HEA and use cream cheese instead of quark or even use some laughing cow wedges.
***
DISCLAIMER: I do not work for Slimming World, I am not affiliated with Slimming World beyond being a paying customer/member, I get no personal benefit from writing this post other than the joy of sharing.
Please note: Syn values are based on my exact ingredients using the online calculator. Your Syn value may vary based on your ingredients and the size of your baking containers and portions, so use this number as a guide only. Syn values also frequently change, but these values are correct at the time of publication.
Many of the Amazon UK links are affiliate links, so if you click on them and buy something, I do get a tiny percent.
This post has not been endorsed by Amazon or any of the products and websites mentioned in this post and I have not received compensation for writing this post or making any videos.
The contents of this post, including personal images are © Rebecca J Lockley and Tim Lockley unless otherwise stated and should not be reproduced without permission. If you are not reading this on http://blog.beccajanestclair.com, my facebook page, Networked Blogs, the RSS feed(s), or through an e-mail subscription, please notify me.
[LJ readers reading this on the LJ RSS feed: Please click on the link at the top of the entry to go directly to my blog to leave a comment, as comments left on the LJ RSS do not get seen by me. Facebook users reading this from my Networked Blogs link can either comment on facebook or on my blog. If you are reading this through an e-mail subscription, you might need to go directly to my blog to view videos and images.]
For full Copyright and Disclaimer, please read http://www.blog.beccajanestclair.com/copyright/
Turkey Hill Orange Iced Tea Copy Cat for PA ExPats
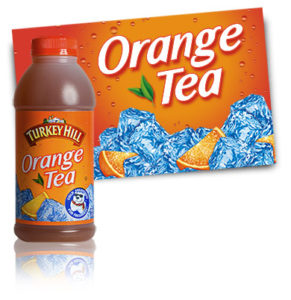 I am from Lancaster County, Pennsylvania. Well, sort of. In that Lancaster Co was the last place I lived before I moved to the UK. I actually grew up in NJ, and now my mom lives in York, PA (where she grew up), so I don’t really go back to visit Lancaster except to hit up tourist places with Tim, but one thing Tim and I both love about visiting is getting to have Turkey Hill Orange Iced Tea. Turkey Hill started out over 85 years ago as a side business for a local farmer to sell his excess milk. Soon, it turned into a business of his own and his children added ice cream to the business, and then iced tea, lemonade, and other fruit-based soft drinks. Turkey Hill used to only be available in Eastern PA, and it was always a favourite. Soon it spread out and now I think Turkey Hill (at least their ice cream) is available in many of the larger markets in the USA. However, they have no plans to expand internationally (I’ve asked!) and no plans on creating a powdered form of their tea or creating concentrated drops (again, I asked!).
When my husband (at the time, only my boyfriend) came to visit me in Lancaster County in 2009, I introduced him to drinking iced tea. He thought it was a bit odd, but he soon found it refreshing on a hot day, especially when I then introduced him to the flavoured teas of Turkey Hill! The last time I visited the US without Tim, I brought him home a small bottle, and when we were last in the US in May 2015, Tim asked me if I thought I could re-create the flavour. AFter all, I had made a pretty good stab at re-creating favourite restaurant meals, so why not give flavoured tea a go? I told him I would try after we got home, and then I forgot and it soon became too cold in the UK to want iced tea.
Enter the current heatwave. ABout a week beofre we went away on holiday, I decided to do an experiment. There isn’t room in our fridge for a proper pitcher (excuse me, jug) of tea, but I wanted to have cold tea and not left out on the counter room temperature tea. Spying the squash bottle, I got the idea to make a “tea concentrate” and then add a bit of it to a glass to top up with tap water. It worked, and then my brain kind of went into overdrive and I managed to create the exact same flavour of Turkey Hill Orange Tea.
You Will Need:
10 regular tea bags (I used Tetley)
10 sweetener tablets (optional. You also could probably use sugar or skip the sweetener)
500ml boiling water (kettle)
500ml cold water
100ml Orange squash (I used Robinsons not double concentrate)
A heat proof measuring jug at least able to hold 500ml
A 700ml (approximately. ours might be 750) water bottle
1. Place 10 tea bags into your heatproof jug and fill to the 500ml line with boiling water from the kettle. Add in your sweetener tablets and let the tea steep for about 10 minutes.
2. Remove tea bags after 10 minutes and allow the tea to cool before putting it into the fridge (I transferred it into a 500ml bottle from Lakeland).
3. Leave the tea concentrate to cool in the fridge for several hours.
4. using your 700ml water bottle, add 100ml of tea concentrate, 100ml of Orange squash, and top up with water, giving it a shake or stir.
5. Enjoy the sweet taste of Lancaster County.
And if you follow Slimming World, this drink has 0 syns!
***
DISCLAIMER: I do not work for Slimming World, I am not affiliated with Slimming World beyond being a paying customer/member, I get no personal benefit from writing this post other than the joy of sharing.
Please note: Syn values are based on my exact ingredients using the online calculator. Your Syn value may vary based on your ingredients and the size of your baking containers and portions, so use this number as a guide only. Syn values also frequently change, but these values are correct at the time of publication.
Turkey Hill image at the top of this post copyright Turkey Hill.
The contents of this post, including images are © Rebecca J Lockley and Tim Lockley unless otherwise stated and should not be reproduced without permission. If you are not reading this on http://blog.beccajanestclair.com, my facebook page, Networked Blogs, the RSS feed(s), or through an e-mail subscription, please notify me.
[LJ readers reading this on the LJ RSS feed: Please click on the link at the top of the entry to go directly to my blog to leave a comment, as comments left on the LJ RSS do not get seen by me. Facebook users reading this from my Networked Blogs link can either comment on facebook or on my blog. If you are reading this through an e-mail subscription, you might need to go directly to my blog to view videos and images.]
For full Copyright and Disclaimer, please read http://www.blog.beccajanestclair.com/copyright/
[Slimming World] Let’s go Camping!
This post is here because I posted this on my local Slimming World group, and one of the members asked if they could share it elsewhere. Since you can’t share posts made on closed groups, I’m sticking it here. So there aren’t any pics to go with it (yet), but I might edit it tomorrow when I get more time.
Tips for staying on Slimming World while camping!
Tip 1 – If you are going to be without electricity to keep food cold, a day or two before you go cook up a batch of something like pasta sauce and then freeze it in either a plastic container or in a zipper top bag (double bag it!) and use this as a cold pack in your cooler. After it thaws out, you can cook some pasta and heat up the sauce, but it will keep your food cool for a bit longer.
Tip 2 – UHT milk cartons. For Tim and I, we go through 1 500ml carton of semi-skim UHT milk per day of our camping trip, so it’s not left out for very long, but this way you can have milk for coffee, tea, and cereal. You also can freeze them and use them as ice packs in your cooler.
Breakfast:
1 – you can make up your own instant porridge packs in plastic baggies. 2 tsp of dried powdered skim milk is 1 Syn. Measure out 35g of porridge and 2tsp of dried skim milk into your bags and in the mornings pour into a bowl and add boiling water. You can add some frozen berries (use them as an ice pack as they thaw!) for some added S foods.
2 – Make hash browns/fried potatoes. Get a tin of new potatoes (it’s only around 20p!), slice them or cut them into chunks, and fry with some fry light. Super easy, and they go great with some fried eggs, tinned tomatoes, and baked beans.
3 – cold cereal with UHT milk in a pinch.4 – French toast. Dip wholemeal bread into a mixture of UHT milk and an egg and fry with fry light. You can make these sweet or savory by either sprinkling with cinnamon and sweetener and serving with thawing berries, or savory and serve it with fried eggs or scrambled eggs.
Main meals:
Tip 1 – Boil in bag rice is FREE and it’s easier to cook when camping as it won’t be as hard to clean and you can reuse the pot right away
Tip 2 – Find a metal colander that fits inside your large pot when you make pasta so you just have to lift out the colander when the pasta is done and dump the water instead of finding a place to pour the pasta pot into the colander.
Tip 3 – Another option for pasta is cooking it at home ahead of time and putting it into a zipper top bag and immersing the bag in boiling water to heat up the pasta
Meal 1 – Vegetable Soup: This is super easy. All you need is a tin of mixed vegetables, a tin of tomatoes, 2 vegetable stock pots, and a handful of pearl barley (optional, but bulks it up). Pour the tins into a pot, add the stock pots, add the barley, and top up with water. The barley takes about 20 minutes to cook (although the longer you leave it, the softer the barley). A larger family might need 2 tins of each and 4 stock pots. You also could open a bag of boil in bag rice and toss it in instead of pearl barley.
Meal 2 – Poor Man’s Ramen: 1 Egg noodle nest or block per person, soy sauce, an OXO veg cube per person, tinned peas, carrots, and tinned corn. Toss it all in a pot, crumble the OXO cube on top, and bring to a boil. Takes about 10 minutes. You can drain it OR have it soupy and use soy sauce to taste.
Meal 3 – Stir Fry: serve with either boil in bag rice or egg noodles.
Meal 4 – If you premade/froze pasta sauce, pop it in a pot and cook some pasta. If your sauce is in a plastic bag, you could even cook it in the pot with the pasta in the bag, or stir it into the pasta after you drain the pasta to heat it through. . (My recipe for camping is really simple – quorn quorn mince, passata, tinned tomatoes, italian spices, worcester sauce, and cinnamon)
Meal 5 – if you have leftover sauce, dump a tin of kidney beans and some chili powder to make chilli and serve over rice.
Meal 6 – Pasta N Sauce with some added tinned vegetables, or make poor man’s mac n cheese with pasta and tinned veg and while the pasta is still hot, stir in laughing cow wedges. Make it cajun style with some cajun or jamaican jerk seasonings and you could add quorn chicken pieces. We like this especially with the laughing cow blue cheese.
I also like to make up some SW barbecue sauce before we go and I use one of those lock n lock tube shaped containers for it. The balsamic vinegar preserves it (Tim just used some I had in the fridge for 2 months and it was fine). If you are taking a grill or can get one of those disposable grills, you could have a barbecue with quorn burgers, or you could even make the burgers on the camping stove in a frying pan. If I was doing a barbecue, I would cook corn on the cob (it’s probably very American! lol), heat up some beans (baked beans is also a big barbecue thing in the US), and fry some potatoes (or if you have a campfire or charcoal grill – stab potatoes and wrap them in foil, then bury them in the coals)
Another good grill option for camping is veggie skewers with rice.
That’s all I have for now, if I think of more I’ll add it!
***
***
DISCLAIMER: I do not work for Slimming World, I am not affiliated with Slimming World beyond being a paying customer/member, I get no personal benefit from writing this post other than the joy of sharing.
Please note: Syn values are based on my exact ingredients using the online calculator. Your Syn value may vary based on your ingredients and the size of your baking containers and portions, so use this number as a guide only. Syn values also frequently change, but these values are correct at the time of publication.
The contents of this post, including images are © Rebecca J Lockley and Tim Lockley unless otherwise stated and should not be reproduced without permission. If you are not reading this on http://blog.beccajanestclair.com, my facebook page, Networked Blogs, the RSS feed(s), or through an e-mail subscription, please notify me.
[LJ readers reading this on the LJ RSS feed: Please click on the link at the top of the entry to go directly to my blog to leave a comment, as comments left on the LJ RSS do not get seen by me. Facebook users reading this from my Networked Blogs link can either comment on facebook or on my blog. If you are reading this through an e-mail subscription, you might need to go directly to my blog to view videos and images.]
For full Copyright and Disclaimer, please read http://www.blog.beccajanestclair.com/copyright/
How To Monthly and Weekly Meal Plan [Slimming Word]
This past week at Slimming World, our consultant talked about learning visually and it got me thinking about meal planning, so I thought I would do a video showing how I meal plan. It turned into two videos – one for monthly planning, and one for weekly planning.
At the end of the previous month, or within the first week of a month, I sit down with a blank monthly calendar (I print out the ones Philifaxy makes) and some of my cookbooks and I plan out 30 days of meals. This doesn’t mean that the meal I write down for the 15th is going to be made on the 15th, it just means I have 30 meals for the month I can pick through when I make our weekly plans. It takes me about 45-60 minutes to plan the month this way, but then it keeps planning the week down to 30-45 minutes.
I also said I would upload my weekly planning sheet to dropbox, so feel free to download this and use it:
Weekly Slimming World Meal Planning Sheet
***
DISCLAIMER: I do not work for Slimming World, I am not affiliated with Slimming World beyond being a paying customer/member, I get no personal benefit from writing this post other than the joy of sharing.
The contents of this post, including images are © Rebecca J Lockley and Tim Lockley unless otherwise stated and should not be reproduced without permission. If you are not reading this on http://blog.beccajanestclair.com, my facebook page, Networked Blogs, the RSS feed(s), or through an e-mail subscription, please notify me.
[LJ readers reading this on the LJ RSS feed: Please click on the link at the top of the entry to go directly to my blog to leave a comment, as comments left on the LJ RSS do not get seen by me. Facebook users reading this from my Networked Blogs link can either comment on facebook or on my blog. If you are reading this through an e-mail subscription, you might need to go directly to my blog to view videos and images.]
For full Copyright and Disclaimer, please read http://www.blog.beccajanestclair.com/copyright/
[Recipe] Boston Cream Cake
I’m posting this recipe by request of one of my friends who commented on my original Instagram share. I made this cake for my Mother in Law for Mother’s Day, which was yesterday in the UK. I wanted to make her something different from the normal Victoria sponge, and I had the week before done a Chocolate and Peanut Butter cake for my SIL, so I didn’t want to repeat flavours.
A lot of Americans will have heard about the Boston Cream Poke Cake, which is basically a box yellow cake mix, a box of yellow pudding, and a can of chocolate icing. You *could* make your cake this way in the UK as they now sell Betty Crocker mixes and sub custard for the pudding, but there’s something really satisfying about baking from scratch. Although I will say I did use a can of Betty Crocker Chocolate Fudge icing, simply because I hate making icing. But by all means, use your favourite chocolate icing recipe!
You Will Need:
Your favourite standard cake recipe OR a box mix for a yellow/vanilla cake OR use my recipe below –
125g butter (or Stork)
125g sugar (caster is best for baking)
125g self rising flour
1tsp baking powder
2 large eggs (if you’re eggs aren’t particularly big, use 3)
1tsp vanilla
1 standard sized tin of custard OR one packet of instant custard OR about 400g homemade custard (if you’re in the US, use Vanilla Jell-O pudding)
1 tub of Betty Crocker Chocolate Fudge icing OR your favourite chocolate icing recipe
50g chocolate chips
1. Pre-heat your oven to 180C and line 2 round cake tins with parchment paper* or butter and flour the tins, whichever you prefer or have handy.
2. Mix your cake. If you’re using a box mix, follow the instructions on the box. If you’re making one from scratch, start by sifting the flour and baking powder together in a small bowl and cream together the butter and sugar in a larger bowl. Add eggs one at a time, beating after each egg, and add the vanilla. Then slowly mix in the flour.
3. Divide your cake evenly between the cake tins, and bake for 25-30 minutes (or follow the instructions on your box)
4. If you’re not using a tin of custard, now is the time to make it as you will want it to cool completely before you use it.
5. Take the cakes out of the oven and cool them in their tins for 10 minutes, then turned out onto a wire rack. Now, here is where you need to decide what to do – if you want your cakes to be gooey with custard, let them cool completely. If you want the to be moist, continue on.
6. Place your bottom layer on your plate and use the end of a wooden spoon to poke holes about 3/4 of the way through the cake. You don’t want the holes to go the whole way through.
7. Use half of the custard and slowly pour over the holes in the cake. If your cake is still warm, the custard will slowly get absorbed making the cake extra moist and giving it a slight custard flaour, but if you let the cakes cool first, the custard will fill the holes and be gooey and custardy when you eat it.
8. For the icing/chocolate bit: Melt 50g chocolate chips and stir it into your icing. This should thin out the icing a little and make it softer. Unless it’s the dead of winter and your kitchen is cold (like mine!), in which case you might want to microwave the icing for 30 minutes to soften it. Slowly pour enough chocolate icing on the top of the cake to just cover it just to the edge. Don’t worry if the custard and chocolate are combining together, that’s fine.
9. Add the top half, poke holes, and repeat step 7 and 8, using the rest of the icing to completely cover the cake so it drips down the sides. You could neaten this up with a knife if you want to, but I left it to drip down and then scooped up the excess and put it back on top. Again, don’t worry about the custard mixing itself in with the chocolate, the flavour will still be there. Because of the added chocolate chips, the icing will go slightly hard and shiny, like the chocolate topping on a Boston Cream doughnut from Dunkins!
TIP: Want cupcakes instead? I made these as cupcakes for an event and I used a cupcake corer to core the cupcakes, fill them with custard, add the top back on, and then put a spoonful of chocolate icing on top. This works best on cupcakes that don’t quite reach the rim of the paper liner so the chocolate doesn’t run off, so slightly underfill the cups.
My MIL, FIL, and husband all agreed this cake is very tasty!
***
*A neat trick is to trace around the bottom of your pan onto the parchment paper, then cut out just inside your trace lines. It should give you the right size. I also help my parchment paper stick little by giving the tin a squirt of fry light.
The contents of this post, including images are © Rebecca J Lockley and Tim Lockley unless otherwise stated and should not be reproduced without permission. If you are not reading this on http://blog.beccajanestclair.com, my facebook page, Networked Blogs, the RSS feed(s), or through an e-mail subscription, please notify me.
[LJ readers reading this on the LJ RSS feed: Please click on the link at the top of the entry to go directly to my blog to leave a comment, as comments left on the LJ RSS do not get seen by me. Facebook users reading this from my Networked Blogs link can either comment on facebook or on my blog. If you are reading this through an e-mail subscription, you might need to go directly to my blog to view videos and images.]
For full Copyright and Disclaimer, please read http://www.blog.beccajanestclair.com/copyright/
[Recipe] Cheap and Easy Vegetable Soup
 When I was younger and home sick from school, my mom would always make me a bowl of Campbell’s vegetable soup with ABC pasta (I liked vegetable soup better than chicken noodle). When I became a vegetarian, I stopped eating it because it had meat based (beef or chicken) stock in it. And then I moved to the UK and stopped being vegetarian, but Campbell soup wasn’t sold here until recently. Two weeks ago when I was sick I happened to be looking at the tinned vegetables in Tesco and I spotted a tin of mixed veg – carrot, potato, parsnip, and peas. I thought it might be nice as a soup, so I picked some up and I’ve been making this soup every few days since. It’s quick, cheap, easy, and surprisingly tastes just like Campbell’s, so it’s also a nice bit of comfort food for this expat.
Vegetable Soup
Syns: 0
You will need:
1 tin mixed vegetables
1 tin chopped tomatoes
1L vegetable stock or broth (made from scratch, cubes, or stock pots*)
handful of pearl barley, small pasta, or rice (optional)
1. Check the cooking time on the barley, pasta, or rice as this will determine how long the soup will take. Pearl barley takes about 30 minutes, but small pasta only 10-15 minutes.
2. Combine everything in a large pot, bring to a boil, and then simmer per directions on the barley, pasta, or rice (I simmer mine for 30 minutes).
And you’re done. This made plenty for my husband and I to have for lunch over two days. I think the total cost for this is under £1, so it’s quite frugal too!
***
*Double check to make sure your stock is still syn free, or calculate the syns. Oxo cubes are free.
DISCLAIMER: I do not work for Slimming World, I am not affiliated with Slimming World beyond being a paying customer/member, I get no personal benefit from writing this post other than the joy of sharing.
Please note: Syn values are based on my exact ingredients using the online calculator. Your Syn value may vary based on your ingredients and the size of your baking containers and portions, so use this number as a guide only. Syn values also frequently change, but these values are correct at the time of publication.
The contents of this post, including images are © Rebecca J Lockley and Tim Lockley unless otherwise stated and should not be reproduced without permission. If you are not reading this on http://blog.beccajanestclair.com, my facebook page, Networked Blogs, the RSS feed(s), or through an e-mail subscription, please notify me.
[LJ readers reading this on the LJ RSS feed: Please click on the link at the top of the entry to go directly to my blog to leave a comment, as comments left on the LJ RSS do not get seen by me. Facebook users reading this from my Networked Blogs link can either comment on facebook or on my blog. If you are reading this through an e-mail subscription, you might need to go directly to my blog to view videos and images.]
For full Copyright and Disclaimer, please read http://www.blog.beccajanestclair.com/copyright/
[Recipe] Peanut Butter Blondies
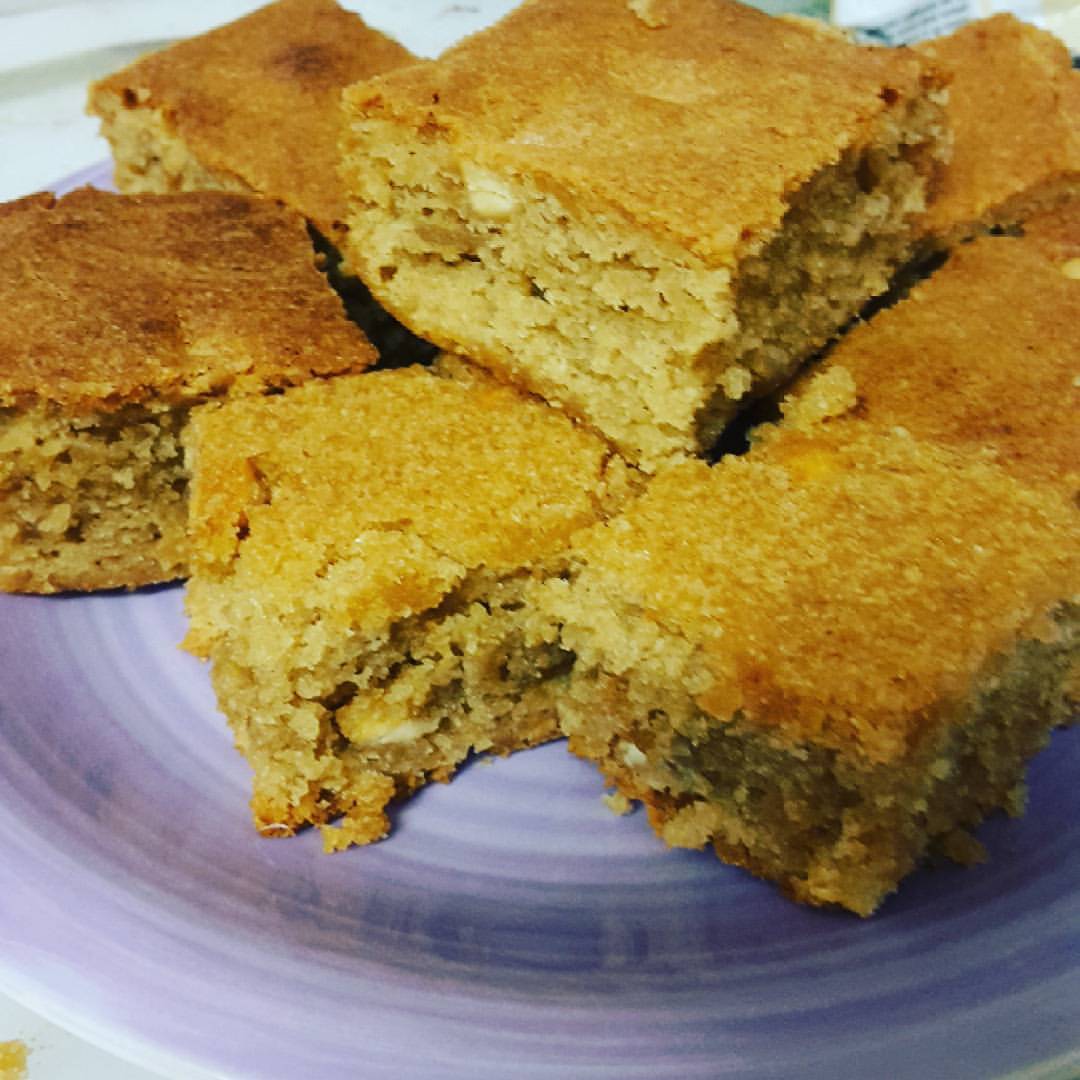 Several months ago, my husband’s aunt hosted all of us for a Sunday dinner and asked everyone else to bring along a sweet. About a month before that, just after our niece was born, I brought over a meal to my Brother and Sister-in-Law and made them some brownies. SIL asked if I would make them again, so I agreed and then I was rooting through my cupboard and found a bag of peanut butter chips I had brought back from the US and I decided to make some blondies too, since Tim’s sister loves peanut butter. Both were a big hit, and when Tim’s aunt decided to host a family dinner again, the request came through from my sisters-in-law (sister-in-laws? How do you plural SIL?) for brownies…..and blondies. The only problem was that I had used the bag of PB chips last time and as it was a grocery item from the USA, I had no way of getting them. So, I went on a hunt for a decent PB blondie recipe. Pinterest yielded a bunch, and then my sister (from another) linked me to a recipe. It only had seven reviews and one review said it was more like a cake, but there also was a side bar link to another PB bar recipe, so on analysing both recipes and then converting down to metric, I came up with this recipe. It’s still a little more cakey than a traditional brownie, and I think I used more white chocolate last time, but these are pretty peanut buttery!
Peanut Butter Blondies
You will need:
275g peanut butter* (I used Jif, you can use any brand. I used smooth, but if you like chunky, use chunky)
100g butter, softened (I used Stork)
175g caster sugar
175g brown sugar
4 eggs
1TBS vanilla essence
200g flour (I used self-rising, plain might have been better and not gone so cakey!)
100g white chocolate chips (optional. Add more if you want!)
1. Pre-heat the oven to 175C and spray a tray bake tray** with fry light or line with baking parchment.
2. Cream together peanut butter, butter, and both sugars.
3. Add vanilla and add eggs one at a time.
4. slowly mix in flour.
5. stir in white chocolate chips
6. Spread evenly in the baking tray and bake 30-40 minutes or until top is golden brown and it pulls slightly from the edge
7. Allow to cool in the pan for 10 minutes before turning out onto a cooling rack.
Makes 32.
I did not calculate syns for this treat, but I do know that peanut butter has a lot of syns in it. Something like 4 or 4.5 per Tablespoon (15g!), so at a bare minimum you would be looking at at least 6 syns per piece (if divided into 32) at a rough estimate using flora light instead of stork, and that’s without the white chocolate chips too. So…..yeah. This has lots of syns in it. If I was planning on keeping it at home, I would work out the syns more accurately, but since I’m taking this to a party, I’m not concerned in knowing.
***
*I would love to try this out with almond butter or other non-peanut butter butters for people with peanut allergies. I bet it would taste really good!
**I bought a pack of 10 tray bake trays at ASDA for £1 or £2 that I’ve been using every time I make brownies so I can easily give it away to someone without worrying about getting the tray back.
The contents of this post, including images are © Rebecca J Lockley and Tim Lockley unless otherwise stated and should not be reproduced without permission. If you are not reading this on http://blog.beccajanestclair.com, my facebook page, Networked Blogs, the RSS feed(s), or through an e-mail subscription, please notify me.
[LJ readers reading this on the LJ RSS feed: Please click on the link at the top of the entry to go directly to my blog to leave a comment, as comments left on the LJ RSS do not get seen by me. Facebook users reading this from my Networked Blogs link can either comment on facebook or on my blog. If you are reading this through an e-mail subscription, you might need to go directly to my blog to view videos and images.]
For full Copyright and Disclaimer, please read http://www.blog.beccajanestclair.com/copyright/
[Recipe] Cherry Almond Marzipan Cake
 Today was my Mother-in-law’s birthday and she wanted to have pizza with her kids, so my sister-in-law hosted us, brother-in-law picked up pizza, and I offered to make a cake. I asked if there was anything in particular she wanted, and she said to surprise her. After thinking about what I knew she liked (Marzipan) and some browsing on Pinterest, I found this cake, showed it to Tim, and he thought his mum would like it. Off I went to Tesco for ingredients…..to discover Tesco was OUT of glacé cherries! In fact, I found out from a friend who works for Tesco that Tesco had issues with the supplier, so NONE of the stores had any! Fortunately, there is an Aldi on the same road as Tesco, so I called in there and found stacks of them (and purchased three containers to be safe!). So, if Tesco hasn’t fixed their issue, you can find the cherries at Aldi. I also purchased a jar of cocktail cherries in case I couldn’t find the glacé, so I bet those could be used in a pinch (but I would drain and pat them dry).
One tip the original recipe suggests is tossing the cherries in a little bit of flour before mixing them in as it will keep the cherries from sinking. I did this, but I’m not sure it really made a difference because once the cherries touched the batter I felt like the coating disappeared. However if I had needed to use the cocktail cherries, I think I would have coated them.
When I took this cake out of the oven, it looked like a mess. Honestly. It looked awful. And after it had cooled off, it felt very dry, so I wound up poking holes in the top with a fork and drizzling over it some of the juice from the jar of cocktail cherries. If you don’t have any and you need to moisten the cake, you also could thin a teaspoon of jam with some boiling water and use that. It didn’t need a lot of liquid, maybe only about 2 teaspoons worth, but I do think that helped. I also thought about using some cherry kirsch, but with one family member pregnant and one breastfeeding, I wanted to keep alcohol away.
This cake also has an incredibly high calorie and fat content due to the almonds. The website the original recipe was on pegs it at just under 400 calories per serving, but doesn’t state how many servings the cake serves. There are 8 of us, so we divided the cake into eight. Slimming World, what slimming world? haha.
This was only my second time working with marzipan (the first being the Battenburg cake), and my first time ever coating a cake with marzipan, because the Battenburg is rolled to wrap it, not draped. So now I can add draping a cake with marzipan to my list of kitchen skills I never thought I would have.
Cherry Almond Marzipan Cake
You will need:
150g butter, softened (I used Stork)
150g caster sugar
2 extra large eggs
150g self-rising flour
150g ground almonds
25g flaked almonds (optional and approximate)
1 tsp almond extract
200g glacé cherries
25g self-rising flour (optional, for coating the cherries)
400g marzipan (divided into 150g and 250g pieces)
1 TBS cherry jam (or any flavour you happen to have)
1. Preheat the oven to 180C and line an 8-inch (20cm) round cake tin with parchment paper.
2. Take 100g of the cherries and cut them in half. Save one half of a cherry for decoration at the end. Coat cherries (both halved and whole) in flour (optional).
3. Cream together butter and sugar. Add almond extract and add eggs one at a time.
4. Alternately mix in flour and ground almonds until mix is smooth.
5. Put away the mixer, and grab a wooden spoon and stir in the cherries. Set mix aside.
6. Roll out 150g marzipan between two sheets of parchment paper and cut it into an 8-inch round (use the cake tin as a guide).
7. Fill the tin with HALF the batter, level off, and carefully place the 150g disc of marzipan on top of the batter. Cover with remaining batter.
8. Bake 45-60 minutes. It’s hard to tell when this one is done, because a toothpick inserted will likely grab onto the marzipan, but the top of the cake will go golden. If you think the bottom isn’t cooked yet but the top is, cover the top with some foil to keep it from burning (this is the reason my cake dried out a little I think)
9. Remove from oven and cool in the pan for 20 minutes, turn out, and cool completely. I left mine overnight.
10. Roll out the 250g piece of marzipan between two sheets of parchment paper until it is 10-12 inches in diameter (27-30cm). You will want the marzipan sheet to be slightly bigger than the size of your cake.
11. Microwave the jam for 30 seconds just to let it go runny and brush over top and sides of cake.
12. Carefully transfer your marzipan round on top of the cake, smooth down the sides, and trim. I did need to make a few patches towards the bottom because it didn’t quite reach. If you’re worried about presentation, you could wrap a ribbon around the cake to cover your mistakes!
13. Place the half cherry you saved in the middle, and artfully arrange the almonds (optional)
Everyone who tried a piece loved it! Which is great, because I was really nervous about this one, and this morning I debated trying to make a new cake and debated dividing the batter between two cake tins and then sandwiching the cakes together with marzipan instead of baking the marzipan into the middle, but it worked out and I didn’t need to. Good thing too, as I had very little sleep last night thanks to a hacking cough keeping me awake!
***
The contents of this post, including images are © Rebecca J Lockley and Tim Lockley unless otherwise stated and should not be reproduced without permission. If you are not reading this on http://blog.beccajanestclair.com, my facebook page, Networked Blogs, the RSS feed(s), or through an e-mail subscription, please notify me.
[LJ readers reading this on the LJ RSS feed: Please click on the link at the top of the entry to go directly to my blog to leave a comment, as comments left on the LJ RSS do not get seen by me. Facebook users reading this from my Networked Blogs link can either comment on facebook or on my blog. If you are reading this through an e-mail subscription, you might need to go directly to my blog to view videos and images.]
For full Copyright and Disclaimer, please read http://www.blog.beccajanestclair.com/copyright/
[Recipe] Crustless Pumpkin Pie
 Because everyone knows the filling is the best part! Special thanks go to Sue, who gave me the original recipe I modified after I lamented on Facebook about all the recipes I found on Pinteresst calling for either ingredients that aren’t sold in the UK or ingredients I didn’t have. You can use fresh or tinned pumpkin for this (you also could use a butternut squash or sweet potato), though the verdict is still out if tinned pumpkin is syn free. I say it is, because it’s a tinned vegetable (and contains 100% pumpkin), but a friend of mine says it isn’t. So, use fresh pureed pumpkin if you have it, syn the tinned or don’t syn, it’s your choice. This pie comes in at 2 syns per slice if you divide it into 8 and it tastes exactly the same a the filling in a regular pie does.
Crustless Pumpkin Pie
You will need:
425g pureed pumpkin
250ml semi-skim milk
75g Truvia for Baking*
2 eggs
2TBS cornflour**
1/2 tsp salt
1 tsp cinnamon
1/2 tsp nutmeg
1/4 tsp ginger
1/4 tsp ground cloves
1. Preheat the oven to 220C and spray your pie plate with fry light.
2. Combine all ingredients and use a hand mixer to mix until smooth
3. Pour into the sprayed pie plate and bake for 15 minutes.
4. Lower the oven to 180C and bake an additional 30-45 minutes, or until it is firm on the edges (a little wiggle is ok. In fact, I think I slightly overcooked mine since it cracked the whole way around!)
I served this after we had a mini Thanksgiving, or Fauxgiving as I called it.We don’t celebrate Thanksgiving in the UK, so anyone who is celebrating it here today is probably an American or related to an American (or friends with, etc.). Basically, we had a roast dinner with turkey instead of chicken and I added a bit of stuffing and cranberry sauce. I served mashed potatoes instead of the usual roast only because my throat hurts right now and I thought the sharp corners on the potatoes would have hurt going down. I followed the cranberry sauce recipe in the Slimming World Christmas cookbook and made a double batch of it to store in a jar until Christmas (if you turn the jar upside down, it will seal itself).

***
*Truvia for baking is sold in a 500g bag and is amazing to bake with on Slimming World, as it only has 2.5 syns per 25g. You could use regular sweetener, but 75g would be A LOT of sweetener, or you could use sugar, but adjust the syns accordingly. 75g Truvia baking blend is 7 1/2 syns.
**If you’re in the US, this is cornstarch, not the stuff you make cornbread with!
DISCLAIMER: I do not work for Slimming World, I am not affiliated with Slimming World beyond being a paying customer/member, I get no personal benefit from writing this post other than the joy of sharing.
Please note: Syn values are based on my exact ingredients using the online calculator. Your Syn value may vary based on your ingredients and the size of your baking containers and portions, so use this number as a guide only. Syn values also frequently change, but these values are correct at the time of publication.
The contents of this post, including images are © Rebecca J Lockley and Tim Lockley unless otherwise stated and should not be reproduced without permission. If you are not reading this on http://blog.beccajanestclair.com, my facebook page, Networked Blogs, the RSS feed(s), or through an e-mail subscription, please notify me.
[LJ readers reading this on the LJ RSS feed: Please click on the link at the top of the entry to go directly to my blog to leave a comment, as comments left on the LJ RSS do not get seen by me. Facebook users reading this from my Networked Blogs link can either comment on facebook or on my blog. If you are reading this through an e-mail subscription, you might need to go directly to my blog to view videos and images.]
For full Copyright and Disclaimer, please read http://www.blog.beccajanestclair.com/copyright/
[Recipe] Easy Chocolate Fudge
 Yum! Who doesn’t love Fudge? Tim and I decided that we will no longer put anything in our mouths unless we know the syn values for it, and that includes tasty chocolate treats. I always like to make assorted treats at Christmas time, and last year I made Peanut Butter Fudge. This year, I want try a few other types of fudge including chocolate, and I decided it needed a trial run and I needed to work out the syns for this. If you follow my recipe exactly and use an 8″ square tin, depending on how small you cut the pieces they can be as little as 4 syns or as many as 9 syns per piece. You might need a ruler to work out the exact sizes!
You Will Need:
1 tin of Carnation Condensed Milk
300g Dr Oetker plain chocolate chips
Parchment paper
microwave safe bowl
8 inch square tin
Spatula
1. Line an 8 inch square tin with parchment paper.
2. Combine milk and chocolate in a microwave safe dish.
3. Microwave for 1 minute, stir, and microwave in 30 second intervals stirring between until chocolate is melted and it is evenly combined with the milk.
4. Pour mixture into tin, and smooth out into the corners with the spatula and level off.
5. Refrigerate overnight.
6. When solid, cut into pieces. 36 pieces = 4 syns per piece, 25 pieces = 6 (5.76) syns each, 16 pieces = 9 syns each.
If you use a different sized container, what you need to know to calculate the syns is the total syn value of these exact ingredients are 144.
***
DISCLAIMER: I do not work for Slimming World, I am not affiliated with Slimming World beyond being a paying customer/member, I get no personal benefit from writing this post other than the joy of sharing.
Please note: Syn values are based on my exact ingredients using the online calculator. Your Syn value may vary based on your ingredients and the size of your baking containers and portions, so use this number as a guide only. Syn values also frequently change, but these values are correct at the time of publication.
The contents of this post, including images are © Rebecca J Lockley and Tim Lockley unless otherwise stated and should not be reproduced without permission. If you are not reading this on http://blog.beccajanestclair.com, my facebook page, Networked Blogs, the RSS feed(s), or through an e-mail subscription, please notify me.
[LJ readers reading this on the LJ RSS feed: Please click on the link at the top of the entry to go directly to my blog to leave a comment, as comments left on the LJ RSS do not get seen by me. Facebook users reading this from my Networked Blogs link can either comment on facebook or on my blog. If you are reading this through an e-mail subscription, you might need to go directly to my blog to view videos and images.]
For full Copyright and Disclaimer, please read http://www.blog.beccajanestclair.com/copyright/