Archive for November, 2015
[Recipe] Cherry Almond Marzipan Cake
 Today was my Mother-in-law’s birthday and she wanted to have pizza with her kids, so my sister-in-law hosted us, brother-in-law picked up pizza, and I offered to make a cake. I asked if there was anything in particular she wanted, and she said to surprise her. After thinking about what I knew she liked (Marzipan) and some browsing on Pinterest, I found this cake, showed it to Tim, and he thought his mum would like it. Off I went to Tesco for ingredients…..to discover Tesco was OUT of glacé cherries! In fact, I found out from a friend who works for Tesco that Tesco had issues with the supplier, so NONE of the stores had any! Fortunately, there is an Aldi on the same road as Tesco, so I called in there and found stacks of them (and purchased three containers to be safe!). So, if Tesco hasn’t fixed their issue, you can find the cherries at Aldi. I also purchased a jar of cocktail cherries in case I couldn’t find the glacé, so I bet those could be used in a pinch (but I would drain and pat them dry).
One tip the original recipe suggests is tossing the cherries in a little bit of flour before mixing them in as it will keep the cherries from sinking. I did this, but I’m not sure it really made a difference because once the cherries touched the batter I felt like the coating disappeared. However if I had needed to use the cocktail cherries, I think I would have coated them.
When I took this cake out of the oven, it looked like a mess. Honestly. It looked awful. And after it had cooled off, it felt very dry, so I wound up poking holes in the top with a fork and drizzling over it some of the juice from the jar of cocktail cherries. If you don’t have any and you need to moisten the cake, you also could thin a teaspoon of jam with some boiling water and use that. It didn’t need a lot of liquid, maybe only about 2 teaspoons worth, but I do think that helped. I also thought about using some cherry kirsch, but with one family member pregnant and one breastfeeding, I wanted to keep alcohol away.
This cake also has an incredibly high calorie and fat content due to the almonds. The website the original recipe was on pegs it at just under 400 calories per serving, but doesn’t state how many servings the cake serves. There are 8 of us, so we divided the cake into eight. Slimming World, what slimming world? haha.
This was only my second time working with marzipan (the first being the Battenburg cake), and my first time ever coating a cake with marzipan, because the Battenburg is rolled to wrap it, not draped. So now I can add draping a cake with marzipan to my list of kitchen skills I never thought I would have.
Cherry Almond Marzipan Cake
You will need:
150g butter, softened (I used Stork)
150g caster sugar
2 extra large eggs
150g self-rising flour
150g ground almonds
25g flaked almonds (optional and approximate)
1 tsp almond extract
200g glacé cherries
25g self-rising flour (optional, for coating the cherries)
400g marzipan (divided into 150g and 250g pieces)
1 TBS cherry jam (or any flavour you happen to have)
1. Preheat the oven to 180C and line an 8-inch (20cm) round cake tin with parchment paper.
2. Take 100g of the cherries and cut them in half. Save one half of a cherry for decoration at the end. Coat cherries (both halved and whole) in flour (optional).
3. Cream together butter and sugar. Add almond extract and add eggs one at a time.
4. Alternately mix in flour and ground almonds until mix is smooth.
5. Put away the mixer, and grab a wooden spoon and stir in the cherries. Set mix aside.
6. Roll out 150g marzipan between two sheets of parchment paper and cut it into an 8-inch round (use the cake tin as a guide).
7. Fill the tin with HALF the batter, level off, and carefully place the 150g disc of marzipan on top of the batter. Cover with remaining batter.
8. Bake 45-60 minutes. It’s hard to tell when this one is done, because a toothpick inserted will likely grab onto the marzipan, but the top of the cake will go golden. If you think the bottom isn’t cooked yet but the top is, cover the top with some foil to keep it from burning (this is the reason my cake dried out a little I think)
9. Remove from oven and cool in the pan for 20 minutes, turn out, and cool completely. I left mine overnight.
10. Roll out the 250g piece of marzipan between two sheets of parchment paper until it is 10-12 inches in diameter (27-30cm). You will want the marzipan sheet to be slightly bigger than the size of your cake.
11. Microwave the jam for 30 seconds just to let it go runny and brush over top and sides of cake.
12. Carefully transfer your marzipan round on top of the cake, smooth down the sides, and trim. I did need to make a few patches towards the bottom because it didn’t quite reach. If you’re worried about presentation, you could wrap a ribbon around the cake to cover your mistakes!
13. Place the half cherry you saved in the middle, and artfully arrange the almonds (optional)
Everyone who tried a piece loved it! Which is great, because I was really nervous about this one, and this morning I debated trying to make a new cake and debated dividing the batter between two cake tins and then sandwiching the cakes together with marzipan instead of baking the marzipan into the middle, but it worked out and I didn’t need to. Good thing too, as I had very little sleep last night thanks to a hacking cough keeping me awake!
***
The contents of this post, including images are © Rebecca J Lockley and Tim Lockley unless otherwise stated and should not be reproduced without permission. If you are not reading this on http://blog.beccajanestclair.com, my facebook page, Networked Blogs, the RSS feed(s), or through an e-mail subscription, please notify me.
[LJ readers reading this on the LJ RSS feed: Please click on the link at the top of the entry to go directly to my blog to leave a comment, as comments left on the LJ RSS do not get seen by me. Facebook users reading this from my Networked Blogs link can either comment on facebook or on my blog. If you are reading this through an e-mail subscription, you might need to go directly to my blog to view videos and images.]
For full Copyright and Disclaimer, please read http://www.blog.beccajanestclair.com/copyright/

[Recipe] Crustless Pumpkin Pie
 Because everyone knows the filling is the best part! Special thanks go to Sue, who gave me the original recipe I modified after I lamented on Facebook about all the recipes I found on Pinteresst calling for either ingredients that aren’t sold in the UK or ingredients I didn’t have. You can use fresh or tinned pumpkin for this (you also could use a butternut squash or sweet potato), though the verdict is still out if tinned pumpkin is syn free. I say it is, because it’s a tinned vegetable (and contains 100% pumpkin), but a friend of mine says it isn’t. So, use fresh pureed pumpkin if you have it, syn the tinned or don’t syn, it’s your choice. This pie comes in at 2 syns per slice if you divide it into 8 and it tastes exactly the same a the filling in a regular pie does.
Crustless Pumpkin Pie
You will need:
425g pureed pumpkin
250ml semi-skim milk
75g Truvia for Baking*
2 eggs
2TBS cornflour**
1/2 tsp salt
1 tsp cinnamon
1/2 tsp nutmeg
1/4 tsp ginger
1/4 tsp ground cloves
1. Preheat the oven to 220C and spray your pie plate with fry light.
2. Combine all ingredients and use a hand mixer to mix until smooth
3. Pour into the sprayed pie plate and bake for 15 minutes.
4. Lower the oven to 180C and bake an additional 30-45 minutes, or until it is firm on the edges (a little wiggle is ok. In fact, I think I slightly overcooked mine since it cracked the whole way around!)
I served this after we had a mini Thanksgiving, or Fauxgiving as I called it.We don’t celebrate Thanksgiving in the UK, so anyone who is celebrating it here today is probably an American or related to an American (or friends with, etc.). Basically, we had a roast dinner with turkey instead of chicken and I added a bit of stuffing and cranberry sauce. I served mashed potatoes instead of the usual roast only because my throat hurts right now and I thought the sharp corners on the potatoes would have hurt going down. I followed the cranberry sauce recipe in the Slimming World Christmas cookbook and made a double batch of it to store in a jar until Christmas (if you turn the jar upside down, it will seal itself).

***
*Truvia for baking is sold in a 500g bag and is amazing to bake with on Slimming World, as it only has 2.5 syns per 25g. You could use regular sweetener, but 75g would be A LOT of sweetener, or you could use sugar, but adjust the syns accordingly. 75g Truvia baking blend is 7 1/2 syns.
**If you’re in the US, this is cornstarch, not the stuff you make cornbread with!
DISCLAIMER: I do not work for Slimming World, I am not affiliated with Slimming World beyond being a paying customer/member, I get no personal benefit from writing this post other than the joy of sharing.
Please note: Syn values are based on my exact ingredients using the online calculator. Your Syn value may vary based on your ingredients and the size of your baking containers and portions, so use this number as a guide only. Syn values also frequently change, but these values are correct at the time of publication.
The contents of this post, including images are © Rebecca J Lockley and Tim Lockley unless otherwise stated and should not be reproduced without permission. If you are not reading this on http://blog.beccajanestclair.com, my facebook page, Networked Blogs, the RSS feed(s), or through an e-mail subscription, please notify me.
[LJ readers reading this on the LJ RSS feed: Please click on the link at the top of the entry to go directly to my blog to leave a comment, as comments left on the LJ RSS do not get seen by me. Facebook users reading this from my Networked Blogs link can either comment on facebook or on my blog. If you are reading this through an e-mail subscription, you might need to go directly to my blog to view videos and images.]
For full Copyright and Disclaimer, please read http://www.blog.beccajanestclair.com/copyright/
[Recipe] Easy Chocolate Fudge
 Yum! Who doesn’t love Fudge? Tim and I decided that we will no longer put anything in our mouths unless we know the syn values for it, and that includes tasty chocolate treats. I always like to make assorted treats at Christmas time, and last year I made Peanut Butter Fudge. This year, I want try a few other types of fudge including chocolate, and I decided it needed a trial run and I needed to work out the syns for this. If you follow my recipe exactly and use an 8″ square tin, depending on how small you cut the pieces they can be as little as 4 syns or as many as 9 syns per piece. You might need a ruler to work out the exact sizes!
You Will Need:
1 tin of Carnation Condensed Milk
300g Dr Oetker plain chocolate chips
Parchment paper
microwave safe bowl
8 inch square tin
Spatula
1. Line an 8 inch square tin with parchment paper.
2. Combine milk and chocolate in a microwave safe dish.
3. Microwave for 1 minute, stir, and microwave in 30 second intervals stirring between until chocolate is melted and it is evenly combined with the milk.
4. Pour mixture into tin, and smooth out into the corners with the spatula and level off.
5. Refrigerate overnight.
6. When solid, cut into pieces. 36 pieces = 4 syns per piece, 25 pieces = 6 (5.76) syns each, 16 pieces = 9 syns each.
If you use a different sized container, what you need to know to calculate the syns is the total syn value of these exact ingredients are 144.
***
DISCLAIMER: I do not work for Slimming World, I am not affiliated with Slimming World beyond being a paying customer/member, I get no personal benefit from writing this post other than the joy of sharing.
Please note: Syn values are based on my exact ingredients using the online calculator. Your Syn value may vary based on your ingredients and the size of your baking containers and portions, so use this number as a guide only. Syn values also frequently change, but these values are correct at the time of publication.
The contents of this post, including images are © Rebecca J Lockley and Tim Lockley unless otherwise stated and should not be reproduced without permission. If you are not reading this on http://blog.beccajanestclair.com, my facebook page, Networked Blogs, the RSS feed(s), or through an e-mail subscription, please notify me.
[LJ readers reading this on the LJ RSS feed: Please click on the link at the top of the entry to go directly to my blog to leave a comment, as comments left on the LJ RSS do not get seen by me. Facebook users reading this from my Networked Blogs link can either comment on facebook or on my blog. If you are reading this through an e-mail subscription, you might need to go directly to my blog to view videos and images.]
For full Copyright and Disclaimer, please read http://www.blog.beccajanestclair.com/copyright/
[Recipe] A Taste of Austria – Pork Schnitzel
 Austria has some amazing food. Some amazingly fattening food. Did you know that Austrians consume on average more calories per day than most other countries in the world? I didn’t either until my husband found an article about it. No wonder he and I both gained weight on our trip to Austria. We figure native Austrians probably need all those calories since everything is on top of a mountain! One of my huband’s favourite foods is Schnitzel, and they serve it pretty much everywhere. Large pieces of chicken, pork, or viel coated in batter and then deep fried. Wow. I can feel my arteries clogging just writing that. A few years back, the Slimming World magazine had some international foods, and incldued a recipe for Schnitzel, which I have used to base my recipe off of. The breadcrumbs are best if you are able to let them bake and stand for several hours, but you can crisp them up just before you make them or you can use them soft. But this is best with crispy crunchy breadcrumbs.
Pork Schnitzel
1 Syn per Schnitzel
You Will Need:
60g wholemeal bread (loaf or roll, but measure to make sure it’s 60!)
2 tsp Celery salt
2 tsp mixed herbs (I actually used Italian herbs as I was out of mixed and it was fine)
1 tsp dried parsley
1 egg
6 pork chops with the fat trimmed off (or pork steaks or pork medallions)
Frylight
For the Breadcrumbs:
1. Preheat oven to 150C.
2. Blitz the bread along with the spices in a blender or food processor until crumbs.
3. Line a baking tray with parchment paper.
4. Bake the crumbs for 15 minutes, stirring halfway.
5. Turn off the oven and and leave the crumbs in the oven for 4 hours.
6. Fold over the parchment paper and crush the now crispy crumbs with your hands, the back of a knife, or a rolling pin.
For the Schnitzel:
1. Preheat oven to 200C.
2. Whisk the egg white, then add the yolk and whisk some more.
3. Spray a baking tray with frylight.
4. Dredge the pork first in the egg, then in the breadcrumbs and place on the tray.
5. Spray the tops of the pork with some frylight.
6. Bake 25-30 minutes or until breadcrumbs are starting to brown.
This goes great with some chips, peas, and sauerkraut! Don’t forget to measure out your ketchup too. 1 TBS of reduced sugar and salt ketchup is half a syn. I just dumped all my ketchup on my chips, so it looks like a lot, but I only used 2TBS, bringing the total syns to my dinner to 4.
***
DISCLAIMER: I do not work for Slimming World, I am not affiliated with Slimming World beyond being a paying customer/member, I get no personal benefit from writing this post other than the joy of sharing.
Please note: Syn values are based on my exact ingredients using the online calculator. Your Syn value may vary based on your ingredients and the size of your baking containers and portions, so use this number as a guide only. Syn values also frequently change, but these values are correct at the time of publication.
The contents of this post, including images are © Rebecca J Lockley and Tim Lockley unless otherwise stated and should not be reproduced without permission. If you are not reading this on http://blog.beccajanestclair.com, my facebook page, Networked Blogs, the RSS feed(s), or through an e-mail subscription, please notify me.
[LJ readers reading this on the LJ RSS feed: Please click on the link at the top of the entry to go directly to my blog to leave a comment, as comments left on the LJ RSS do not get seen by me. Facebook users reading this from my Networked Blogs link can either comment on facebook or on my blog. If you are reading this through an e-mail subscription, you might need to go directly to my blog to view videos and images.]
For full Copyright and Disclaimer, please read http://www.blog.beccajanestclair.com/copyright/
[Recipe] Savory Cheese Cookies (Cheese Scones)
 I know you’re probably thinking savory cookies? What? But see, I started out reworking a recipe for Victorian Cheese Scones, and they came out a bit flat – more like a cheese biscuit, but they’re soft like a cookie. Since they’re too flat to be scones, I’ve decided they must be savory cookies. Even better? They work out at 2.5 Syns each! Of course, you could make them bigger/thicker and have them at 5 syns each, too. As this was originally a recipe measured in ounces, the grams are a little funny looking.
Savory Cheese Cookies (Cheese Scones)
You will need:
170g self-rising flour
28g Flora light (blue container) (if you’re not following SW, use any butter or margarine)
84g grated reduced fat Cheddar cheese*
1 egg
2 TBS semi-skim milk
pinch of salt & pepper
1/4 tsp Coleman’s mustard powder
about 1/2 TBS water (optional)
1. Preheat oven to 180C and line a tray with parchment paper OR spray with Frylight.
2. Whisk together egg and milk in a small bowl and set aside.
3. Sift together flour, salt, pepper, and mustard powder.
4. Rub in the Flora. I did his by kind of scrunching it, if that makes sense. You’ll wind up with the texture of breadcrumbs.
5. Stir in the cheese.
6. Mix in the milk and egg and combine until it forms a ball. If it’s not picking up all the flour and looks dry, add about 1/2TBS of water.
7. Lightly flour your work surface and roll out the dough to around 1/4″ to 1/2″.
8. Using a middle sized biscuit cutter, cut out 20 rounds and transfer them onto the baking sheet.
9. Bake for 15-20 minutes, or until golden brown.
If you divide this into 20, each cookie is 2.5 Syns each. If you roll out the dough thicker and only cut 10 out, each one is 5 syns. For a more rustic look, you could just shape them by hand.
Add-ins: Make Cheese & Onion scones by adding some chopped spring onions after adding the cheese. Make Cheese & Bacon by adding drained chopped bacon (use lardons for no added syns) to the dough. Try adding chilli powder for a kick. The possibilities are endless!
*You can use another type of cheese, but you will need to recalculate the syns.
***
DISCLAIMER: I do not work for Slimming World, I am not affiliated with Slimming World beyond being a paying customer/member, I get no personal benefit from writing this post other than the joy of sharing.
Please note: Syn values are based on my exact ingredients using the online calculator. Your Syn value may vary based on your ingredients and the size of your baking containers and portions, so use this number as a guide only. Syn values also frequently change, but these values are correct at the time of publication.
The contents of this post, including images are © Rebecca J Lockley and Tim Lockley unless otherwise stated and should not be reproduced without permission. If you are not reading this on http://blog.beccajanestclair.com, my facebook page, Networked Blogs, the RSS feed(s), or through an e-mail subscription, please notify me.
[LJ readers reading this on the LJ RSS feed: Please click on the link at the top of the entry to go directly to my blog to leave a comment, as comments left on the LJ RSS do not get seen by me. Facebook users reading this from my Networked Blogs link can either comment on facebook or on my blog. If you are reading this through an e-mail subscription, you might need to go directly to my blog to view videos and images.]
For full Copyright and Disclaimer, please read http://www.blog.beccajanestclair.com/copyright/
[Recipe] Stuffed French Toast
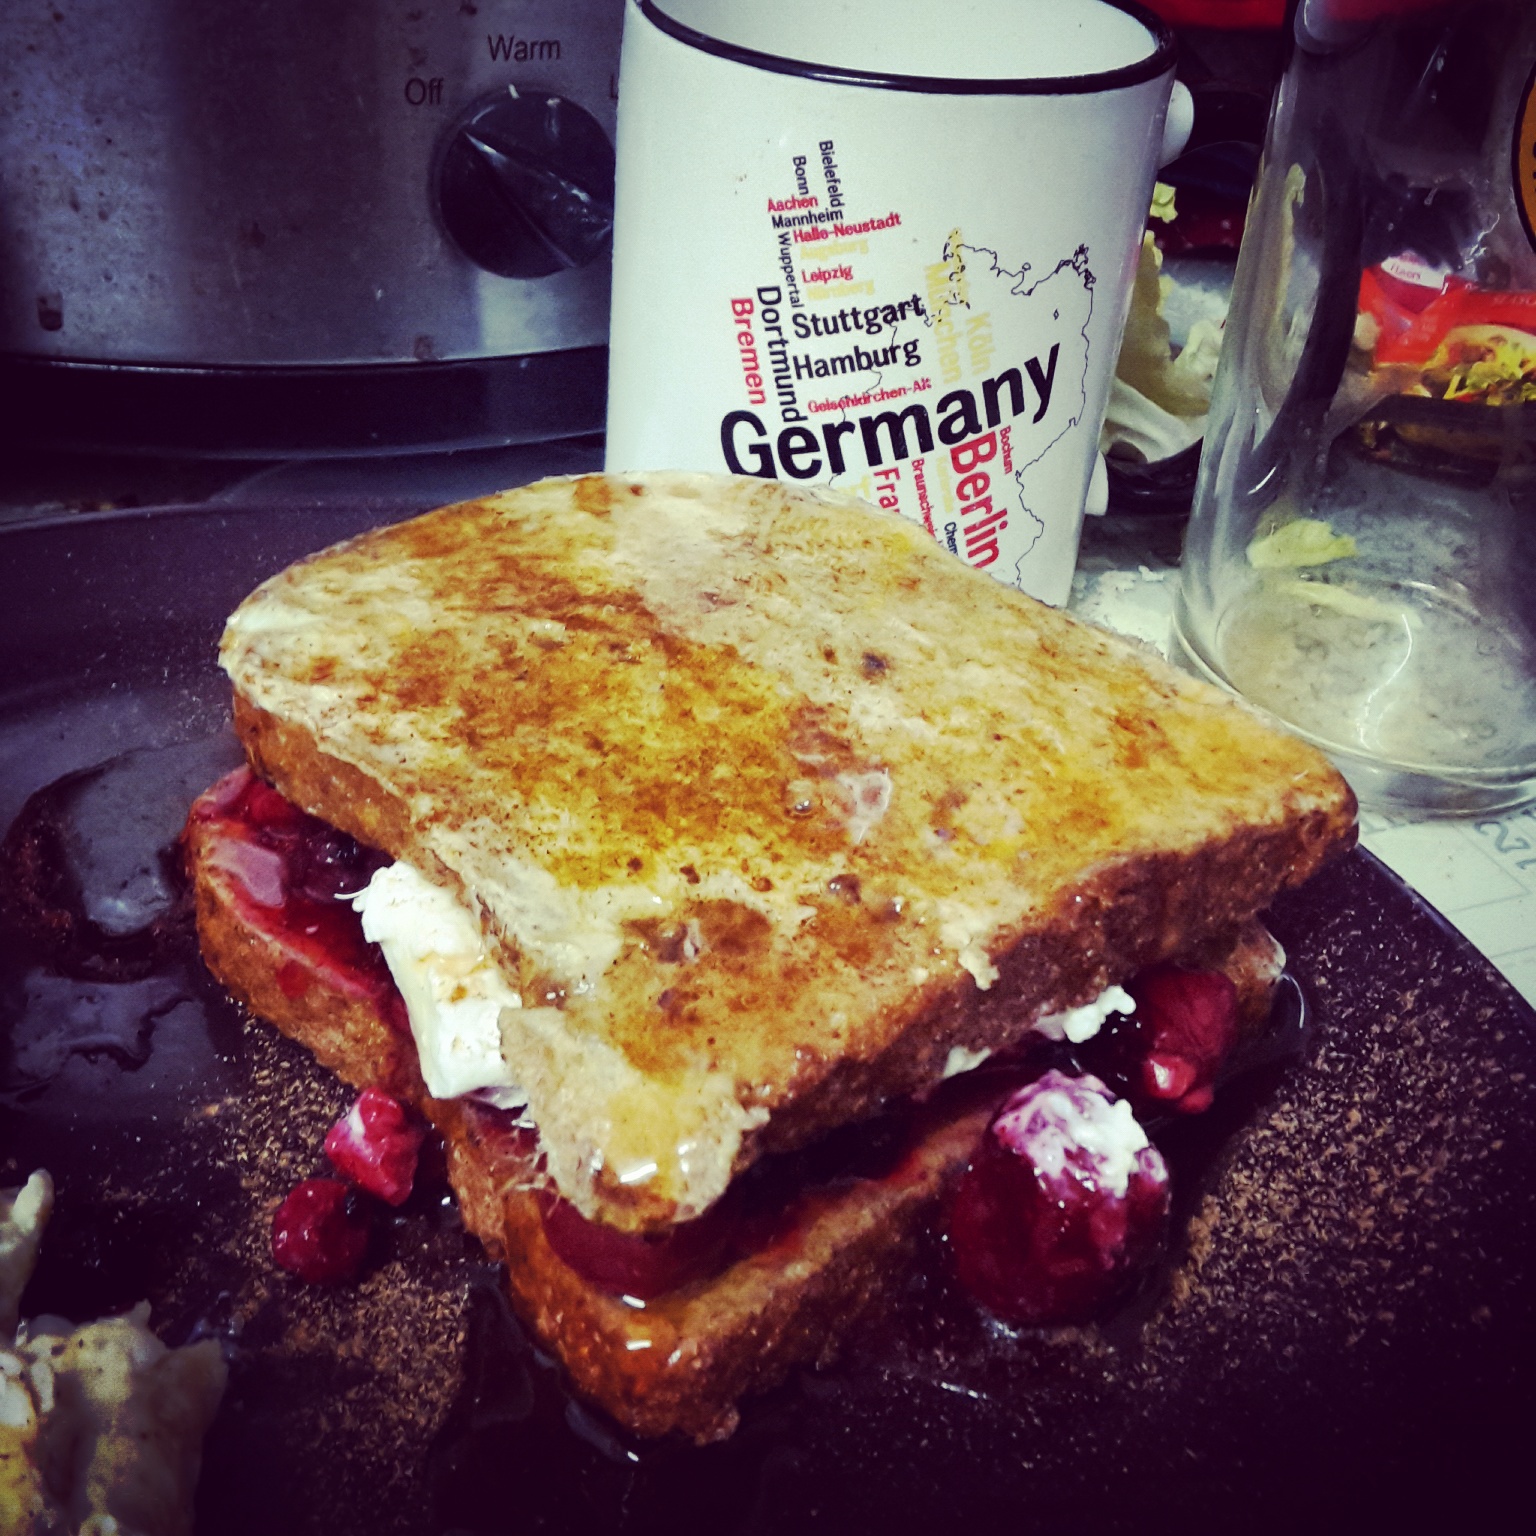 Walk into an American diner, and one thing you’ll spot on the menu is French Toast, and about a half dozen (or more!)) ways to have it , including stuffed.
French toast is known as eggy bread in the UK, the only difference being that eggy bread is more of a savory dish, and French toast is usually a sweet. And to further confuse things, in the UK we also have something called fried bread, which you would think would be similar, but nope. Fried bread kind of grosses me out.
If you order Stuffed French Toast in a diner, you will usually get two really thick slices of white bread, dipped in a mixture of egg and milk, and fried. Between the two pieces of bread they lay on the sweet cream cheese and then it’s topped with fruit mixed in a sugary syrup. Sounds disgustingly delicious, doesn’t it?
Since Tim was swapping over to night shift on Saturday, I knew we would be up late on Friday night (to try to sleep in on Saturday to help him switch over) and Saturday by the time we got up we would be having Brunch instead of Breakfast, and I decided to make French Toast. Then, when I was getting the milk out for my coffee, I spotted the dish of thawed out frozen berries and a container of quark, so I decided to make mine stuffed!
Stuffed French Toast
Syns: 0, but this will count as your HEB. If you’re not having it as your HEB, you will need to syn the bread.
You will need:
2 slices of any Healthy Extra B bread option
2 eggs
1 tsp cinnamon
100g frozen mixed berries, thawed (or fresh berries)
2 TBS quark
Fry Light
1. Spray a frying pan with Fry Light and pre-heat it on the hob (that’s stove for my American readers!).
2. Whisk the eggs with the cinnamon in a bowl or dish large enough to fit a slice of bread.
3. Soak one slice of bread in the mixture and fry until golden brown (3-4 minutes per side). Repeat with the second slice of bread (you might need to give the pan another spray of Fry Light too). If your frying pan is large enough, you could do both slices at once.
4. Spread one slice of French toast with quark, top with mixed berries, and place the second slice of French toast on top.
5. Optional: top the whole thing with some agave syrup, treacle, American pancake syrup, or golden syrup (and make sure you calculate the syns for your syrup!)
Not only is this a great Slimming World brunch choice, it’s great for a diabetic! If you wanted to make a “full fat” version, use cream cheese instead of quark and you could use tinned fruit in syrup.
***
DISCLAIMER: I do not work for Slimming World, I am not affiliated with Slimming World beyond being a paying customer/member, I get no personal benefit from writing this post other than the joy of sharing.
Please note: Syn values are based on my exact ingredients using the online calculator. Your Syn value may vary based on your ingredients and the size of your baking containers and portions, so use this number as a guide only. Syn values also frequently change, but these values are correct at the time of publication.
The contents of this post, including images are © Rebecca J Lockley and Tim Lockley unless otherwise stated and should not be reproduced without permission. If you are not reading this on http://blog.beccajanestclair.com, my facebook page, Networked Blogs, the RSS feed(s), or through an e-mail subscription, please notify me.
[LJ readers reading this on the LJ RSS feed: Please click on the link at the top of the entry to go directly to my blog to leave a comment, as comments left on the LJ RSS do not get seen by me. Facebook users reading this from my Networked Blogs link can either comment on facebook or on my blog. If you are reading this through an e-mail subscription, you might need to go directly to my blog to view videos and images.]
For full Copyright and Disclaimer, please read http://www.blog.beccajanestclair.com/copyright/
[Recipe] Queen Cakes from Beamish
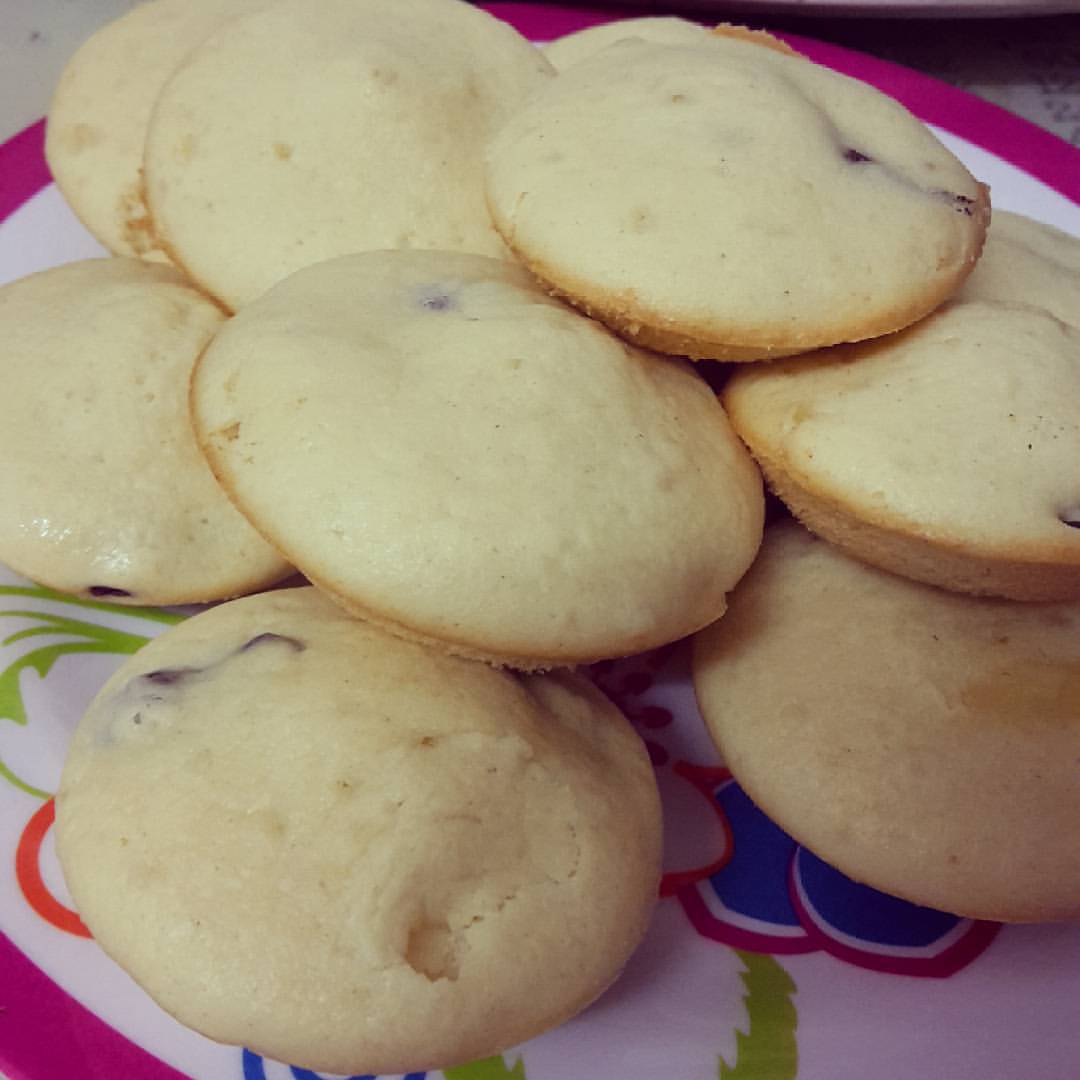 Last year, my husband gave me an experience day at Beamish for our 5th anniversary. I went on the baking course, and it was loads of fun! Not only did we get to use recipes from the Victorian era, we also baked on a coal stove, similar to the Esse stove I have in my kitchen (which I still haven’t used…..). We got to take home everything we baked and we were given a packet with the recipes to use at home. The goodies were enjoyed by my husband and I over our weekend break up North, and also given to my in-laws. We enjoyed everything we made, with the exception of the bread as it had too much yeast in it for our tastes. I held on to the recipe packet, and today when my pictures from the baking day popped up on my Timehop, I asked Tim what from that day I should make again. He suggested queencakes.
If the measurements look a little odd, its because the recipe from Beamish was in ounces. Fortunately, my digital scale can be switched from grams to ounces, so I swapped it over and then swapped it back to see what it was in grams so I could share this in an easier to measure measurement. I also worked out the sys for this since I wanted to know if I could have any and if you make 12, they come out at 3.5 Syns each. The batter filled up the tins, so I debated making 24 with the mixture, which would make them 1.7 syns each (round up to 2), but I think they would wind up being too small.

Queen Cakes
Makes 12, 3.5 Syns each
You will need:
114g self-rising flour
56g caster sugar
56g Flora light
1 egg
2 TBS semi-skim milk
31g currants
1. Preheat oven to 180C and spray a 12-hole bun tin with fry light.
2. beat the egg and milk together and set aside.
3. Cream together Flora and sugar.
4. Alternate adding egg mixture and flour to the mix.
5. Stir in currants.
6. Divide evenly into the bun tin and bake for 15 minutes.
7. allow to cool in the pan for about 5 minutes, then turn onto a cooling rack.
***
DISCLAIMER: I do not work for Slimming World, I am not affiliated with Slimming World beyond being a paying customer/member, I get no personal benefit from writing this post other than the joy of sharing.
Please note: Syn values are based on my exact ingredients using the online calculator. Your Syn value may vary based on your ingredients and the size of your baking containers and portions, so use this number as a guide only. Syn values also frequently change, but these values are correct at the time of publication.
The contents of this post, including images are © Rebecca J Lockley and Tim Lockley unless otherwise stated and should not be reproduced without permission. If you are not reading this on http://blog.beccajanestclair.com, my facebook page, Networked Blogs, the RSS feed(s), or through an e-mail subscription, please notify me.
[LJ readers reading this on the LJ RSS feed: Please click on the link at the top of the entry to go directly to my blog to leave a comment, as comments left on the LJ RSS do not get seen by me. Facebook users reading this from my Networked Blogs link can either comment on facebook or on my blog. If you are reading this through an e-mail subscription, you might need to go directly to my blog to view videos and images.]
For full Copyright and Disclaimer, please read http://www.blog.beccajanestclair.com/copyright/
[Recipe] A Trio of Cheap and Easy Crock Pot Soups
 I regularly make Slimming World speed soup because it’s super easy, and the ingredients are almost always in my cupboard and if they’re not, the local co-op stocks everything I need. I’ve been on a Crock Pot (Slow Cooker) kick lately, especially with it becoming colder outside and Tim wanting to take food in a hot food flask for his pack-up. Last year, Tim wound up with microwave curries most days (at a hefty cost of £6 for 2!) or a Bachelor’s Pasta N Sauce. But I decided to try to not only save us some money, but to also give him some healthier meals, as the only way his curry was Slimming World friendly was if I went to Iceland and bought the SW frozen curries, but more often I wound up popping down to the co-op at the last minute! Using the crock pot to make soup means I can make it in bulk to last the whole week. A few weeks ago, I made Parsnip and apple soup, last week was butternut squash soup, and this week is Tomato Speed soup. The best part about the tomato soup is it’s less than £3 for all the ingredients as this works great with the value ranges! And if you’re on an early shift, you can put this in the crock pot the night before!
Parsnip and Apple Soup
You will need:
6 Parsnips, chopped
1 large cooking apple
2 Celery ribs, diced
1 Vegetable stock cube, made up with water to make 500ml vegetable stock
2 tsp Nutmeg
Dump everything into a 3L crock pot and turn on low for 8-10 hours. In the morning, use a stick blender or transfer into a blender to blend until smooth. You will need to weigh your apples before putting them in the crock pot to determine the total number of syns for this soup, then divide it by the number of portions. This should make at least 4 servings and each serving should be 1-2 syns. I did not peel the parsnips or apples as I relied on the stick blender to smooth everything, but you could take an extra step and peel them first. If the soup is too thick, add more vegetable stock to thin it out.
Butternut Squash Soup
You will need:
1 Butternut (or other squash) squash, quartered and de-seeded
1 Sweet potato, roughly chopped
2 Celery ribs, diced
3 Spring onion sprigs, chopped
2 Vegetable stock cubes, made up with water to make 1L vegetable stock
Put all ingredients in a 6L crock pot and cook on low for 8-10 hours. In the morning, use a stick blender or transfer into a blender to blend until smooth. I did not peel the squash or potato as I relied on the stick blender to smooth everything, but you could take an extra step and peel them first. If the soup is too thick, add more vegetable stock to thin it out, but we liked it as a thick soup. I also added leftover mashed potatoes and leftover carrot and swede mash to it this time, and it gave it some extra flavour and helped to stretch the servings. This soup has no syns!
Tomato Speed Soup
You will need:
6 tins of chopped tomatoes
2 tins of carrots (or 6 carrots diced)
2 tins of baked beans (for this, I bought the cheapest beans Tesco sell)
2 Celery ribs, diced
3 Spring onion sprigs, chopped
4 TBS Italian herbs
2 tsp chili powder (optional, to give it a kick)
3 TBS Worcestershire sauce
2 vegetable stock cubes, crumbled
Dump everything into a 6L crock pot and turn on low for 8-10 hours. In the morning, use a stick blender or transfer into a blender to blend until smooth. If the soup is too thick, add more vegetable stock to thin it out. Makes 8 400ml portions. This soup has no syns!
***
DISCLAIMER: I do not work for Slimming World, I am not affiliated with Slimming World beyond being a paying customer/member, I get no personal benefit from writing this post other than the joy of sharing.
Please note: Syn values are based on my exact ingredients using the online calculator. Your Syn value may vary based on your ingredients and the size of your baking containers and portions, so use this number as a guide only. Syn values also frequently change, but these values are correct at the time of publication.
The contents of this post, including images are © Rebecca J Lockley and Tim Lockley unless otherwise stated and should not be reproduced without permission. If you are not reading this on http://blog.beccajanestclair.com, my facebook page, Networked Blogs, the RSS feed(s), or through an e-mail subscription, please notify me.
[LJ readers reading this on the LJ RSS feed: Please click on the link at the top of the entry to go directly to my blog to leave a comment, as comments left on the LJ RSS do not get seen by me. Facebook users reading this from my Networked Blogs link can either comment on facebook or on my blog. If you are reading this through an e-mail subscription, you might need to go directly to my blog to view videos and images.]
For full Copyright and Disclaimer, please read http://www.blog.beccajanestclair.com/copyright/
[Recipe] Battenberg Cake
 I had never heard of Battenberg Cake until I moved here and I think it took several years before I even had a piece, as it’s not something I would usually pick. But Tim and I were at a cafe once and he bought one, which had me curious. Recently, Tim told me Battenberg was one of his favourite treats when he was a kid. I became inspired to try to make one myself, and today I finally did.
I will admit I did not make my own marzipan, but that’s something for me to think about trying in the future. I also did not calculate syns for this cake or use anything low fat/ low sugar as I knew I wouldn’t be keeping the cake for myself. I made today’s as a trail run for Christmas.
Battenberg Cake
You will need:
175g butter
175g golden caster sugar
3 eggs
175g self-raising flour
65g ground almond
3/4 tsp baking powder
Pink (or red) food colouring
150g apricot jam
250g ready-made marzipan (half a pack)
You also will need:
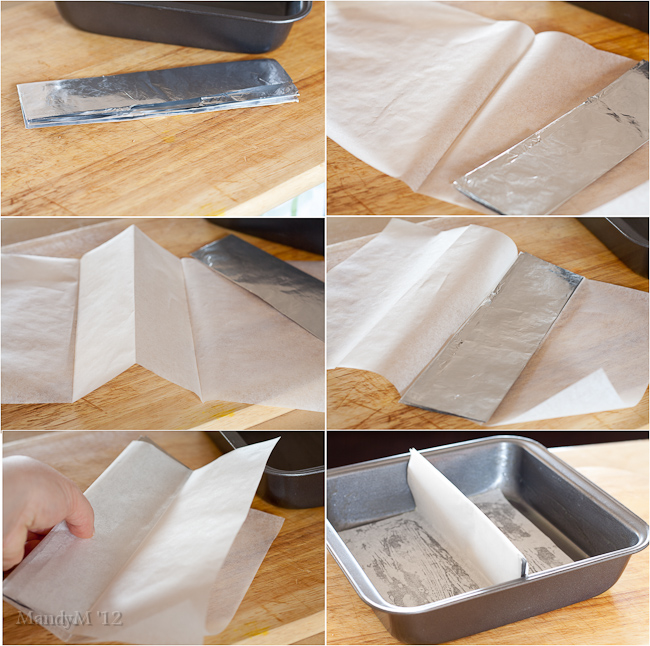
Square baking tin (20x20cm/8″x8″)
Parchment paper
Aluminium foil
Non-stick cooking spray
Small strainer (I used a tea strainer)

1. Pre-heat the oven to 180C
2. Divide your cake tin in half. Fold a piece of foil over and over itself several times to make a thick divider the same length as your tin. Line the tin with parchment paper and then cover the foil divider with parchment paper. I used cooking spray to stick the parchment divider to the parchment liner.
3. Cream together eggs, butter, and sugar. Add eggs one at a time.
4. Combine dry ingredients and slowly add dry to wet.
5. Put HALF the batter in one side of the cake tin.
6. Add pink food colouring to the remaining batter until the batter is the shade of pink you like and pour it into the other half of the in
7. Bake 30 minutes. I rotated it after 15, but if your oven doesn’t need things to be rotated, you can skip that.
8. While the cake is baking, bring the jam to a boil and then strain it over a small bowl. Discard the apricot bits left in the strainer. Allow the jam to cool completely.
9. Remove cake from oven and cool in the pan for 10 minutes, then turn out onto a cooling rack and allow it to cool for about an hour.

10. Cut each cake in half lengthwise, making 4 cake strips. Trim each strip so they are all the same size.
11. Stack the cakes. Bottom layer – one pink, one yellow. Top layer – yellow on top of pink, pink on top of yellow.
12. Use some of the apricot jam to stick the strips of cake together. Sit to one side.
13. Knead the marzipan slightly and roll out onto a floured surface (you can use icing sugar or more ground almond for this, too) until it is a rectangle large enough to cover all four sides of the cake.
14. Spread apricot jam onto the marzipan and lay the cake down onto the jam. Wrap the jam covered marzipan around the cake.
15. Trim off the excess marzipan on each edge of the cake and slightly trim the cake so you can see the checkerboard pattern.
Now what can I do with all these cake ends?!?!

(Answer: Cake Pops!)
***
The contents of this post, including images are © Rebecca J Lockley and Tim Lockley unless otherwise stated and should not be reproduced without permission. If you are not reading this on http://blog.beccajanestclair.com, my facebook page, Networked Blogs, the RSS feed(s), or through an e-mail subscription, please notify me.
[LJ readers reading this on the LJ RSS feed: Please click on the link at the top of the entry to go directly to my blog to leave a comment, as comments left on the LJ RSS do not get seen by me. Facebook users reading this from my Networked Blogs link can either comment on facebook or on my blog. If you are reading this through an e-mail subscription, you might need to go directly to my blog to view videos and images.]
For full Copyright and Disclaimer, please read http://www.blog.beccajanestclair.com/copyright/
[Recipe] Weetabix Tea Cake
 When a new Slimming World recipe book comes out, I always flip through it with a set of tabs and tab off the recipes I’d like to try. One of the recipes I marked in Best Loved Extra Easy Recipes was Weetabix Cake (p156). I finally decided to make it today, but unfortunately I didn’t have the Skim Milk or the mixed spice it calls for, so I needed to get a little creative. I thought about the recipe for my Lincolnshire Plum Bread and how you soak the sultanas in tea, so I decided to try it with the Weetabix Cake, and for the spices, I used the mixture I use for Plum Bread (which is actually Pumpkin Pie spice). So really, alternate names for this could be Weetabix Plum Bread or even Pumpkin Spice Weetabix Cake. But I called it a tea cake on my Instagram pictures, so Tea Cake it is. This cake is not only suitable for someone following Slimming World, but it is suitable for a diabetic as well.

Weetabix Tea Cake
2 Syns per slice if divided into 15 slices / 30 Syns for the whole cake (for you to divide by number of slices) [PLEASE NOTE: You cannot use the Weetabix as your Healthy Extra B choice as it is considered a tweak and the 6 syns for the Weetabix have been calculated into the Syn value.]
You will need:
2 Weetabix
200ml very strong tea (I used a chai spiced, but any black tea will work)
100g sultanas
100g self-rising flour
1 tsp pumpkin pie spice OR 1/4 tsp each of Cinnamon, Nutmeg, All Spice, and Ginger
2 TBS sweetener (I used Splenda)
2 eggs
1. Pre-heat the oven to 180C and line a loaf tin with some parchment paper or spray with fry light
2. Place Weetabix and sultanas in a large bowl and pour over the tea. Leave to soak for 5 minutes.
3. Whisk two eggs in a separate bowl, set aside.
4. Add all dry ingredients to Weetabix and sultana mix and beat in the eggs.
5. Pour mixture into prepared tin and spread out evenly
6. Bake for 45-60 minutes or until a toothpick inserted into the cake comes out clean
7. Cut into 15 equal pieces.
***
DISCLAIMER: I do not work for Slimming World, I am not affiliated with Slimming World beyond being a paying customer/member, I get no personal benefit from writing this post other than the joy of sharing.
Please note: Syn values are based on my exact ingredients using the online calculator. Your Syn value may vary based on your ingredients and the size of your baking containers and portions, so use this number as a guide only. Syn values also frequently change, but these values are correct at the time of publication.
The contents of this post, including images are © Rebecca J Lockley and Tim Lockley unless otherwise stated and should not be reproduced without permission. If you are not reading this on http://blog.beccajanestclair.com, my facebook page, Networked Blogs, the RSS feed(s), or through an e-mail subscription, please notify me.
[LJ readers reading this on the LJ RSS feed: Please click on the link at the top of the entry to go directly to my blog to leave a comment, as comments left on the LJ RSS do not get seen by me. Facebook users reading this from my Networked Blogs link can either comment on facebook or on my blog. If you are reading this through an e-mail subscription, you might need to go directly to my blog to view videos and images.]
For full Copyright and Disclaimer, please read http://www.blog.beccajanestclair.com/copyright/
[Recipe] Self Saucing Chocolate Cake
 Today is our 6th wedding anniversary! Since we’ve had a pretty amazing year already between 3 weeks in the US in May and a spur of the moment 10 days in Austria, we decided to keep our anniversary low-key. When I asked Tim what he wanted, he asked for pulled pork and a gooey dessert, the kind like you can get a Frankie and Benny’s. A dish my Aunt Barb made came to mind, which was like a brownie baked in a pie pan that made it’s own sauce and I remembered it was out of the Betty Crocker cookbook. It’s on Page 200 of the spiral bound (US) version and is called a Hot Fudge Sundae Cake. I’ve made it once before, but this time I wanted to scale it down to 2 servings, convert it to UK measurements, and work out the syns for Slimming World. As listed in the cookbook, the original serves 9 and has 10 Syns per serving (basing it on calories only as I don’t have the size of a serving to plug it into the calculator). I wanted to scale this down to serve 2 (no leftovers means no temptation!) and I also wanted to make it diabetic friendly and use some sugar substitutes. It still comes out to 10 syns, so changing the sugar didn’t matter and I will list the recipe using both regular sugar and sweeteners.
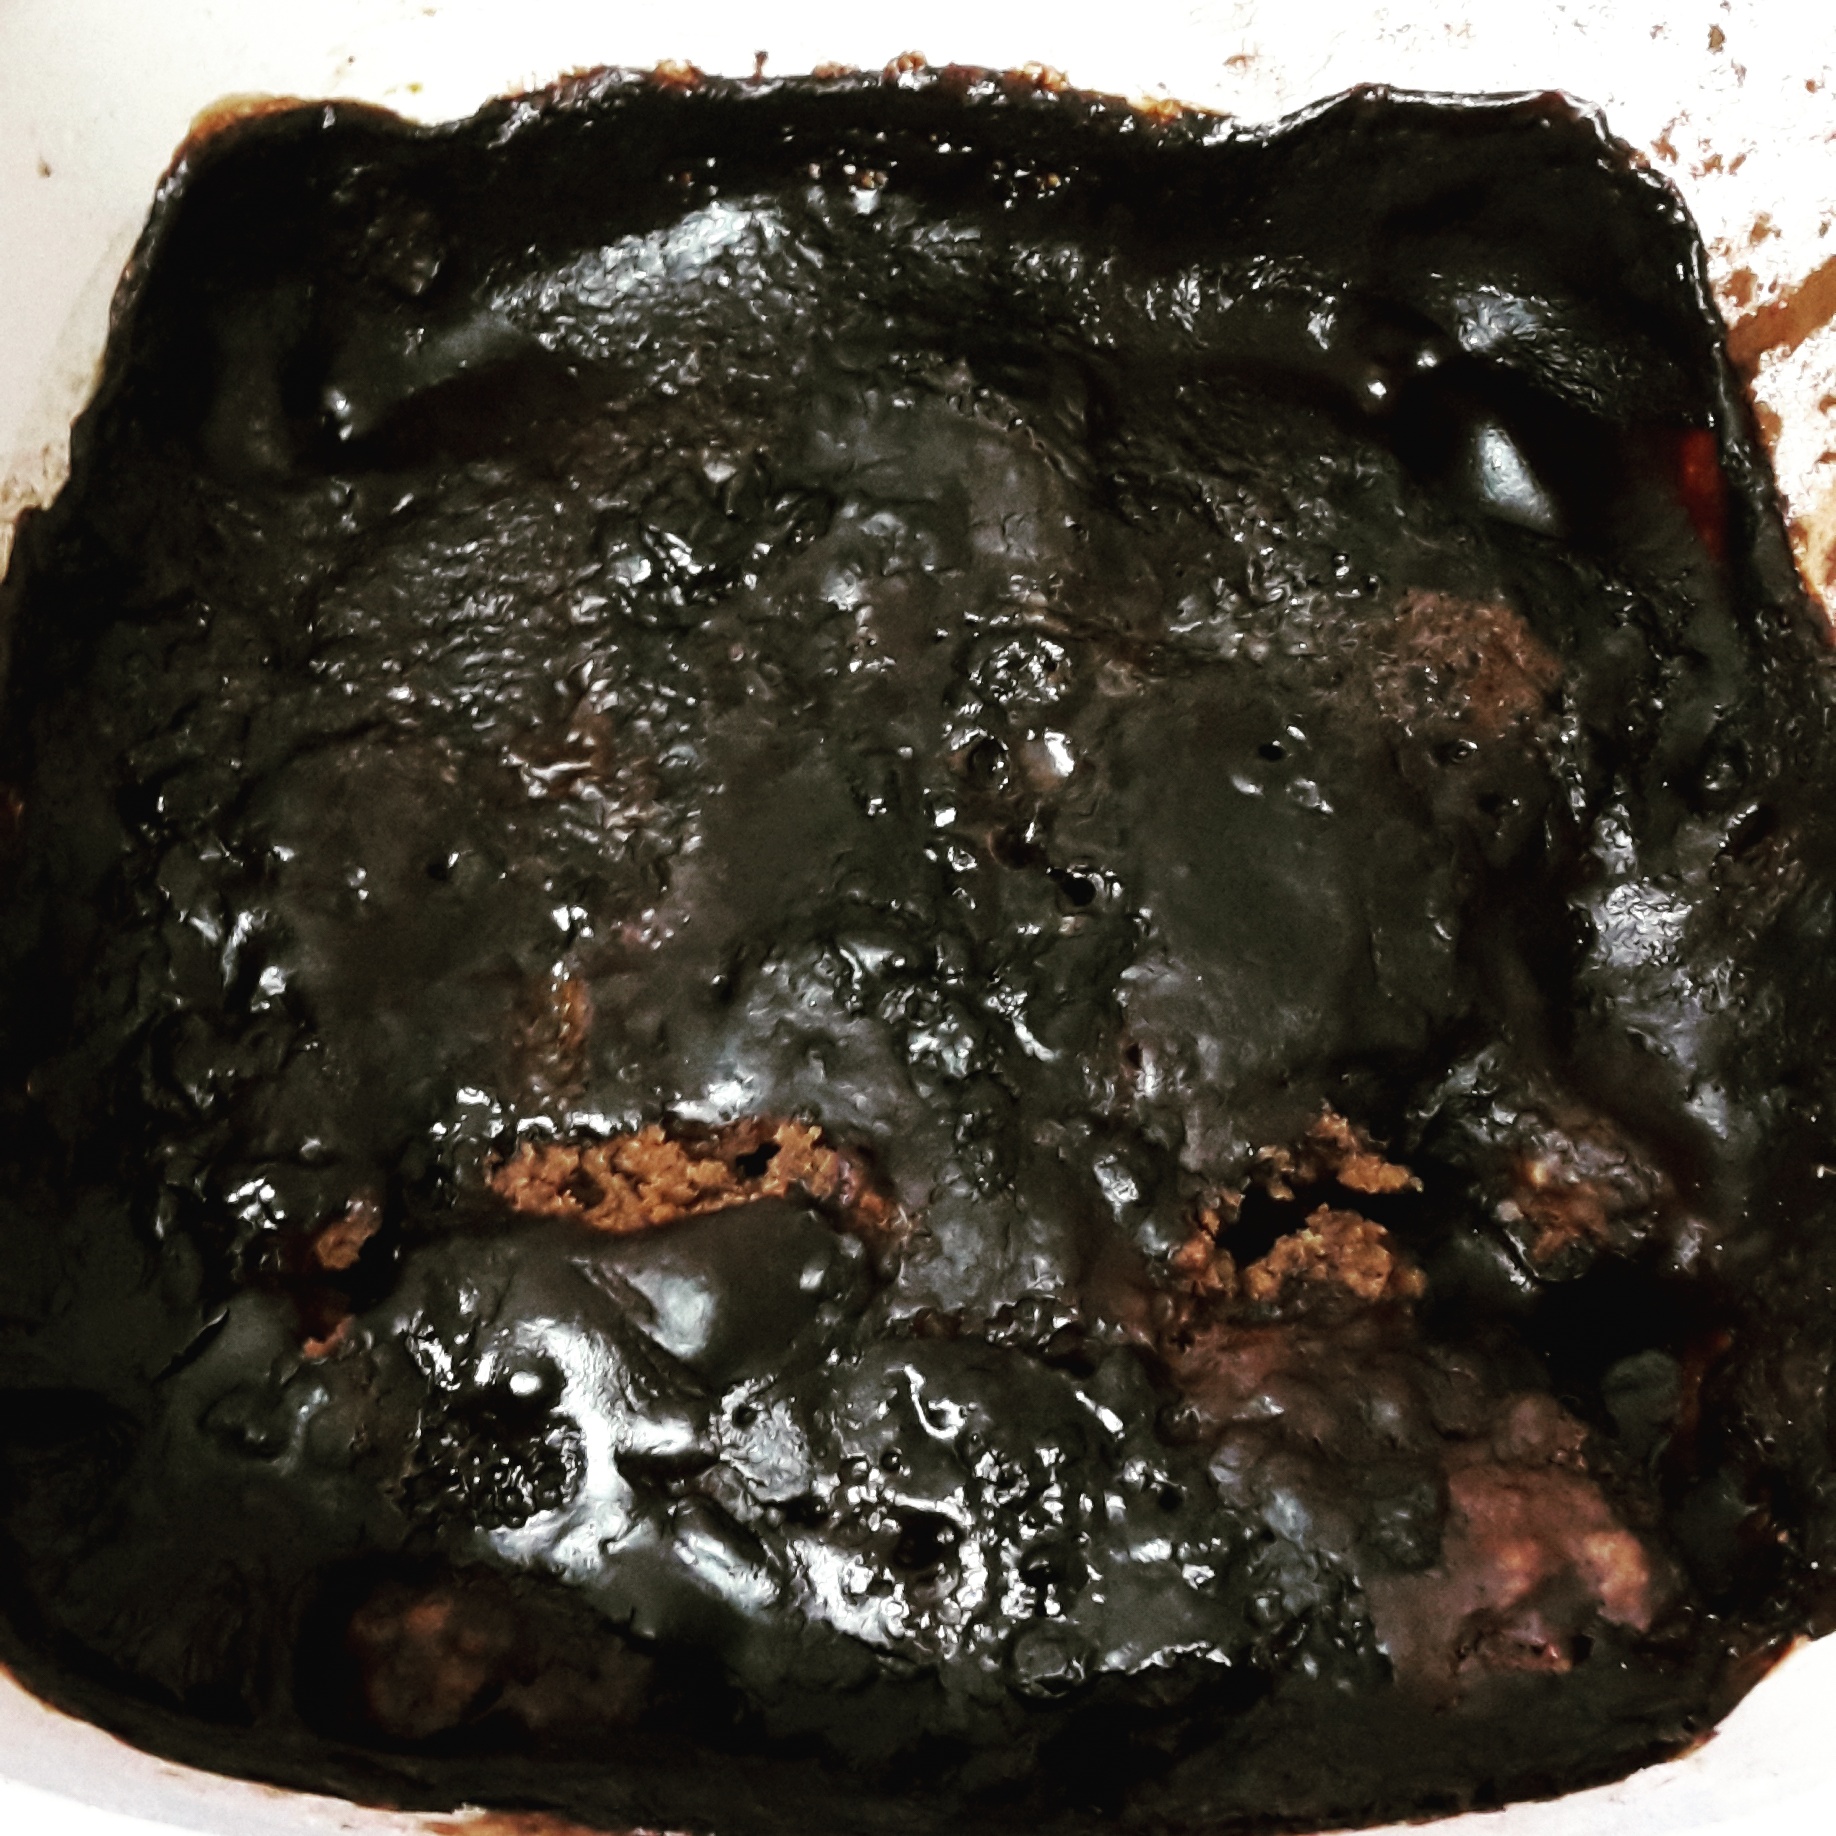
I baked this in a small Corningware dish my mom gave me when I moved. It’s an individual casserole size, so an individual pie dish would work for this or possibly dividing it in half into two ramekins (but then you would need to adjust cooking time). There also is a recipe for a Melting Chocolate Pudding on the Slimming World website which has 9 syns per serving, but I didn’t have individual microwaveable pudding containers and I wanted to be a bit more creative.
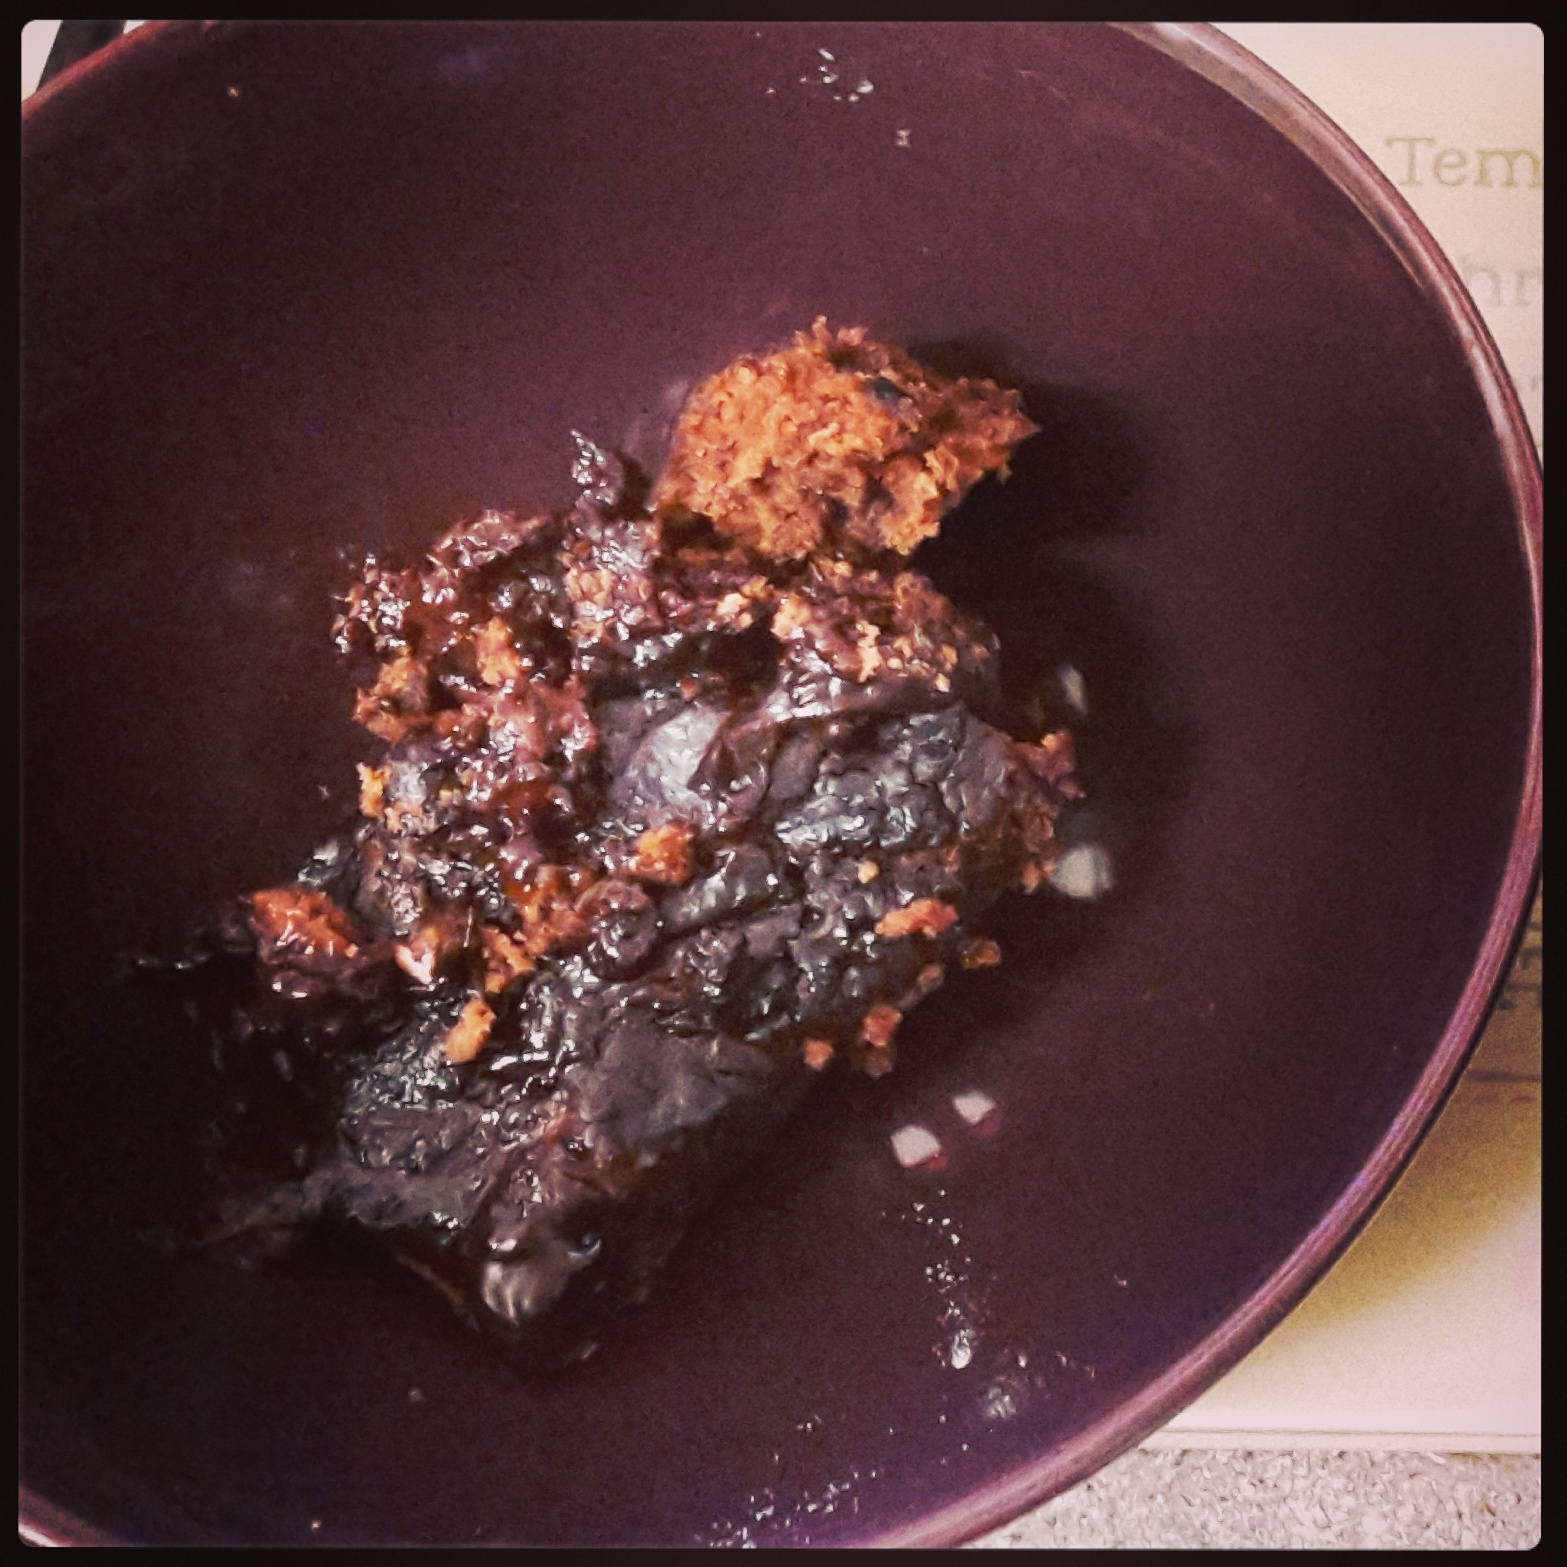
Self Saucing Chocolate Cake
Serves: 2
Syns: 10 per serving (it’s 9.25 if you use sweetener products)
You Will Need:
Cake –
50g self-rising flour
15g Truvia baking blend OR 30g caster sugar
1/2 TBS cocoa (I used Green & Black’s Organic)
25ml semi-skim milk
1-2 TBS water
1/2 TBS vegetable oil
1/2 tsp vanilla essence
Topping –
25g Splenda for baking Brown (or 50g brown sugar)
1 TBS cocoa
100ml very hot water (from the kettle)
1) Preheat oven to 180C (350F)
2) Combine flour, Truvia, and 1/2 TBS cocoa in the ungreased small casserole dish.
3) Mix in milk, vegetable oil, vanilla, and 1TBS of water. If mixture is still dry, add an additional Tablespoon water.
4) Spread mix evenly in dish.
5) Sprinkle batter with 1 TBS cocoa and brown sugar.
6) Pour hot water evenly over the top.
7) Bake 25-30 minutes until cake is cooked (Will be gooey on top. Stick a spoon in to check the cake)
Serve hot with custard or ice cream!
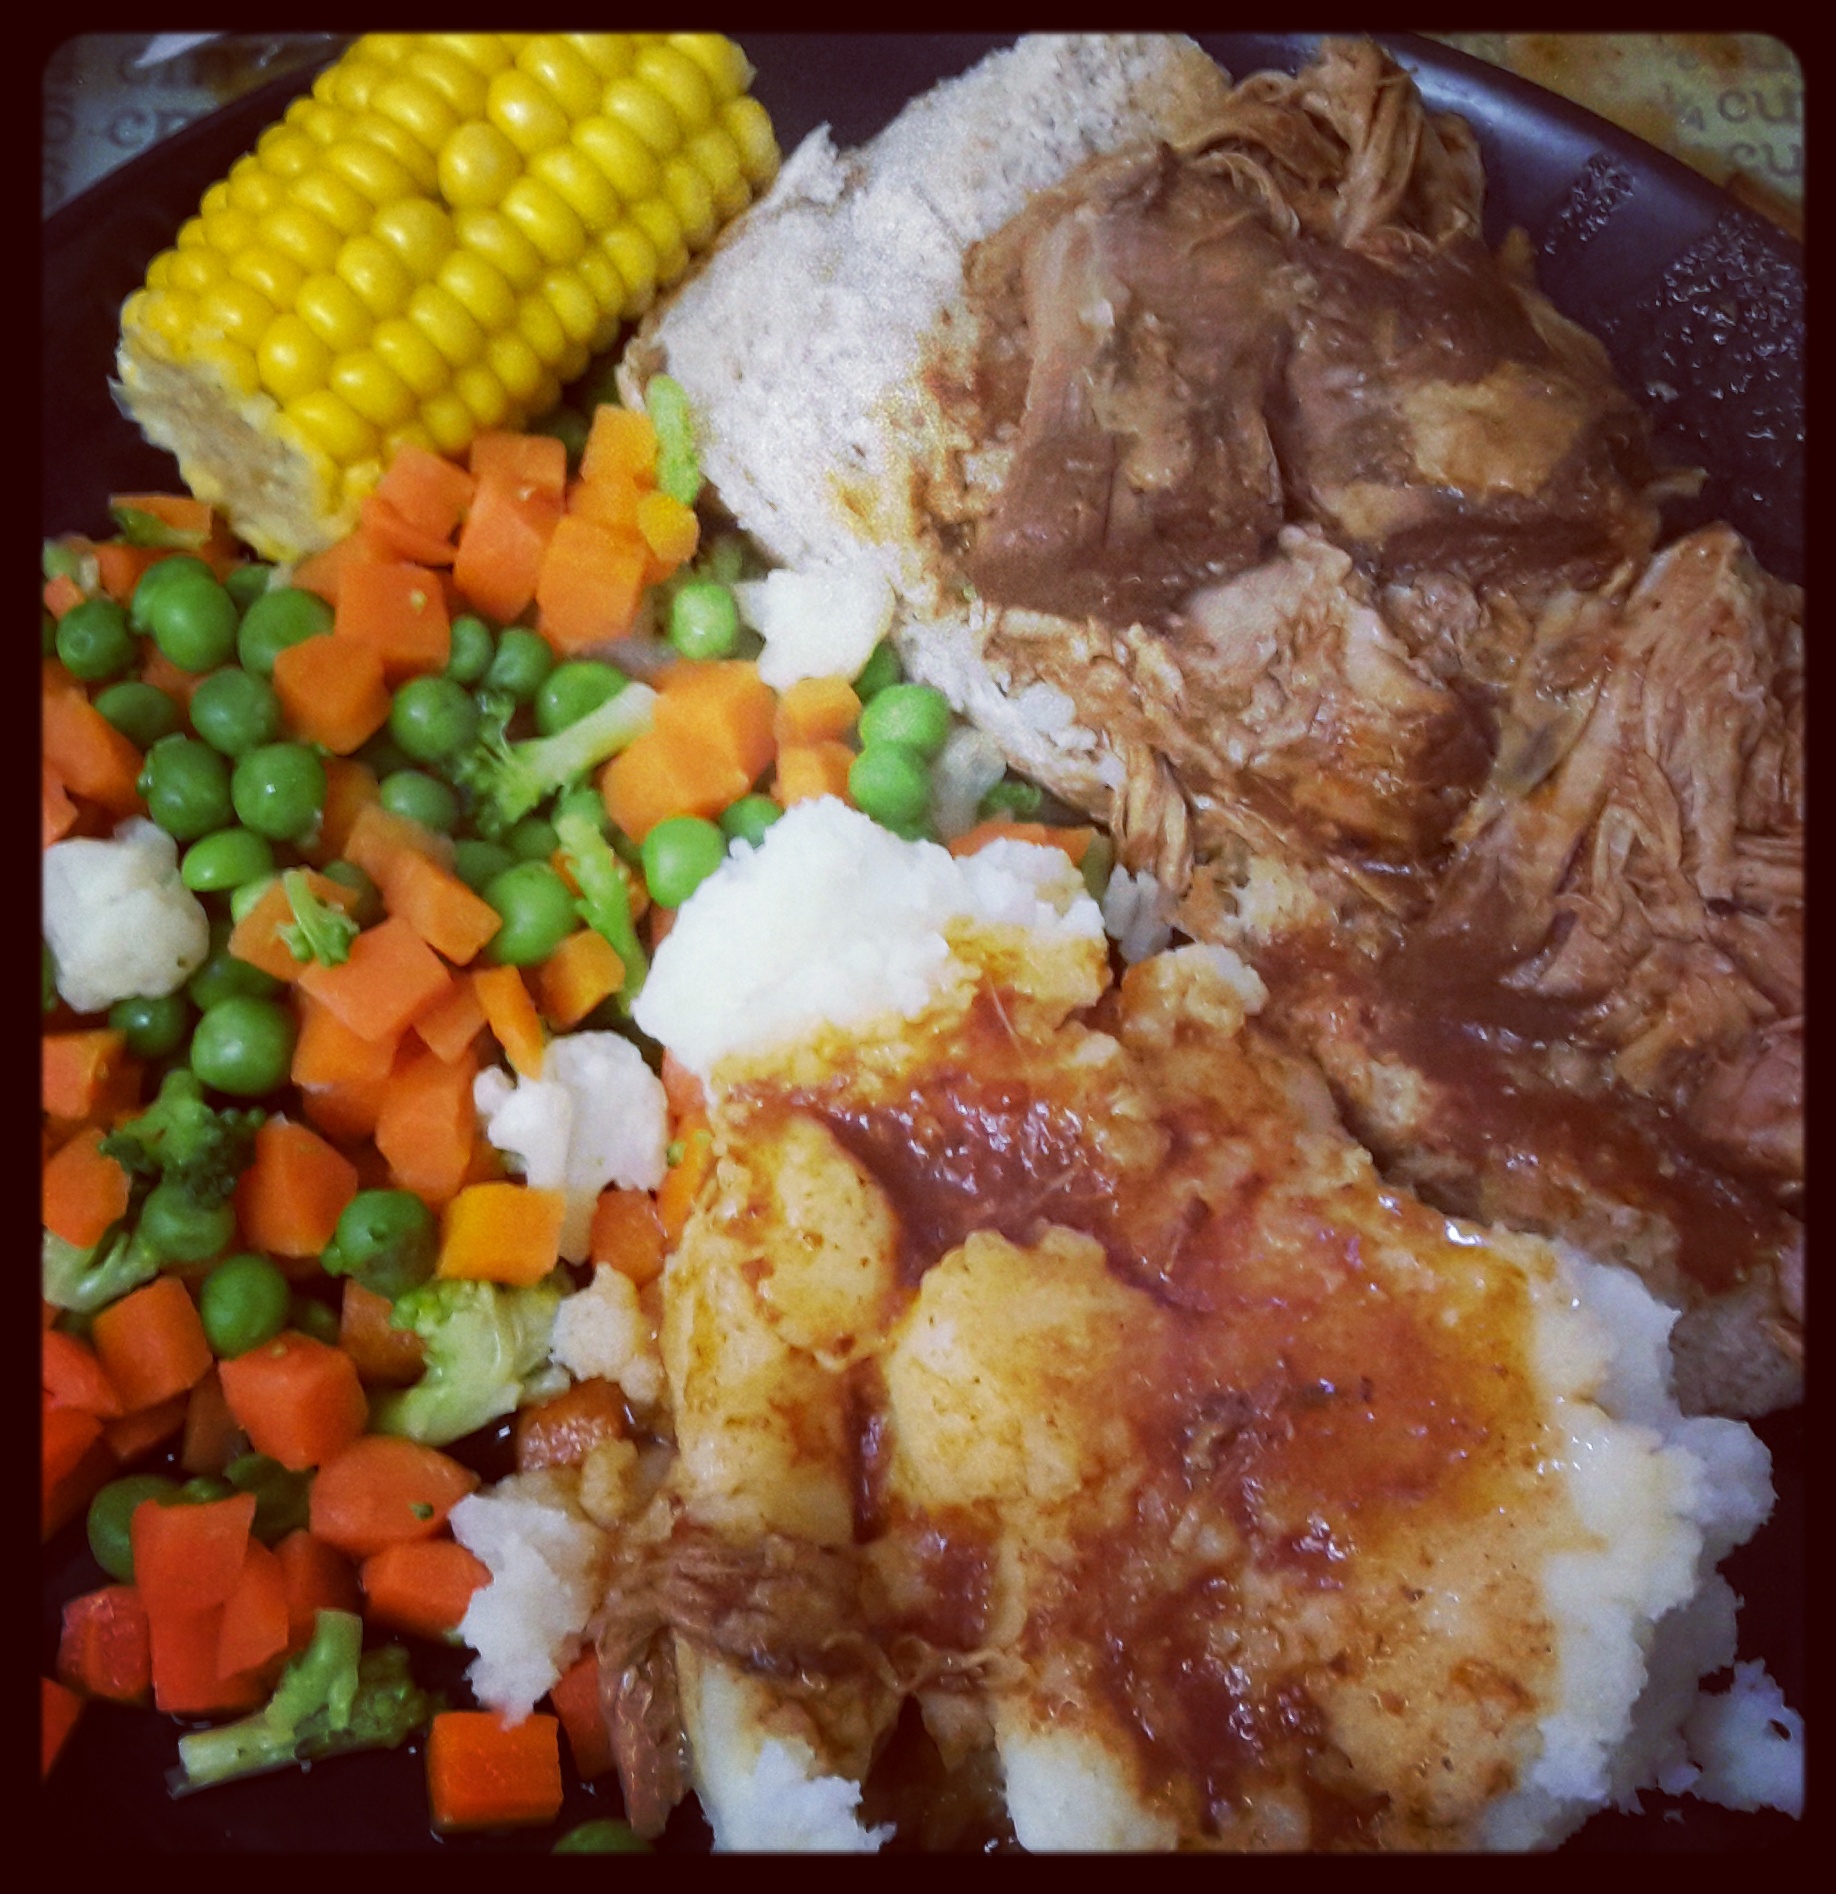
For the pulled pork, all you need is a piece of pork butt or shoulder (cut off all visible fat) and a batch of Slimming World Barbecue Sauce. Just toss it all in a crock pot and let it cook on low for 8-10 hours. I put ours in the crock pot last night before we went to bed and it was ready by the time we woke up and then I left it on warm until Lunch. We served it on top of wholemeal rolls (my HEB for the day) with smash, corn on the cob, and mixed vegetables.
***
DISCLAIMER: I do not work for Slimming World, I am not affiliated with Slimming World beyond being a paying customer/member, I get no personal benefit from writing this post other than the joy of sharing.
Please note: Syn values are based on my exact ingredients using the online calculator. Your Syn value may vary based on your ingredients and the size of your baking containers and portions, so use this number as a guide only. Syn values also frequently change, but these values are correct at the time of publication.
Photo of Tim and I taken by Eric Stocklin
The contents of this post, including images are © Rebecca J Lockley and Tim Lockley unless otherwise stated and should not be reproduced without permission. If you are not reading this on http://blog.beccajanestclair.com, my facebook page, Networked Blogs, the RSS feed(s), or through an e-mail subscription, please notify me.
[LJ readers reading this on the LJ RSS feed: Please click on the link at the top of the entry to go directly to my blog to leave a comment, as comments left on the LJ RSS do not get seen by me. Facebook users reading this from my Networked Blogs link can either comment on facebook or on my blog. If you are reading this through an e-mail subscription, you might need to go directly to my blog to view videos and images.]
For full Copyright and Disclaimer, please read http://www.blog.beccajanestclair.com/copyright/