Archive for the 'How-To' Category
Packing Carry-On Only with Ryanair
My husband and I planned a bit of a spur of the moment trip to Leipzig and Dresden recently and booked cheap flights with Ryanair. We did not want to pay the baggage fees (£40 one way for one bag!), so we decided to pack into our good old LL Bean Deluxe Bookbags. I’ve had mine since the mid-90s when I was in High School, and my husband got his about 8 years ago. These bags were made to last, so I can highly recommend one! They hold 32L, and weigh around 600g, so perfect for a carry-on!
We were going away for 5 days, one night would be in an Ibis in Leipzig, and the rest of the trip we stayed in an apartment in Dresden. I packed with the plans that I would wear everything at least twice, and if I needed to I knew I could wash things in the sink.
Packing list:
• Sport skort
• Short sleeved sport top
• Long sleeved sport top
• 3 x sport knickers
• T-shirt
• Pajama shorts
• Slippers
• Toiletries bag (see below)
• Nesting snack boxes
• Travel cup
• Crushable sun hat
• Packable rain coat
• Laptop charger/UK to EUR converters/US charging hub
• First aid kit
• Bag of snacks
• Tea bags/sweetener
• Bread bag and bag clasp*
• Reusable shopping bag
• Folding mini rucksack
All my clothing fit into a single packing cube. I also had some zipper top plastic bags in the bottom of my cube in case I needed to separate any dirty or wet clothing or in case the airport didn’t accept my toiletries bag and made me swap it to a plastic bag. I deliberately picked a sport skort for having shorts built in to protect my modesty when I crouched down to take photos and also to help with preventing chafing. I took sport tops for their quick drying technology so I had the option of washing my shirts in the sink. The long sleeved top I packed along was one that has mesh shoulders and upper back, so it still kept me cool even in the heat. I even packed sport knickers for their quick drying properties. I worked out that I actually only needed to pack 2 pairs (plus the pair I wore on the plane) as long as I was religious with washing them, but I decided to take a third pair along for a spare. And I actually wound up adding in two more pairs because I had the space for them. I also added a bralette, which didn’t work out the way I had expected it to.
I packed slippers over flip flops since we were going to be in an apartment and I knew I wouldn’t need them for the shower. In Germany and Austria (at least), it is usual to remove your shoes when you enter a home, so we always pack hausschuhe when we visit these countries and are renting apartments.
The nesting snack boxes are from Paperchase, and they are excellent for travelling if you plan on making packed lunches while you are away since they take up very little space in your bag. We also took along reusable drink cups that could hold both hot and cold drinks in them since we had a rental car with cup holders. We just took the cheapie £1 cups you can get in Starbucks, so nothing fancy.
Curious about the bread bag/clip? In Germany and Austria (and likely other parts of Europe), fresh rolls daily is a thing. You can buy them in the grocery store or from a bakery, but the bags they sell them in don’t keep the bread fresh longer than a day. Since our trip was so short, we didn’t want to have to deal with getting bread daily, so I packed a bread bag and took along a bag clip. This actually worked and our bread remained fresh for the duration of our trip!
You also might notice laptop charger, but no laptop. My laptop fit into a sleeve in Tim’s camera bag, so I only needed to pack my charger. However, I had plenty of space, so I could have easily slipped my laptop in.
Toiletries:
• 2in1 shampoo/conditioner bar (Godiva by Lush)
• Dove bar soap
• Hibiscrub
• Zineryt
• Degree for Women solid deodorant
• Mist You Madly body mist
• Face moisturiser
• Make-up: BB Cream, powder,blush, eyeshadow, concealer, mascara, & lipgloss
• Anti-itch cream
• Anti-chafe cream (lifesaver!)
• Sudocreame
• Clinique Moisture Surge
• Boots Tea Tree blemish stick
• Toothbrush/toothtabs/mouthwash tabs
• Folding hairbrush and hair bands/pins
• Vicks inhaler stick
• Yes To Cucumber travel wipes
• Febreeze
and the clothing I wore on the plane:
Denim Skirt
Footless tights
Socks
Sport knickers
Bra
T-shirt
Thin Jumper
Fleece body warmer
Sketchers Go Walks
The tights and socks were the only ones of each I packed as I planned on washing them in the sink. I forgot to wash the tights and wished I had them on the return trip! I also didn’t need the body warmer again until our last day, but I needed it on the UK side the day we left and knew I would need it in the UK once we landed. Wearing it on the plane meant it didn’t take up any space in my bag, though I did have room for it. I wore my denim skirt the day after we landed and on the way home, and wore the skort the other three days.
After I came home and emptied my bag out, I decided to ask myself a set of questions. A girl on #HPLWorld calls it an “exit interview†with her bag. These are the following questions I ask myself:
1 Did I wear all my clothing packed? At least twice? If no, what and why?
2 Did I use all outerwear/accessories? If no, what and why?
3 Did I use all toiletry items including cosmetics but excluding first aid kit? If no, what and why?
4 Did I have to buy anything for immediate use? What?
5 Did I use all electronics/electronic accessories packed? If no, what and why?
6 Did I use all other items not previously categorised? If no, what and why?
7 Is there anything left unused that can be eliminated from a future trip?
8 Is there anything used on this trip that you do not want to pack again?
9 Was anything missing? Anything you felt like you should have packed?
10 Did the bag hold up? Was it too heavy or awkward?
11 Will you travel hand luggage/rucksack only again?
These questions apply to my main bag only. My personal item is my camera bag/purse and contained my DSLR, zoom lens, other camera accessories, and purse. I did not use my zoom lens, but it’s not something I would eliminate from a future trip if I was taking my DSLR.
1. Yes, I wore everything I packed at least twice, and in some instances more than twice. Except for my knickers, since I took enough pairs to last the whole trip.
2. No, surprisingly. It didn’t rain at all on our trip during the day so I never needed to use my mack in a pack. It also stayed ridiculously hot, so I never needed to add on a layer of wrist warmers.
3. No. Items left unused at the end of the trip were blush, eyeshadow, lipstick/gloss, and mascara. I used the BB cream daily as it had SPF in it and set it with setting powder, but I never used the other make-up items as it was just too hot for make up!
4. Yes – My folding brush broke the first day so I had to pick up a new one and we purchased sunblock in the airport before we left. I didn’t like the toothtabs, so I bought some toothpaste too.
5. We never tried out the HDMI cable (we were too tired each night!) and I didn’t need to use my card reader.
6. Yes. Er, I think. I’m sat in Starbucks enjoying the air conditioning while my phone says it’s 32C out, so I can’t double check everything. I think I had a leftover zipper top plastic bag, but that was it. Oh, I didn’t use all of the tea bags or eat all of the HiFi bars packed, but I left them behind. I didn’t know if we would need lots of tea bags or if I would be hungry daily for a bar.
7. This is a good question, and a puzzling one. I’d love to eliminate the rain coat, because it takes up a chunk of space, but rain is one of those unpredictable things. Originally, it was supposed to rain on our trip! An umbrella would take up less space, but an umbrella is less convenient as it ties up a hand to hold it. The travel cups turned out to be an excellent idea as we had a rental car and were able to pour water and soft drinks out of larger bottles and have it easy to hand. Probably wouldn’t take the travel cups on a trip we aren’t renting a car on, though.
8. No more bralette. Ugh. I really hated that thing. It offered no support whatsoever and I felt like I might as well have been wearing no bra. I think I’ll either just make space for a second proper bra (and I had space!) or I’ll have to hope I can wash/dry my bra overnight at least once during a trip. Or maybe use a bathing suit top as double duty. The Boots tea tree blemish stick I removed from its original packaging did not work out. It became dried out and unusable, and I would have had room for the original packaging anyway! I also didn’t really like the Yes To Cucumber facewipes, but they were passable.
9. I wanted a second pair of shoes desperately. The heat made my feet sweat in my sketchers so badly and it was just gross. So either a second pair to alternate or maybe just some powder to sprinkle in my shoes daily to keep them feeling fresh. And as mentioned above, a second bra. I also wished I had another top along because I had spilled something on my shirt at dinner and had to wear my pajama T-shirt out that evening since I didn’t want to swap into my only other clean shirt for a few hours. So another top would have been nice. I also wished I had some tea tree or acne fighting face wash along as I broke out pretty badly on my chin (though it was bacterial/an allergic reaction), I wished I had something better than Dove to wash my face with.
10. My bag is basically indestructible. The only problem it has is that it lacks structure, so I wouldn’t take it hiking or anything like that but it’s pretty good for point a to point b. It did get a little heavy (even though it only weighed 6KG on the return) when I was stuck wearing it going through the long queue at UK immigration, but for the most part it was fine as I wasn’t wearing it for very long periods of time.
11. Absolutely. Though my next trip my ticket includes a checked bag and we want to bring along a tripod and some other non carry on items, so we will be checking a small (it’s still carry on sized) suitcase between the two of us.
We’re off back to Germany soon, but for a longer trip. Hopefully, I can still keep it minimal!
***
The contents of this post, including images are © Rebecca J Lockley and Tim Lockley unless otherwise stated and should not be reproduced without permission. If you are not reading this on http://blog.beccajanestclair.com, my facebook page, Networked Blogs, the RSS feed(s), or through an e-mail subscription, please notify me.
I have not been compensated by any of the companies mentioned in this blog post, however some links might be affiliate links where I earn a small commission.
[LJ readers reading this on the LJ RSS feed: Please click on the link at the top of the entry to go directly to my blog to leave a comment, as comments left on the LJ RSS do not get seen by me. Facebook users reading this from my Networked Blogs link can either comment on facebook or on my blog. If you are reading this through an e-mail subscription, you might need to go directly to my blog to view videos and images.]
For full Copyright and Disclaimer, please read http://www.blog.beccajanestclair.com/copyright/

[Travel] Making a Car First Aid Kit
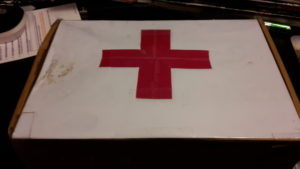 Having a first aid kit in the car is a legal requirement for some European countries and it’s just a good idea in general. You can purchase pre-made kits (and we have a cheap one of those too just so we can fulfil the legal requirements) in Halfords that will comply with the applicable laws, but I have kept a personal first aid kit in the car since 2010 with things that we specifically need or use. Also, some countries have a weird rule that the first aid kit needs to be sealed, so this was just easier for us. And having it has come in handy on multiple occasions! I decided to get our current kit out of the car in preparation for our road trip to Austria to check the expiration dates and give it an update before we go again. No surprise, a lot of it had expired as it was put together in 2010! So now it’s updated, and here’s a video about putting together a first aid kit:
The nice thing about making your own first aid kit instead of buying a pre-made one is you can create it around your needs and your likes/dislikes. If you have products you like better than other for first aid, if there’s a pain relief product you like better than another (or tummy remedy!), or if there’s a product you know you’ll need based on your own medical needs…it can go in your own personalised first aid kit. The type of box you use doesn’t matter, but it should be sturdy and waterproof. Alternatively, you could keep everything in a zippered bag (and it would probably squish better). I took a cardboard box we had waiting for the recycle bin and I covered it with clear contact paper. You also could use clear packing tape if you don’t have any contact paper and I added a red cross to the front to make it easily recognisable as a first aid kit. We also always keep it under the front passenger seat so it’s always in the same location and can easily be grabbed or we can tell someone else exactly where it is.
The total cost for putting this together was probably around £20. I bought all the value range first aid items from shops like Tesco, Wilkinson’s, and Asda…and they work. You don’t NEED fancy brands for first aid. Or if you’re really attached to having a certain brand, you always have the option of buying those. Probably the priciest item was the 4head stick!
When I first went to make the kit, I solicited advice from my friends who are first aiders, EMTs, and nurses on what they felt were important things to have on hand in a first aid kit, so this list is medical professionals approved!
Our first aid kit contents in no particular order:
-Box of plasters/band-aids
-Blister plasters
-strapping tape
-micro-porous tape
-gauze pads
-elastic band
-paracetamol
-ibuprofen
-diarrhoea medication
-soap box for above medicine to keep it dry
-gaviscon
-antiseptic wipes
-antiseptic ointment
-sudocream
-medical scissors
-tweezers
-antibacterial gel
-rubber gloves
-burn ointment
-spray on plaster
-4head headache gel
-duct tape (I fold over a piece several times to have a small bit, not a whole roll!)
-nit comb
-sanitary towel
And don’t forget to check with Halfords or the RAC or AA what other requirements are needed in each European country you will be driving through, as they can vary. You also should sign up for temporary European breakdown coverage (we got the highest level of coverage that not only will bring your car back to the UK for you, but give you a rental car to finish out your holiday and provide a way to get you back home at the end. Pricey, but worth the peace of mind) as well as additional coverage through your car insurance. For example, our insurance only automatically covers a few days abroad, and adding coverage for the three weeks only cost £42. Also make sure you have signed up for your EHIC card as well before you go (this is subject to change depending on the terms of Brexit). If you are not a UK or EU resident, make sure you get travel insurance before you go, because you never know! We have a multi trip world plan that costs us around £100/yr, but you can get single trip plans for as low as £8. You can read more about other requirements for driving abroad in my previous post from 2011.
I also always try to carry a mini first aid kit in my backpack when we aren’t in the car just with a few plasters and some antiseptic wipes to clean and cover a cut until you get back to the car.
Obviously, this first aid kit isn’t going to fix all medical problems that arise, but it should cover enough basics until you can get somewhere else to get proper medical attention. And I think the Halford’s ones even include a thermal blanket, but you also could pick one up at the pound shop if you wanted to include one of those for emergencies too.
***
This post has not been endorsed by any of the products mentioned in this post and I have not received compensation for writing this post or making any videos.
The contents of this post, including personal images are © Rebecca J Lockley and Tim Lockley unless otherwise stated and should not be reproduced without permission. If you are not reading this on http://blog.beccajanestclair.com, my facebook page, Networked Blogs, the RSS feed(s), or through an e-mail subscription, please notify me.
[LJ readers reading this on the LJ RSS feed: Please click on the link at the top of the entry to go directly to my blog to leave a comment, as comments left on the LJ RSS do not get seen by me. Facebook users reading this from my Networked Blogs link can either comment on facebook or on my blog. If you are reading this through an e-mail subscription, you might need to go directly to my blog to view videos and images.]
For full Copyright and Disclaimer, please read http://www.blog.beccajanestclair.com/copyright/
Turkey Hill Orange Iced Tea Copy Cat for PA ExPats
 I am from Lancaster County, Pennsylvania. Well, sort of. In that Lancaster Co was the last place I lived before I moved to the UK. I actually grew up in NJ, and now my mom lives in York, PA (where she grew up), so I don’t really go back to visit Lancaster except to hit up tourist places with Tim, but one thing Tim and I both love about visiting is getting to have Turkey Hill Orange Iced Tea. Turkey Hill started out over 85 years ago as a side business for a local farmer to sell his excess milk. Soon, it turned into a business of his own and his children added ice cream to the business, and then iced tea, lemonade, and other fruit-based soft drinks. Turkey Hill used to only be available in Eastern PA, and it was always a favourite. Soon it spread out and now I think Turkey Hill (at least their ice cream) is available in many of the larger markets in the USA. However, they have no plans to expand internationally (I’ve asked!) and no plans on creating a powdered form of their tea or creating concentrated drops (again, I asked!).
When my husband (at the time, only my boyfriend) came to visit me in Lancaster County in 2009, I introduced him to drinking iced tea. He thought it was a bit odd, but he soon found it refreshing on a hot day, especially when I then introduced him to the flavoured teas of Turkey Hill! The last time I visited the US without Tim, I brought him home a small bottle, and when we were last in the US in May 2015, Tim asked me if I thought I could re-create the flavour. AFter all, I had made a pretty good stab at re-creating favourite restaurant meals, so why not give flavoured tea a go? I told him I would try after we got home, and then I forgot and it soon became too cold in the UK to want iced tea.
Enter the current heatwave. ABout a week beofre we went away on holiday, I decided to do an experiment. There isn’t room in our fridge for a proper pitcher (excuse me, jug) of tea, but I wanted to have cold tea and not left out on the counter room temperature tea. Spying the squash bottle, I got the idea to make a “tea concentrate” and then add a bit of it to a glass to top up with tap water. It worked, and then my brain kind of went into overdrive and I managed to create the exact same flavour of Turkey Hill Orange Tea.
You Will Need:
10 regular tea bags (I used Tetley)
10 sweetener tablets (optional. You also could probably use sugar or skip the sweetener)
500ml boiling water (kettle)
500ml cold water
100ml Orange squash (I used Robinsons not double concentrate)
A heat proof measuring jug at least able to hold 500ml
A 700ml (approximately. ours might be 750) water bottle
1. Place 10 tea bags into your heatproof jug and fill to the 500ml line with boiling water from the kettle. Add in your sweetener tablets and let the tea steep for about 10 minutes.
2. Remove tea bags after 10 minutes and allow the tea to cool before putting it into the fridge (I transferred it into a 500ml bottle from Lakeland).
3. Leave the tea concentrate to cool in the fridge for several hours.
4. using your 700ml water bottle, add 100ml of tea concentrate, 100ml of Orange squash, and top up with water, giving it a shake or stir.
5. Enjoy the sweet taste of Lancaster County.
And if you follow Slimming World, this drink has 0 syns!
***
DISCLAIMER: I do not work for Slimming World, I am not affiliated with Slimming World beyond being a paying customer/member, I get no personal benefit from writing this post other than the joy of sharing.
Please note: Syn values are based on my exact ingredients using the online calculator. Your Syn value may vary based on your ingredients and the size of your baking containers and portions, so use this number as a guide only. Syn values also frequently change, but these values are correct at the time of publication.
Turkey Hill image at the top of this post copyright Turkey Hill.
The contents of this post, including images are © Rebecca J Lockley and Tim Lockley unless otherwise stated and should not be reproduced without permission. If you are not reading this on http://blog.beccajanestclair.com, my facebook page, Networked Blogs, the RSS feed(s), or through an e-mail subscription, please notify me.
[LJ readers reading this on the LJ RSS feed: Please click on the link at the top of the entry to go directly to my blog to leave a comment, as comments left on the LJ RSS do not get seen by me. Facebook users reading this from my Networked Blogs link can either comment on facebook or on my blog. If you are reading this through an e-mail subscription, you might need to go directly to my blog to view videos and images.]
For full Copyright and Disclaimer, please read http://www.blog.beccajanestclair.com/copyright/
How To Monthly and Weekly Meal Plan [Slimming Word]
This past week at Slimming World, our consultant talked about learning visually and it got me thinking about meal planning, so I thought I would do a video showing how I meal plan. It turned into two videos – one for monthly planning, and one for weekly planning.
At the end of the previous month, or within the first week of a month, I sit down with a blank monthly calendar (I print out the ones Philifaxy makes) and some of my cookbooks and I plan out 30 days of meals. This doesn’t mean that the meal I write down for the 15th is going to be made on the 15th, it just means I have 30 meals for the month I can pick through when I make our weekly plans. It takes me about 45-60 minutes to plan the month this way, but then it keeps planning the week down to 30-45 minutes.
I also said I would upload my weekly planning sheet to dropbox, so feel free to download this and use it:
Weekly Slimming World Meal Planning Sheet
***
DISCLAIMER: I do not work for Slimming World, I am not affiliated with Slimming World beyond being a paying customer/member, I get no personal benefit from writing this post other than the joy of sharing.
The contents of this post, including images are © Rebecca J Lockley and Tim Lockley unless otherwise stated and should not be reproduced without permission. If you are not reading this on http://blog.beccajanestclair.com, my facebook page, Networked Blogs, the RSS feed(s), or through an e-mail subscription, please notify me.
[LJ readers reading this on the LJ RSS feed: Please click on the link at the top of the entry to go directly to my blog to leave a comment, as comments left on the LJ RSS do not get seen by me. Facebook users reading this from my Networked Blogs link can either comment on facebook or on my blog. If you are reading this through an e-mail subscription, you might need to go directly to my blog to view videos and images.]
For full Copyright and Disclaimer, please read http://www.blog.beccajanestclair.com/copyright/
Foot Therapy: DIY Foot Soak
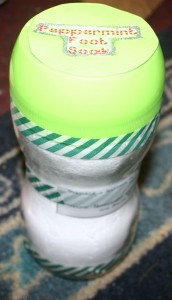
I needed a gift idea for my Mother-in-law. She’s hard to shop for because she will always tell us she doesn’t want anything! I decided to make her some peppermint foot soak. I would make some for my mom, too, but I don’t think a bag full of white powder would make it though customs, do you?
It’s really easy to make, too! I ordered all my supplies off eBay, and I have more than enough for several more batches. Buying the baking soda/bicarbonate of soda in bulk online will save you a bundle. I think I spent around £10 for the supplies, but that included essential oils for other projects, too.
You will need:
1 Cup Epsom Salts
1 Cup Baking Soda or Bicarbonate
Essentail Oil (I used peppermint and eucalyptus, but you can use whatever you want)
Mix together the Salt and Soda and add however many drops of oil you’d like (I probably used about a dozen of each). Stir or shake t distribute the oil. If you can’t smell the oil, add a few more drops.
Store in a clean jar. For gift giving, you could make a label for the jar and some instructions (sprinkle in a footbath or tub). I also included a list of ingredients so the receiver would know if they were intolerant of any of the items. I used a jar that some Stevia came in because I liked the shape of the jar and the colour of the lid.
The Eucalyptus is also great if you’ve got a cold. I just added a few drops to my bath and it helped to clear my nose!
~~*~~
The contents of this post, including images are © Rebecca J Lockley and Tim Lockley unless otherwise stated and should not be reproduced without permission. If you are not reading this on http://blog.beccajanestclair.com, my facebook page, Networked Blogs, the RSS feed(s), or through an e-mail subscription, please notify me.
[LJ readers reading this on the LJ RSS feed: Please click on the link at the top of the entry to go directly to my blog to leave a comment, as comments left on the LJ RSS do not get seen by me. Facebook users reading this from my Networked Blogs link can either comment on facebook or on my blog. If you are reading this through an e-mail subscription, you might need to go directly to my blog to view videos and images.]
For full Copyright and Disclaimer, please read http://www.blog.beccajanestclair.com/copyright/
Make Your Own Draft Stopper
A few weeks back I talked about things we were doing to get our home ready for Winter and I mentioned making draft stoppers for the front door and living room door. Today I decided to make the front door draft blocker.

[It will be on the inside of the door, but there was better lighting if I took the photo outside!]
You will need:
-A pair of thick tights (40 denier or higher. Used is Ok, but make sure it doesn’t have any holes)
-Sand (I used about 6KG of builder’s sand, but you could get sand from a beach or a sandbox too. We just happen to have builder’s sand in the shed)
-Cardboard or a funnel
-Scissors
-Rubber gloves (optional, but it keeps the sand from getting stuck under your fingernails)
Step One:
Cut down the center of the tights to separate the legs.
Step Two:
Roll up the cardboard to create a funnel inside the leg, or use a funnel.
Step Three:
Fill up the leg with sand. This is best done outside! Once you think you have enough sand in the leg, stretch it out and move the sand around until it’s about the same length as the bottom of your door. Tie off the end and snip the edges. It should look something like this:

Step Four:
Take the other leg of the tights and stuff the sand-filled leg inside of it, leaving a small “tail” at the toe end. Tie off the outer tight at the top, cut the loose ends off, and tie a knot at the toe.

Your sand sock/draft buster is ready to use!
I’ve also been informed by my friend Lauren that if you use unscented kitty litter instead of sand it will absorb odours too. I did try this, and I have to say it wasn’t a success for me as it was too dusty and even though it says “unscented”, it still smelled like cat litter. I’m wondering if the clumping kind would have worked better, though.
~~*~~
The contents of this post, including images are © Rebecca J Lockley and Tim Lockley unless otherwise stated and should not be reproduced without permission. If you are not reading this on http://blog.beccajanestclair.com, my facebook page, or the RSS feed(s), please notify me.
[LJ readers reading this on the LJ RSS feed: Please click on the link at the top of the entry to go directly to my blog to leave a comment, as comments left on the LJ RSS do not get seen by me. Facebook users can comment directly on Facebook.]
Tips for having a good Halloween in the UK
I was on BBC Lincolnshire last week talking about Halloween with William Wright. He asked me to come on as an American to talk about Halloween, since it’s not celebrated all that much in the UK.
Here are a few guidelines for having an authentic Halloween:
-Wear a costume. If your child is going to go trick or treating, they need a costume. You don’t have to go out and spend a lot of money on this, either. One of my favourite costumes was made on Halloween out of things we had in the house. I became an Absent-minded professor with a button down shirt open over a t-shirt, an untied tie looped around my neck, a pair of boxers (I wore tights under for warmth), and one slipper and one shoe.
-Trick or Treating is for kids. The general cut off IMHO should be the lower teens, unless you have a younger sibling or babysitting charge to take around. Groups of 19-20-yr-olds begging for sweets just isn’t cool.
-If you are escorting a younger child, don’t expect candy for yourself. Some people will only give candy to the little ones, but it helps your case for candy if you put on a costume.
-If someone doesn’t have candy, that isn’t an excuse to throw eggs or do other vandalism. Some people just don’t like Halloween or forgot to plan for it. Be gracious and thank them for their time before leaving their property.
-If the light is out, don’t knock. A common undocumented rule in the US is to leave your front light on if you want trick or treaters and to turn it off if you don’t.
-Trick or Treat only on Halloween or your town’s designated night. Trick or Treating is one night. Some towns designate a different day for Trick or Treating other than Halloween, but it is always just one night. If your town is doing Trick or Treating on the 30th, don’t go out on the 31st, too!
-Be polite and say thank you. Loads of kids would come to my door in the US and some wouldn’t even say “Trick or Treat” let alone thank me for the candy. A little manners goes a long way!
-If you’re giving out candy, remember to only give out wrapped candy. Unwrapped candy isn’t safe, and neither are home baked goods. Save the home baked goods for the people you know directly and not the strangers. Small coins are also sometimes given out in the US by people who either don’t want to give candy, or have run out. When I was younger we also occasionally would receive a small bag of pretzels, crisps, or even a pencil.
-Likewise, parents please go through your children’s candy before they start eating it. Check to make sure things are still in date and that wrappers are secure. Throw away unwrapped candies or home baked goods, unless you know the person who gave it to your child.
-Halloween does not have to be scary, and in fact, can be fun and even silly! The producer at BBC Lincolnshire told me her child was terrified of the skulls and spiders decorating the nursery he goes to. You don’t need scary skulls and spiders to decorate for Halloween. Witches, black cats, mummies unravelling, even just plain pumpkins and coloured leaves can be a nice Halloween decoration.
-Please remember that just because you see something OTT on an American TV programme, that doesn’t mean it’s something done by middle-class America. This note applies to Proms as well! When in doubt, do some internet research or find an American friend to ask.
Have a safe and happy Halloween!!
~~*~~
The contents of this post, including images are © Rebecca J Lockley and Tim Lockley unless otherwise stated and should not be reproduced without permission. If you are not reading this on http://blog.beccajanestclair.com, my facebook page, or the RSS feed(s), please notify me.
[LJ readers reading this on the LJ RSS feed: Please click on the link at the top of the entry to go directly to my blog to leave a comment, as comments left on the LJ RSS do not get seen by me. Facebook users can comment directly on Facebook.]
Clean Your Flasks…with Denture Cleaner?
I had a problem. Tim and I have stainless steel flasks we use for carrying around tea when we are out and about. And of course, we have milk in our tea in the flasks. You can imagine where this is going, I’m sure.
Yes, I forgot about emptying the flasks the time before last. I dumped them outside and discovered we had made tea-flavoured cottage cheese (no, I was not about to eat it!), and left a film on the inside and bottom of the flasks. I thought I had cleaned them out, but the next time I made tea in them, my husband complained that it tasted funny.
I searched google to find a way to clean out my flask, and after wading through many sites about how to clean your hip flask, I was getting no where. I changed my search term to “clean steel Thermos”, even though ours aren’t Thermos brand flasks, and found several e-how articles. I tried the following:
-bicarbonate of soda (baking soda) and hot water
-fill it halfway with white vinegar and top off with hot water
-mix hydrogen peroxide with bicarbonate of soda
-soak with regular dish soap
And nothing worked, so I went to a favourite LJ community of mine, Hip Domestic. I got lots of solutions that either didn’t make sense to me or that I didn’t have the supplies for, and then jackmaybenimble came forward with a great soloution – Steradent.
She instructed me to put the Steradent into the flasks (with water) and then to use pebbles. She suggested glass pebbles like the kind you can get to put in vases, but I just grabbed a handful of pea shingle from outside and washed them off. Seal up the flask and then shake. The combination of the fizzy Steradent tablet and the rocks act like an agitator to help scrape off the inside.
And you know what? Both flasks look brand new. I’m going to give them a re-wash to make sure all the Steradent is out, but there isn’t even a stain on the bottom! All the filmy stuff that was clinging to the sides of the flasks is gone, and we’re confident we will have tasty tea tomorrow!
Why isn’t this stuff listed on a cleaning website?
[LJ readers reading this on the LJ RSS feed: Please click on the link at the top of the entry to go directly to my blog to leave a comment, as comments left on the LJ RSS do not get seen by me. Facebook users can comment directly on Facebook.]
Christmas Cracker Tutorial

When Tim and I were in Austria, we bought several bags of Mozart Kugel that we wanted to share with our family. I hung onto them until Christmas, and I was planning on using leftover gauze bags from our wedding to put a few pieces in and tie them onto packages as decorations. I was browsing Craftster one day when I stumbled on this post about making your own crackers, and I thought that would be a really fun way of distributing the candy.

Authentic crackers go bang! when you pull on them, and some airlines even consider them explosive. I wanted mine to snap, and I wanted to include the traditional paper hat and silly joke (or “motto” as it gets called). So I hunted online. If you are in the US, you can get your supplies from a site called Old English Cracker. If you’re in the UK, you can do what I did and order your pieces off Amazon or go directly to the seller on Amazon, Fred Aldous. I spent about £7 for 24 snappers, 12 hats, and 48 “mottos” including shipping. Next year, I’ll only need to order snappers and hats!

After you order your inside bits, and know what kind of “prize” you want (If I was in the US, I might look at Oriental Trading Co. for some inexpensive prizes), you need to start collecting your tubes. For each cracker, you will need either 1 empty kitchen roll (US: paper towel) tube or 2 empty toilet paper tubes. Depending on the size of your household and how quickly you use those products, you might have to start collecting early! You will use one tube as the middle, and cut the other tube in half to be the sides. If you are using a kitchen roll tube, cut it in half, and then cut one side in half again. If you are using a combination of TP tubes and kitchen roll tubes, check to make sure they are the same width. If not, make sure you use all 3 pieces of kitchen roll tube on the same cracker.
Other supplies include: curling ribbon, tape, and wrapping paper.

You’ll need a piece of wrapping paper that easily wraps around the three tubes plus leave some extra on either end. Our pieces were just big enough, so when I make them next year, I’m going to add a little extra to the sides.

Lay your wrapping paper print side down, with the large tube in the middle and a small tube on either side. Take your snapper and put it inside the tubes, making sure it’s not sticking out on either end, and secure it with tape to the inside of each small tube. The one pictured has the snapper taped down flat, but I also taped some in diagonally, and those seemed to snap better. At this point, put the hat and motto in the middle section (it’s a lot easier at this stage).

Next, roll the wrapping paper around the tube, securing with tape on the middle piece. You shouldn’t need tape on the side pieces, and I think it works a lot easier to leave those tape free for now.

This next step might take some practise. Cut a length of the curling ribbon and pinch together the wrapping paper between one small roll and the middle roll, being careful not to tear the paper. Wrap the ribbon around the pinched area and tie it as tight as you can (again, without ripping. Told you, it might take some practise)
Now pick up the cracker, with the pinched side down and insert your candy/prize through the other end. If it falls out the other side, you didn’t tie the ribbon tight enough. Repeat pinching and tying on the other side of your cracker.

The very last step is tucking the stray wrapping paper around the ends (if there is any) and curling the ribbon ties. At this point, you might also want to straighten the wrapping paper around the sides and tape it down.

The whole family loved them, and my SIL told me they looked like professional store-bought crackers! Can’t wait to make them next year!
[LJ readers reading this on the LJ RSS feed: Please click on the link at the top of the entry to go directly to my blog to leave a comment, as comments left on the LJ RSS do not get seen by me. Facebook users can comment directly on Facebook.]
Fixing Mailto Links to use GMail in Firefox3.5
Occasionally, I like to post things here that are useful to the masses, as opposed to just blog posts….
Just in case anyone else is having this problem:
Go to Tools -> Options -> Applications then scroll down to mailto and make sure GMail is selected in the drop down. If GMail doesn’t show there, follow the lifehacker instructions on how to add GMail to the options.
Also, if you were using Better Gmail 2, No Squint, or any other add-on that firefox 3.5 tells you is incompatible, search for the websites for each add-on and on the sites there should be updates for 3.5 and instructions on how to install.
It’s also worth noting that Firefox 3.5 doesn’t have a huge memory leak previous versions of Firefox seemed to have been plagued with.
[X-posted to LJ]
[Note to LJ users reading this via the LJ feed: Please click on one of the links at the top to go directly to my blog to leave comments, as comments left on the LJ feed will not be seen by me.]